Archives For 30 November 1999

one-does-not-pull-request

Recently I became a committer in the Apache CloudStack project. Last week when I was working with Rohit Yadav from ShapeBlue he showed me how he had automated the process with a Git alias. I really like it so I’ll share it here as well.

First of all, pull requests are created on Github.com. Rohit created a git alias called simply ‘pr’. This is how it looks like (for the impatient: copy/paste the one-liner below). The command below is for easy reading, it will print a syntax error.

[alias]
pr= "!apply_pr() { set -e; 
rm -f githubpr.patch; 
wget $1.patch -O githubpr.patch
--no-check-certificate; 
git am -s githubpr.patch; 
rm -f githubpr.patch; 
pr_num=$(echo $1 | sed 's/.*pull\\///'); 
git log -1 --pretty=%B > prmsg.txt; 
echo \"This closes #$pr_num\" >> 
prmsg.txt; git commit --amend -m \"$(cat prmsg.txt)\"; 
rm prmsg.txt; }; apply_pr"

Copy/paste this next two lines into your .gitconfig file (usually located in ‘~/.gitconfig’.):

[alias]
pr= "!apply_pr() { set -e; rm -f githubpr.patch; wget $1.patch -O githubpr.patch --no-check-certificate; git am -s githubpr.patch; rm -f githubpr.patch; pr_num=$(echo $1 | sed 's/.*pull\\///'); git log -1 --pretty=%B > prmsg.txt; echo \"This closes #$pr_num\" >> prmsg.txt; git commit --amend -m \"$(cat prmsg.txt)\"; rm prmsg.txt; }; apply_pr"

This alias allows you to do this:

git pr https://pull-request-url

It will then fetch the patch, extract the pull request number, adds a note that closes the pull request, finally commits all commits to your current branch. All you have to do is review and push.

Let’s demo this on a pull request I openend on the CloudStack documentation. Goes like this:

git pr https://github.com/apache/cloudstack-docs-rn/pull/21
--2015-05-24 19:22:54-- 
https://github.com/apache/cloudstack-docs-rn/pull/21.patch
Resolving github.com... 192.30.252.130
Connecting to github.com|192.30.252.130|:443... connected.
HTTP request sent, awaiting response... 302 Found
Location: https://patch-diff.githubusercontent.com/raw/apache/cloudstack-docs-rn/pull/21.patch [following]
--2015-05-24 19:22:54-- 
https://patch-diff.githubusercontent.com/raw/apache/cloudstack-docs-rn/pull/21.patch
Resolving patch-diff.githubusercontent.com... 192.30.252.130
Connecting to patch-diff.githubusercontent.com|192.30.252.130|:443... connected.
HTTP request sent, awaiting response... 200 OK
Cookie coming from patch-diff.githubusercontent.com attempted to set domain to github.com
Length: unspecified [text/plain]
Saving to: 'githubpr.patch'
githubpr.patch [ <=> ] 9.23K --.-KB/s in 0.002s
2015-05-24 19:22:55 (4.96 MB/s) - 'githubpr.patch' saved [9449]

Applying: add note on XenServer: we depend on pool HA these days
Applying: remove cached python classes and add ignore file for it
Applying: explicitly mention the undocumented timeout setting

[master 08e325d] explicitly mention the undocumented timeout setting
 Author: Remi Bergsma <[email protected]>
 Date: Sun May 24 08:28:43 2015 +0200
 3 files changed, 21 insertions(+), 3 deletions(-)

The pull request has 3 commits that are now committed to the current branch. Check the log:

git log

git_log

Isn’t that great? Now all you have to do is push it to a upstream repository.

Signed-off-by
This is achieved by adding the following to ‘.gitconfig’:

[format]
 signoff = true

Thanks Rohit for sharing!

Recently I played with Open vSwitch and it’s awesome! Open vSwitch is a multilayer virtual switch and it brings a lot of flexibility in the way you can create interfaces and bridges in Linux. It’s also a Linux distribution independent way to configure these things. Switching in software!

To create a bridge, simply run:

ovs-vsctl add-br remibr0

You can also create another bridge on top of it, to handle a VLAN for example:

ovs-vsctl add-br mgmt0 remibr0 101

Even better, create a bond based on LACP:

ovs-vsctl add-bond remibr0 bond0 em49 em50 bond_mode=balance-tcp lacp=active other_config:lacp-time=fast

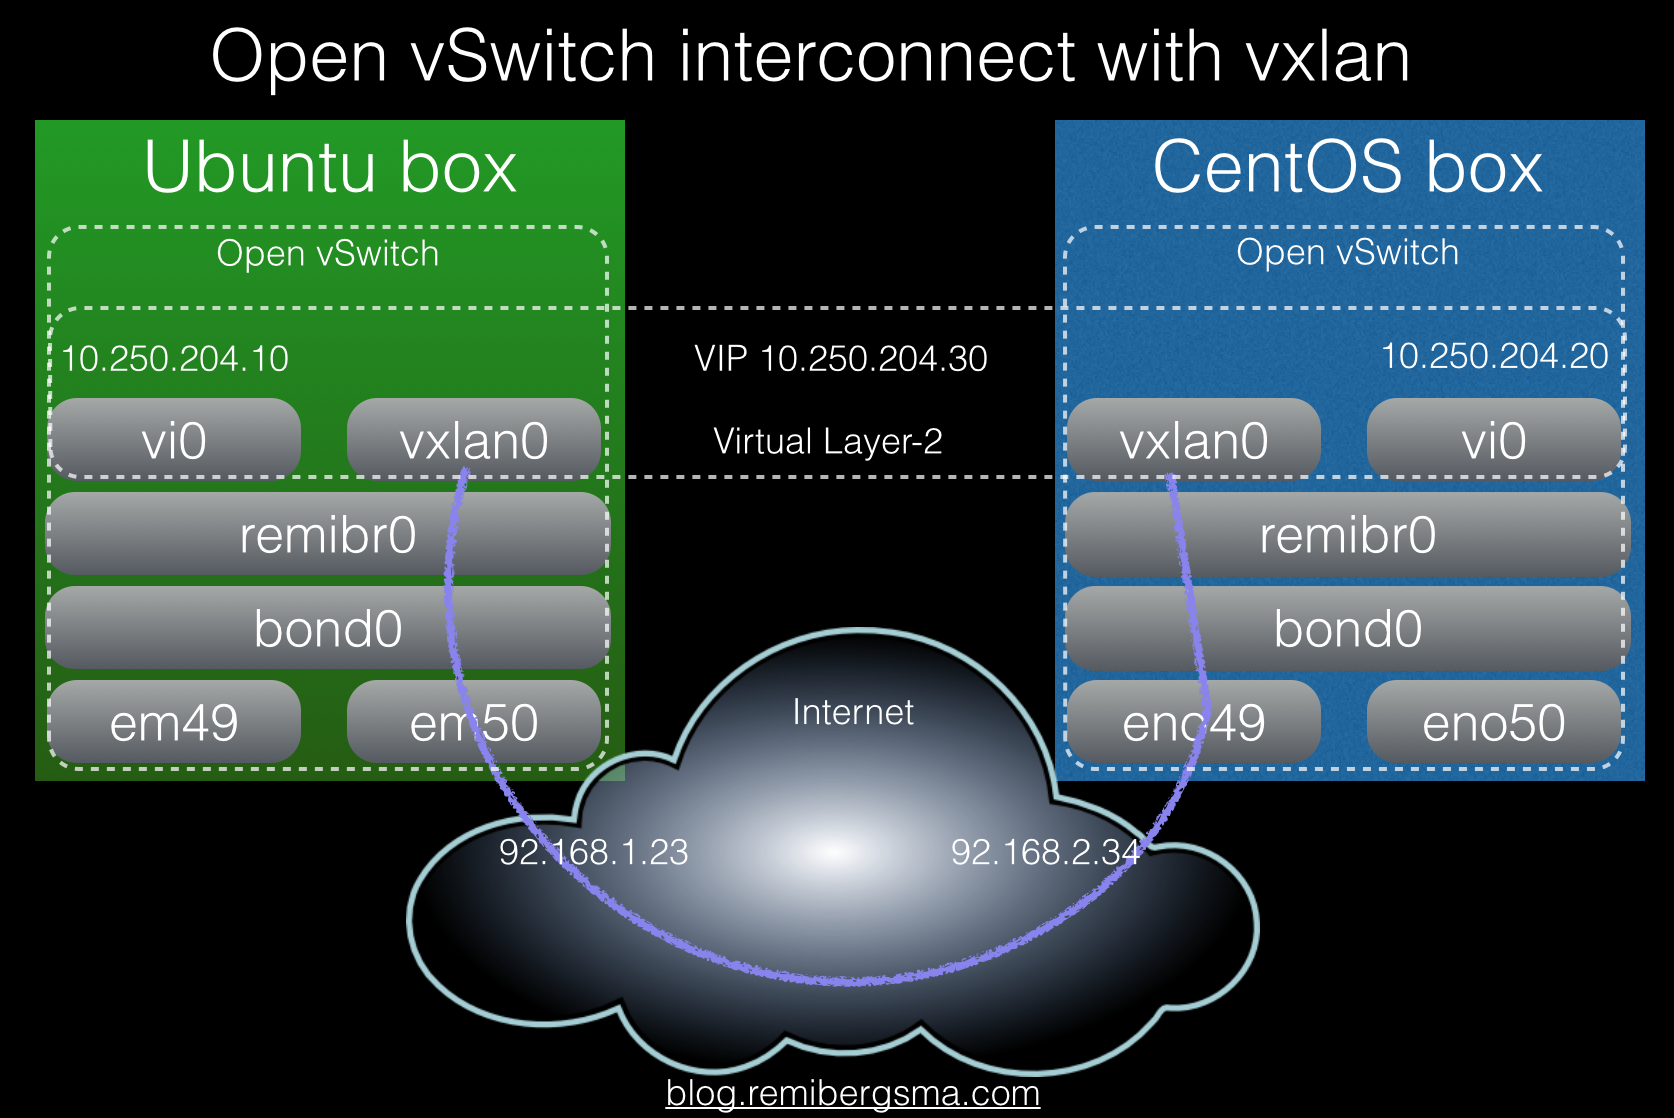
This is all quite nice but still basic. It gets interesting when you realise you can connect two switches like you can put a patch cable between physical switches. To test how cross platform this works, I setup two boxes: a CentOS 7 box and a Ubuntu 15.04 one. This shows it in a picture:

openvswitch-vxlan-interconnect

We’ll create a new bridge and add a vxlan interface that connects to the other vswitch. Then create a port on it and assign it an ip address. Installing Open vSwitch should be simple, as it is included in the releases.

Create the configuration and be sure to fill in the right ip addresses.

ovs-vsctl add-br remibr0
ovs-vsctl add-port remibr0 vxlan0 -- set Interface vxlan0 type=vxlan options:remote_ip=92.168.1.23
ovs-vsctl add-port remibr0 vi0 -- set Interface vi0 type=internal
ifconfig vi0 10.250.204.10/24 up

On the second box, bring up 10.25.204.20/24 on vi0.

Your config should look like this:

ovs-vsctl show
f11505d7-199c-4fa9-9f3a-21016ab4fded
 Bridge "remibr0"
   Port "vxlan0"
     Interface "vxlan0"
       type: vxlan
       options: {remote_ip="92.168.1.23"}
   Port "remibr0"
     Interface "remibr0"
       type: internal
   Port "vi0"
     Interface "vi0"
       type: internal
 ovs_version: "2.3.1"

And on the second box:

ovs-vsctl show

Output:

129f100b-1377-46bd-89ba-eaf1f1bc5162
 Bridge "remibr0"
   Port "vi0"
     Interface "vi0"
       type: internal
   Port "vxlan0"
     Interface "vxlan0"
       type: vxlan
       options: {remote_ip="92.168.2.34"}
   Port "remibr0"
     Interface "remibr0"
       type: internal
 ovs_version: "2.3.90"

As you can see, I used different versions on purpose. You can use two boxes that are the same, of course.

By now, a simple ping test should work:

PING 10.250.204.20 (10.250.204.20) 56(84) bytes of data.
64 bytes from 10.250.204.20: icmp_seq=1 ttl=64 time=0.019 ms
64 bytes from 10.250.204.20: icmp_seq=2 ttl=64 time=0.009 ms
^C
--- 10.250.204.20 ping statistics ---
2 packets transmitted, 2 received, 0% packet loss, time 999ms
rtt min/avg/max/mdev = 0.009/0.014/0.019/0.005 ms

And reversed:

PING 10.250.204.10 (10.250.204.10) 56(84) bytes of data.
64 bytes from 10.250.204.10: icmp_seq=1 ttl=64 time=1.47 ms
64 bytes from 10.250.204.10: icmp_seq=2 ttl=64 time=0.202 ms
^C
--- 10.250.204.10 ping statistics ---
2 packets transmitted, 2 received, 0% packet loss, time 1001ms
rtt min/avg/max/mdev = 0.202/0.839/1.477/0.638 ms

Create a virtual floating ip address
To make the demo a bit more advanced, let’s setup a virtual ip address on the interfaces that can travel between the switches. We use keepalived for this.

vim /etc/keepalived/keepalived.conf

Add this:

global_defs {
 notification_email {
 [email protected]
 [email protected]
 [email protected]
 }
 notification_email_from [email protected]
 smtp_server 192.168.200.1
 smtp_connect_timeout 30
 router_id LVS_DEVEL
}
vrrp_instance VI_1 {
 state MASTER
 interface vi0
 virtual_router_id 51
 priority 200
 advert_int 1
 authentication {
 auth_type PASS
 auth_pass 1111
 }
 virtual_ipaddress {
 10.250.204.30/24 
 }
}

Copy the config to the other box, be sure to have on MASTER and one BACKUP. Also, the priority of the MASTER should be 200 and the BACKUP 100. It’s just a demo, all it does it bring up an ip address.

Start them both and they should discover each other over the vi0 interfaces on the connected vswitches.

Try pinging the virtual ip address:

PING 10.250.204.30 (10.250.204.30) 56(84) bytes of data.
64 bytes from 10.250.204.30: icmp_seq=1 ttl=64 time=0.045 ms
64 bytes from 10.250.204.30: icmp_seq=2 ttl=64 time=0.031 ms
64 bytes from 10.250.204.30: icmp_seq=3 ttl=64 time=0.023 ms
^C
--- 10.250.204.30 ping statistics ---
3 packets transmitted, 3 received, 0% packet loss, time 1998ms

Depending on where the virtual address resides, the latency may be different:

PING 10.250.204.30 (10.250.204.30) 56(84) bytes of data.
64 bytes from 10.250.204.30: icmp_seq=1 ttl=64 time=0.481 ms
64 bytes from 10.250.204.30: icmp_seq=2 ttl=64 time=0.202 ms
64 bytes from 10.250.204.30: icmp_seq=3 ttl=64 time=0.215 ms
64 bytes from 10.250.204.30: icmp_seq=4 ttl=64 time=0.203 ms
^C
--- 10.250.204.30 ping statistics ---
4 packets transmitted, 4 received, 0% packet loss, time 2998ms
rtt min/avg/max/mdev = 0.202/0.275/0.481/0.119 ms

Now start a ping and stop keepalived, then start it again and stop it on the other side. You’ll miss a ping or two when it fails over and then it will recover just fine.

PING 10.250.204.30 (10.250.204.30) 56(84) bytes of data.
64 bytes from 10.250.204.30: icmp_seq=1 ttl=64 time=0.824 ms
64 bytes from 10.250.204.30: icmp_seq=2 ttl=64 time=0.167 ms
64 bytes from 10.250.204.30: icmp_seq=3 ttl=64 time=0.160 ms
64 bytes from 10.250.204.30: icmp_seq=4 ttl=64 time=0.148 ms
64 bytes from 10.250.204.30: icmp_seq=5 ttl=64 time=0.149 ms
From 10.250.204.10: icmp_seq=6 Redirect Host(New nexthop: 10.250.204.30)
From 10.250.204.10 icmp_seq=6 Redirect HostFrom 10.250.204.10: icmp_seq=7 Redirect Host(New nexthop: 10.250.204.30)
From 10.250.204.10 icmp_seq=7 Redirect Host64 bytes from 10.250.204.30: icmp_seq=8 ttl=64 time=0.012 ms
64 bytes from 10.250.204.30: icmp_seq=9 ttl=64 time=0.025 ms
64 bytes from 10.250.204.30: icmp_seq=10 ttl=64 time=0.012 ms
64 bytes from 10.250.204.30: icmp_seq=11 ttl=64 time=0.016 ms
64 bytes from 10.250.204.30: icmp_seq=12 ttl=64 time=0.011 ms
64 bytes from 10.250.204.30: icmp_seq=13 ttl=64 time=0.011 ms
From 10.250.204.10: icmp_seq=14 Redirect Host(New nexthop: 10.250.204.30)
From 10.250.204.10 icmp_seq=14 Redirect HostFrom 10.250.204.10: icmp_seq=15 Redirect Host(New nexthop: 10.250.204.30)
From 10.250.204.10 icmp_seq=15 Redirect Host64 bytes from 10.250.204.30: icmp_seq=16 ttl=64 time=0.323 ms
64 bytes from 10.250.204.30: icmp_seq=17 ttl=64 time=0.162 ms
64 bytes from 10.250.204.30: icmp_seq=18 ttl=64 time=0.145 ms
64 bytes from 10.250.204.30: icmp_seq=19 ttl=64 time=0.179 ms
64 bytes from 10.250.204.30: icmp_seq=20 ttl=64 time=0.147 ms
^C
--- 10.250.204.30 ping statistics ---
20 packets transmitted, 16 received, +4 errors, 20% packet loss, time 19000ms
rtt min/avg/max/mdev = 0.011/0.155/0.824/0.193 ms

Note on the MTU when travelling over the internet
vxlan is encapsulation and this obviously needs space in the packets send over the wire. If you travel over networks that have a default MTU of 1500, it may be wise to lower the MTU of the vi0 interfaces as this will prevent fragmentation. Lowering the MTU is a simple work-around. You could also have a look at GRE tunnels instead.

To alter the MTU:

ip link set dev vi0 mtu 1412

You can make this persistent in Ubuntu’s ‘interfaces’ file and add ‘mtu 1400’. Red Hat alike systems have ‘ifcfg-*’ files for each interface. Add ‘MTU=1400’ to them to alter the MTU.

Conclusion
Although this is a simple demo, the real power comes when you use this to connect two different (virtual or physical) networks in different data centers. You’ll be able to create a Layer-2 network over Layer-3. It’s simple, fast and awesome.

Be the automator!

30 November 2014 — Leave a comment

Today I saw an awesome video of a presentation by Glenn O’Donnell.

In his presentation, Glenn states that it’s not about technology, it’s about services. Service design is modular with a logical structure. Approach it as a system and try to improve it as a whole, not just tiny pieces of it. To do that, you need systems engineers. Although most are lazy, or, as Glenn puts it: “Locally brilliant, globally stupid”.

Accept we have no full control
The whole eco system includes a lot of infrastructure and application components. Including services from third parties. We tend to zoom in a lot but then we miss the point: it’s not about the servers, the storage and the network. It’s about how it all works together. And let’s face it, we’ll not have full control over the eco system because it contains components managed by third parties.

We IT people have a hard time accepting we have no control. We think we’re the only one that can maintain that server. But in fact, software can do better and will put us out of business. That software is already out there today.

In this new world, we need people with a different skill set that can manage this complex eco system. It’s all software these days. Obviously the application is software, but so is the infrastructure on which it runs. Cloud infrastructure is all software defined. Even physical servers should be software controlled, instead of manipulating them manually.

How? Well, you can automate if you have a model. The model is a software description of reality. Tools consume this model and create reality out of it.

 ne the automator model

Software Model drives Automation Tool that produces the Service.

Glenn compares this with building a plane: first models are build and simulated before they ever put a plane in the air. Makes sense, right?

We should not be on the command line
This means we should not be on the command line. Let’s get away from the command line! We should manipulate the model instead, and let the model create or change reality. This model is our system software, which we should treat the same way as we treat application software. It’s software, and we can automate software.  By the way, no automation means no DevOps because it’s gonna be too slow.

You’ll also get a better quality because human beings are bad at repetitive tasks. And it’s a waste having smart people do repetitive work. Software can do that instead. The model is the language, the secret code.

Automate yourself out of your job
Although this is cool, it does render some jobs obsolete. Glenn states that if you have “administrator” in jour job title, you’ll be replaced by software (that can do better). But don’t worry, there will be other, more interesting jobs, instead. Automate yourself out of your job. It’s fun! In short: be the automator, not the automated.

be the automator jobs

To drive this movement, we need innovators! Geeks are innovators 🙂 Geeks love change, they automate, they create, and they want to move on to the next interesting thing to discover.

Next to Geeks, there are also Geek Imposters. They might do the same job, but they hate change and want to keep everything as it is. To them, Glenn has a nice advice: “Learn to say: Would you like fries with that?“.

View the video of Glenn’s presentation:

Geeks are changing the world. If you think you are a Geek that loves change and loves automation, you could be what we call a Cupfighter at Schuberg Philis.

Are you a Cupfighter?

If you think you are a Cupfighter, please contact me and we’ll change the world 😉

Configuration management in an Enterprise Linux Team — How I automated myself out of my job

Thanks to the FOSDEM video team for this video! It nicely integrates the slides and me talking! It’s just a pity the sound from the camera was used instead of the mic I was wearing. Therefore you hear a lot of noises from the people outside the room, on the hallway (there were >100 people that did not fit in the room anymore!). But anyway, enjoy the recording 🙂

Here are the slides of the talk I just gave in the Configuration Management devroom at FOSDEM’14: