![]() As KVM seems more and more interesting, at work we wanted to do a Proof-of-Concept. The KVM hypervisor cluster had to be controlled by CloudStack and also integrate with NSX (formerly known as Nicira).
As KVM seems more and more interesting, at work we wanted to do a Proof-of-Concept. The KVM hypervisor cluster had to be controlled by CloudStack and also integrate with NSX (formerly known as Nicira).
NSX is owned by VMware these days and is one of the first Software Defined Networking solutions. At Schuberg Philis we use this since early 2012.
Choosing an OS
To me, the most interesting part of KVM is the fact you only need a very basic Linux box with some tooling and you have a nice modern hypervisor ready to rock. Since we’re using CloudStack to orchestrate everything, we do not need cluster features. In fact, this prevents the “two captain” problem that we sometimes encounter with XenServer and VMware ESX. We compared Ubuntu with CentOS/RHEL and both work fine. It all depends on your needs.
Installing KVM
Installing the software is pretty straight forward:
CentOS:
yum install kvm libvirt python-virtinst qemu-kvm bridge-utils pciutils
Ubuntu:
apt-get install qemu-kvm libvirt-bin bridge-utils virt-manager openntpd
Installing Open vSwitch
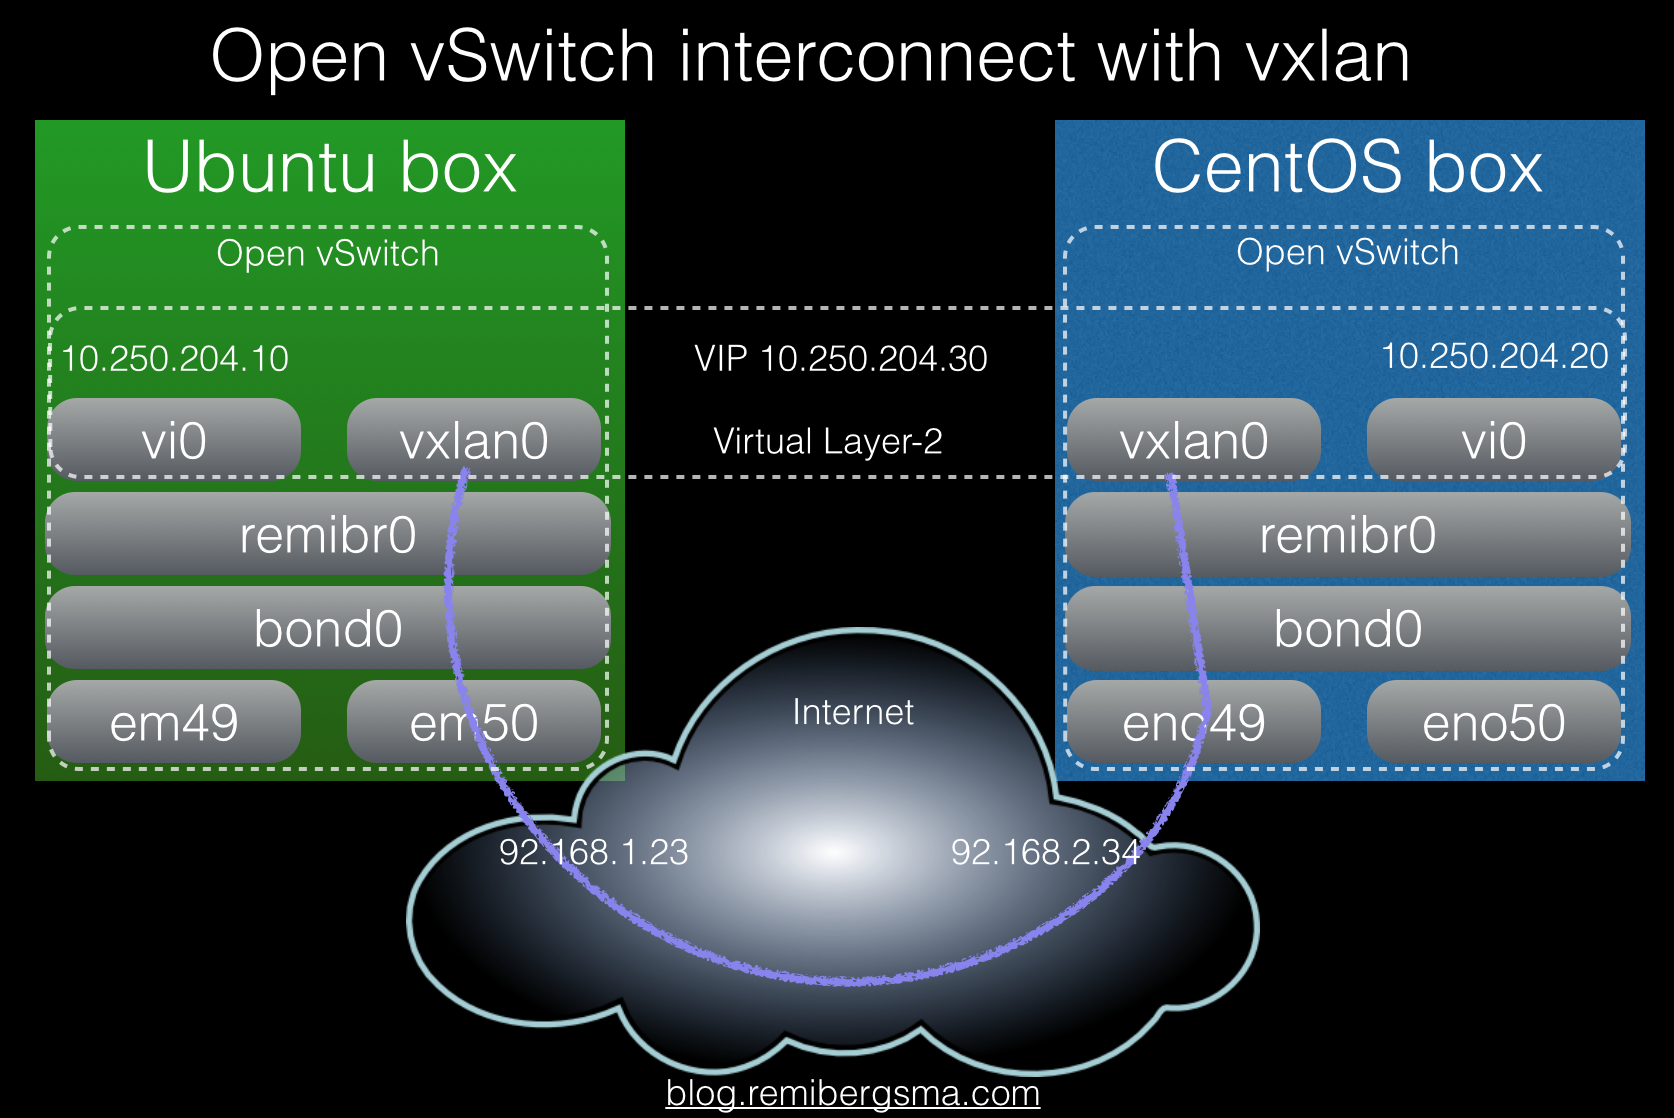
Open vSwitch is a multilayer virtual switch and it brings a lot of flexibility in the way you can create interfaces and bridges in Linux. There are two options here. If you need STT tunnels, you need the NSX patched version of Open vSwitch. If you need VXLAN or GRE tunnels, you can use the open source version that comes with Ubuntu and CentOS. Both ship version 2.3.1 which works perfectly fine.
CentOS:
yum install openvswitch kmod-openvswitch
Ubuntu:
apt-get install openvswitch-switch
Configuring Open vSwitch
Instead of classic Linux bridges, we use Open vSwitch bridges. In our POC lab environment, we were using HP DL380 G9 servers that have 2 10Gbit NICs to two Arista switches. They run a LACP bond and on top of this we create the bridges for KVM to use. Because we setup the Open vSwitch networking over and over again while debugging and testing different OS’es, I wrote a script that can quickly configure networking. You can find it at Github.
To give some quick pointers:
Create a bridge:
ovs-vsctl add-br cloudbr0
Create an LACP bond:
ovs-vsctl add-bond cloudbr0 bond0 eno49 eno50\
bond_mode=balance-tcp lacp=active other_config:lacp-time=fast
Create a so-called fake bridge (with a VLAN tag):
ovs-vsctl add-br mgmt0 cloudbr0 123
Get an overview of current configuration:
ovs-vsctl show
Get an overview of current bond status:
ovs-appctl show/bond
Example output:
---- bond0 ----
bond_mode: balance-tcp
bond may use recirculation: yes, Recirc-ID : 300
bond-hash-basis: 0
updelay: 0 ms
downdelay: 0 ms
next rebalance: 9887 ms
lacp_status: negotiated
active slave mac: fc:00:00:f2:00(eno50)

slave eno49: enabled
 may_enable: true
 hash 139: 3 kB load

slave eno50: enabled
 active slave
 may_enable: true
 hash 101: 1 kB load
 hash 143: 5 kB load
 hash 214: 5 kB load
 hash 240: 5 kB load
Add hypervisor to NSX
For now I assume you already have a NSX cluster running capable of acting as a controller/manager for Open vSwitch. If you don’t know NSX, have a look because it’s awesome.
We do need to connect our Open vSwitch to the NSX cluster. To do that, you need a SSL certificate. This is how you generate one:
cd /etc/openvswitch
 ovs-pki req ovsclient
 ovs-pki self-sign ovsclient
 ovs-vsctl -- --bootstrap set-ssl \
 "/etc/openvswitch/ovsclient-privkey.pem" \
 "/etc/openvswitch/ovsclient-cert.pem" \
 /etc/openvswitch/vswitchd.cacert
Next, add the hypervisor to NSX. You can either set the authentication to be ip-address based (it will then exchange certificates on connect) or copy/paste the certificate (ovsclient-cert.pem) to NSX at once. The first method allows for easier automation. I’m showing the UI here, but of course you can also use the API to add the hypervisor.
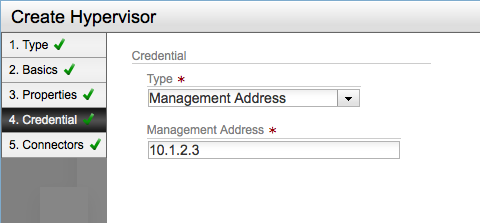
Setting authentication to be ip-address based (allow for automatic exchange of security certificates)

Setting authentication to use a security certificate (and provide one manually)
The final step is to connect Open vSwitch to NSX:
ovs-vsctl set-manager ssl:10.10.10.10:6632
Then NSX should show green lights and tunnels are being created.
To get an idea of what’s going on, you can run:
ovs-vsctl list manager
ovs-vsctl list controller
ovs-vsctl show
Debugging this can be done from the command line (check Open vSwitch logs) or from NSX.
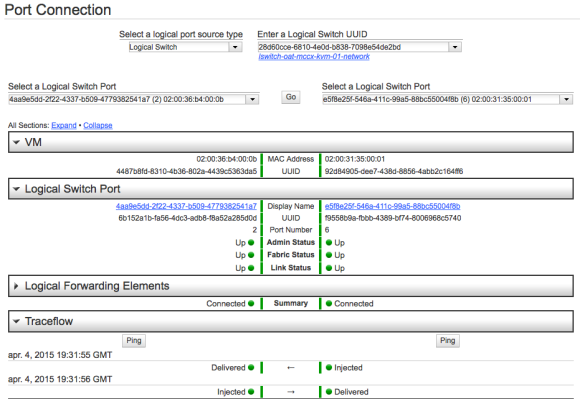
Debugging in NSX is very nice
At this point, NSX is controlling our Open vSwitch.
Setting up the CloudStack agent
When running KVM, CloudStack runs an agent on the hypervisor in order to configure VMs.
Installing the agent is simply installing a RPM or DEB package. Depending on the version you will use different repositories. At Schuberg Philis, we build our own packages that we serve in a repository.
Because we’re using Open vSwitch, some settings need to be tweaked in the agent.properties file, found in /etc/cloudstack/agent.
echo "libvirt.vif.driver=com.cloud.hypervisor.kvm.resource.OvsVifDriver" \
>> /etc/cloudstack/agent/agent.properties
echo "network.bridge.type=openvswitch" \
>> /etc/cloudstack/agent/agent.properties
You may also want to set the log level to debug:
sed -i 's/INFO/DEBUG/g' /etc/cloudstack/agent/log4j-cloud.xml
CloudStack requires some KVM related settings to be tweaked:
# Libvirtd
echo 'listen_tls = 0' >> /etc/libvirt/libvirtd.conf
echo 'listen_tcp = 1' >> /etc/libvirt/libvirtd.conf
echo 'tcp_port = "16509"' >> /etc/libvirt/libvirtd.conf
echo 'mdns_adv = 0' >> /etc/libvirt/libvirtd.conf
echo 'auth_tcp = "none"' >> /etc/libvirt/libvirtd.conf

# libvirt-bin.conf
sed -i -e 's/libvirtd_opts="-d"/libvirtd_opts="-d -l"/' \
/etc/init/libvirt-bin.conf
service libvirt-bin restart

# qemu.conf
sed -i -e 's/\#vnc_listen.*$/vnc_listen = "0.0.0.0"/g' \
/etc/libvirt/qemu.conf
On CentOS 7 Systemd ‘co-mounts’ cpu,cpuacct cgroups, and this causes issues for launching a VM with libvirt. On the mailing list this is the suggested fix
Edit /etc/systemd/system.conf and pass empty string to JoinControllers parameter. Then rebuild the initramfs via ‘new-kernel-pkg –mkinitrd –install `uname -r`’.
Something I currently don’t like: SELinux and AppArmour need to be disabled. I will dive into this and get it fixed. For now, let’s continue:
#AppArmour (Ubuntu)
ln -s /etc/apparmor.d/usr.sbin.libvirtd /etc/apparmor.d/disable/
ln -s /etc/apparmor.d/usr.lib.libvirt.virt-aa-helper /etc/apparmor.d/disable/
apparmor_parser -R /etc/apparmor.d/usr.sbin.libvirtd
apparmor_parser -R /etc/apparmor.d/usr.lib.libvirt.virt-aa-helper

# SELinux (CentOS)
setenforce permissive
vim /etc/selinux/config
SELINUX=permissive
You can now add the host to CloudStack, either via de UI or the API.
Keep an eye on the agent log file:
less /var/log/cloudstack/agent/agent.log
After a few minutes, the hypervisor is added and you should be able to spin up virtual machines! 🙂
When we spin up a VM, CloudStack does the orchestration. So, CloudStack is the one to talk to NSX to provide the network (lswitch) and NSX communicates with Open vSwitch on the hypervisor. The VM is provisioned by CloudStack and KVM/Libvirt makes sure the right virtual interfaces are plugged in Open vSwitch. This way VMs on different hypervisors can communicate over their own private guest network. All dynamically created without manual configuration. No more VLANs!
If it does not work right away, look at the different log files and see what happens. There usually are hints that help you solve the problem.
Conclusion
KVM hypervisors can be connected to NSX and using Open vSwitch you can build a Software Defined Networking setup. CloudStack is the orchestrator that connects the dots for us. I’ve played with this setup for some time now and I find it very fast. We’ll keep testing and probably create some patches for CloudStack. Great to see that the first KVM related pull request I sent is already merged 🙂
Looking forward to more KVM!