Archives For 31 December 2012

The Raspberry Pi can easily be setup as an OpenVPN server. One common feature is to access servers or services on the remote network. Another use case is to provide a secure connection when you’re not at home.

You can do this by sending all traffic over the VPN connection, instead of only traffic for the remote servers. The idea is to connect your laptop to your OpenVPN server (this is encrypted by default) and access the internet from there. Whatever you send over the wifi connection, is encrypted by the VPN and thus safe. In the comments on the previous post there was someone trying to set this up. To help him solve the issue, I tested this myself, and decided to write a post showing how to do it because I really like the idea.

This is how it looks like: you’re on a untrusted network (red) and create a safe VPN connection (green) and all traffic will flow over the green network, to the also trusted home network (lighter green). People on the red network now cannot see the sites you visit.

OpenVPN secure wifi browsing

Here’s how to set it up:

  1. Allow the OpenVPN server to route ip traffic
  2. Tell the default gw where to send traffic for OpenVPN clients
  3. Send DNS servers to the VPN Clients
  4. Configure the OpenVPN Client
  5. Test your setup

Allow the OpenVPN server to route ip traffic
First of all, you need to allow the OpenVPN server to route packets.

sudo vim /etc/sysctl.conf

Add this line, or alter it if it already exists:

net.ipv4.ip_forward = 1

Then activate the change:

sudo sysctl -p

The change is now activated, and persistent.

Tell the default gw where to send traffic for OpenVPN clients
Another important step is to tell the default gateway in the home network (lighter green) where to send traffic for theOpenVPN clients. If you omit this step, this traffic gets lost. More info in this post. Short story: add this static route to your default gateway. If it’s Linux, you’d run:

sudo route add -net 10.8.0.0/24 gw 10.5.5.5

Assuming 10.5.5.5 is the ip address of the OpenVPN server. When your router is not Linux, check the manual on howto add a static route.

Send DNS servers to the VPN clients
Most ISP’s restrict the usage of their DNS servers to their own network. When you connect to Wifi, you probably receive some DNS servers via DHCP. When you connect to VPN and then send all traffic through the VPN, you are effectively using the network (and internet connection) of your VPN server and not the local network. The DNS-servers you received via DHCP might not work because you access them from another network. To solve this, configure the OpenVPN server to push public DNS servers to use. Alternatively you can also push some local DNS servers or the DNS servers of your ISP.

sudo vim /etc/openvpn/server.conf

Add or edit these lines:

push "dhcp-option DNS 8.8.8.8"
push "dhcp-option DNS 8.8.4.4"

These are Google’s public DNS servers. Just enter some DNS servers that work on the network of your OpenVPN server and that you are allowed to use.

Configure the OpenVPN client
I’m using Viscosity and all I have to do is enable a setting to send all traffic over the VPN connection.
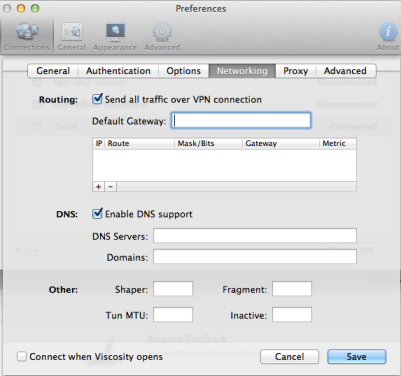
viscosity_enable_all_traffic_over_vpn

Alternative way: It’s also possible to configure the ‘Send all traffic over VPN connection’ on the server-side instead of the client. Both has pros and cons, of course. To set it server-side set this option in the server config:

push "redirect-gateway def1"

Test your setup
The final step: test your setup! Make sure you’re connected through some other network than the one the OpenVPN server is in. Use some public Wifi service of connect over 3G. My iPhone can share its 3G connection and start a Wifi hotspot. My MacBook connects via Wifi, then does the OpenVPN connection to the Pi. The expected behavior is then to see the public ip address of the OpenVPN server’s internet connection, instead of the 3G ip address. Use a website like whatismyip.com to test this. Do this before connecting the VPN, and after. It should be different.

Enjoy your secure browsing experience!

I’m using SSH’s key-based authentication to login to my servers using a SSH key pair. Of course my private key is protected with a password of its own. This has the consequence that even with key-based authentication, you still need to type a password: your private key passphrase. And you need to type it on every single connect. Although this is far more secure that having no passphrase on your private key, typing it so many times is a bit over done.

In this blog I’ll show you how to setup a system where you enter the passphrase only once per day when you start a new terminal session. For me this works great, as I now only type my passphrase in the morning when I login to my workstation and am able to connect password-less the rest of the day. Whenever I leave my desk, my screen is locked so no one can access my key.

Setting up key-based authentication

The first step is to generate a key pair to use.

ssh-keygen -t rsa -b 2048

The output is something like below. Enter your passphrase twice, when prompted.

Generating public/private rsa key pair.
Enter file in which to save the key (/home/remi/.ssh/id_rsa):
Enter passphrase (empty for no passphrase):
Enter same passphrase again:
Your identification has been saved in /home/remi/.ssh/id_rsa.
Your public key has been saved in /home/remi/.ssh/id_rsa.pub.
The key fingerprint is:
41:22:af:8b:4b:aa:94:34:a4:fa:5a:eb:91:4c:5b:5e remi@wks

The key's randomart image is:

+--[ RSA 2048]----+
|    . . .        |
|     o o         |
| .    . .        |
|o    .   .       |
|.o. o E S        |
|ooo* o           |
|.oO o            |
|.= +             |
|=o=              |
+-----------------+

To setup key-based authentication, copy your public key to the ‘.ssh/authorized_keys’ file on the server you want to connect to. You can do this by using ‘ssh-copy-id‘. You need to have access to the user account you want to connect to because you need to type its password to authenticate the copying.

ssh-copy-id -i ~/.ssh/id_rsa.pub user@server

You can now login to this server by typing only the passphrase of your private key, instead of typing the user account’s password.

Using ssh-agent to manage private keys
When you want to take this to the next level, you can use ‘ssh-agent‘ to manage your SSH keys. This program is started at login and remembers the keys you add each session. Through use of environment variables the agent can be located and automatically used for authentication when logging in to other machines using SSH.

The idea is that the agent is run in the user’s local PC, laptop, or terminal.  Authentication data need not be stored on any other machine, and authentication passphrases never go over the network. However, the connection to the agent is forwarded over SSH remote logins, and the user can thus use the privileges given by the identities anywhere in the network in a secure way.

To add a key, run ‘ssh-add‘ and type the passphrase of your private key. This is needed only once per session. After you’ve added your key to ‘ssh-agent‘, you should be able to SSH to the local machine without entering a password. This is more secure than a key pair without a passphrase because whenever your key gets lost, one still needs to type your passphrase to get access.

Use case
At work, I SSH to a central server from which I can access all the other servers. My public key is distributed to all servers, my private key is on my workstation. Now, for secure password-less logins to work, I need to be able to access my local ssh-agent from this central server. When you SSH to your server as I describe above, you don’t have to type the passphrase. When you have a look at the environment variables, you’ll notice SSH_AUTH_SOCK is set. This variable holds the path to the socket connecting to your ‘ssh-agent‘ running on your local machine. Authentication is now done this way!

Getting this to work with GNU screen
There’s a little problem when using this technique with GNU screen. When you reconnect to a running screen session from another location, the environment variable inside screen is not updated and so you need to type the password for your private key on each connect again. I found this post that describes a solution, which I further enhanced to make it work correctly for me:

export SSH_AUTH_SOCK=$(find /tmp/ssh-* -user `whoami` -name agent\* -printf '%T@ %p\n' 2>/dev/null | sort -k 1nr | sed 's/^[^ ]* //' | head -n 1)

This one-liner looks for the most recent ssh-agent socket, owned by the current user and sets the SSH_AUTH_SOCK environment variable to this socket. You can now use this socket again to authenticate to your locally running ‘ssh-agent‘.

To make this a little easier, I added this scrip ‘update-ssh-agent-socket.sh‘ on my home directory on the central server (also available on github):

#!/bin/bash

echo "Updating ssh-agent socket environment.."
echo "Current value:  $SSH_AUTH_SOCK"

export SSH_AUTH_SOCK=$(find /tmp/ssh-* -user `whoami` -name agent\* -printf '%T@ %p\n' 2>/dev/null | sort -k 1nr | sed 's/^[^ ]* //' | head -n 1)

if [ $? -gt 0 ]; then
 echo "ERROR!"
 exit $?
fi

echo "New value:  $SSH_AUTH_SOCK"
echo "All done!"

Run it like this to use the most recent ssh-agent socket (note the dot at the start):

. ~/update-ssh-agent-socket.sh

Usually I type ‘<CTR>+r update <enter>’ to quickly run this command from history. This is the quickest way I could think of to get everything working and make it easy to quickly login to our servers.

Passed LPIC-2 today!

16 January 2013 — 4 Comments

lpic2-logo-mediumAbout 2 weeks ago I wrote in a previous post about LPIC, when I had just passed the LPIC-1 exams. In the mean time I studied the objectives, read some man-pages and experimented with the things I wasn’t 100% familier with.

And today I completed LPIC-2! 🙂 There were two exams required to pass. I scored 740/800 on the 201 exam, and 730/800 on the 202 exam.

Now I’m looking forward on taking some SUSE classes and exams in a couple of weeks!

OpenVPN is a very powerful tool to connect to a remote network in a secure and easy way. But while it’s quite easy to set it up (see my post about OpenVPN on Raspberry Pi), getting all the pieces together takes some more network understanding and configuration. I created an image to show what’s going on when a OpenVPN client connects to the server.

OpenVPN networking

The grey network is the local network you’re connecting to, the green network is created by OpenVPN. After a successful connection, the OpenVPN server can ‘push’ a route to the OpenVPN client to make it aware of the grey network that is available through the OpenVPN connection. In this case you’d add this setting to the OpenVPN server:

push "route 10.5.5.0 255.255.255.0"

Now that the OpenVPN client knows how to find the Linux server on the grey network, it should be working, right? Nope. The Linux server does not know about the green network. So, when a OpenVPN client connects with a 10.8.0.x ip-address, this server does not know where to send the response to. When this happens, the Linux server sends its traffic to the default gateway of the local network: the router of the grey network.

But unfortunately, the router does not know about the green network neither. Since 10.8.0.x is a non-routable address (RFC 1918), it drops the packets because it has no way of knowing where to find this private network. To the OpenVPN client, this may look like there’s something wrong with the VPN connection, because even a simple ping will not work and times out. In reality, this is a routing problem.

The solution? Make the Linux server or at least the router aware of the green network, and tell them where to send traffic to this network. This is done by adding a route like this:

route add -net 10.8.0.0/24 gw 10.5.5.5

Assuming the local network ip-address of the OpenVPN server is 10.5.5.5.

This way the hosts in the grey network know about the green network and send their traffic to the OpenVPN server. Of course the OpenVPN server knows how to reach the OpenVPN client and all is working!

You can extend this further and add routes to the network of the VPN client and make hosts on both networks communicate to each other. This is useful for example to connect a branch-office to the corporate network. I’ll write about this in more detail some other time.

Hopefully this post brings some insight in what goes on when using networks and VPN connections.

Someone asked me if it were possible to download a web site and make it available offline. To some extend, this can be done. Interactive forms will not work (searching, ordering, etc), but you can use ‘wget‘ to transform a website into a static version.

It goes like this:

wget \
 --recursive \
 --no-clobber \
 --page-requisites \
 --html-extension \
 --convert-links \
 --restrict-file-names=windows \
 --domains example.org \
 --no-parent \
 --wait=1 \
 --limit-rate=500K \
 example.org/

Let me explain:
The ‘–recursive’ option downloads the entire web site and ‘–domains’ tells wget not to follow links outside example.org. Otherwise you will download far too many pages. ‘–page-requisites’ makes sure we’ll get all the elements that compose the page (images, CSS, etc), ‘–html-extension’ saves files with the .html extension so they will work on a stand-alone pc, ‘–convert-links’ converts links so they’ll work off-line and ‘–no-clobber’ prevents any existing files to be overwritten

Using a ‘–limit-rate’ you can prevent wget from using all available bandwidth. Wile downloading will take longer, it is now possible to browse the web while wget is downloading.

Give it a try, it works pretty nice and is great if you’re about to make big changes to your site and you want to save a copy of the old version.