


As discussed in a previous post, multi-factor authentication really makes things more secure. Let’s see how we can secure services like SSH and the Gnome desktop with multi-factor authentication.
The Google Authenticator project provides a PAM module than can be integrated with your Linux server or desktop. This PAM module is designed for for home and other small environments. There is no central management of keys, and the configuration is saved in each users home folder. I’ve successfully deployed this on my home server (a Raspberry Pi) and on my work laptop.
When using a Debian-like OS, you can install it with a one-liner
apt-get install libpam-google-authenticator
But note the packaged version is old and does not support all documented options. Below I talk about the ‘nullok’ option, but that is not supported in the packaged version. You then see this error:
sshd(pam_google_authenticator)[884]: Unrecognized option "nullok"
sshd(pam_google_authenticator)[887]: Failed to read "/home/pi/.google_authenticator"
That’s why I suggest building from source, as this can be done quickly:
apt-get remove libpam-google-authenticator
apt-get install libpam0g-dev libqrencode3
cd ~
wget https://google-authenticator.googlecode.com/files/libpam-google-authenticator-1.0-source.tar.bz2
tar jvxf libpam-google-authenticator-1.0-source.tar.bz2
cd libpam-google-authenticator-1.0/
make
make install
Open a shell for a user you want to enable two-factor authentication for and run ‘google-authenticator’ to configure.
google-authenticator
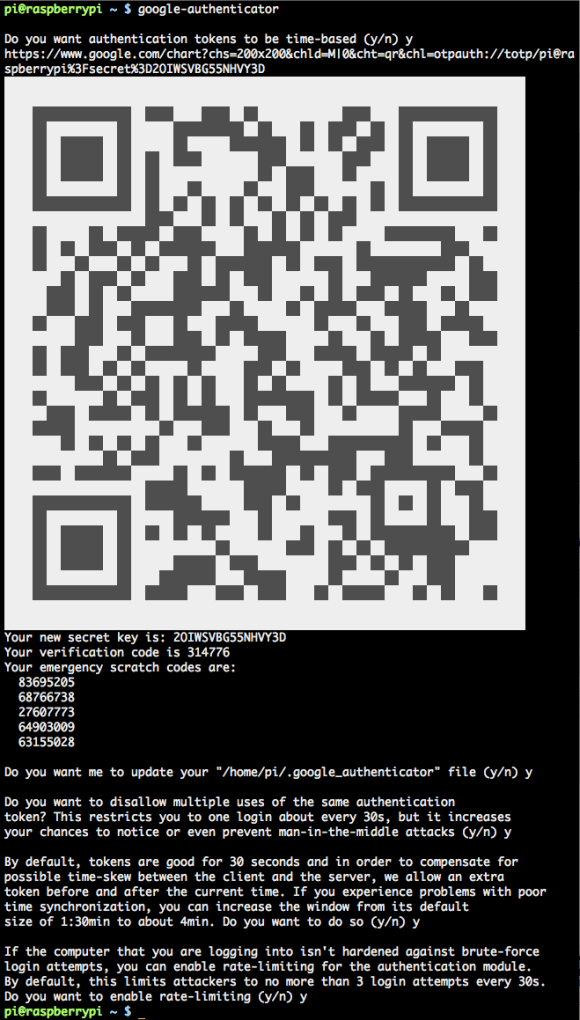
Configure Google Authenticator
Nice!
Configure your Mobile device
Install the ‘Google Authenticator’ app and just scan the QR-code. It will automatically configure itself and start displaying verification codes.
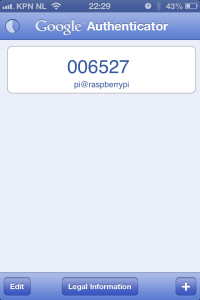
Verification codes displayed by app
You should notice it’ll display new codes each 30 seconds.
Configure SSH
Two files need to be edited in order to enable two-factor authentication in SSH.
vim /etc/pam.d/sshd
Add this line:
auth required pam_google_authenticator.so nullok
Where to put this in the file? That depends. When you put it at the top, SSH will first ask a verification code, then a password. To me this sounds unlogical, so I placed it just below this line:
@include common-auth
The ‘nullok’ option, by the way, tells PAM whenever no config for 2-factor authentication is found, it should just ignore it. If you want SSH logins to fail, when no two-factor authentication is configured, you can delete the option. Be warned to at least config it for one user, or you will be locked out of your server.
Now tel SSH to ask for the verification code:
vim /etc/ssh/sshd_config
Edit the setting, it’s probably set to ‘no’:
ChallengeResponseAuthentication yes
Now all you need to do is restart SSH. Keep a spare SSH session logged-in, just in case.
/etc/init.d/ssh restart
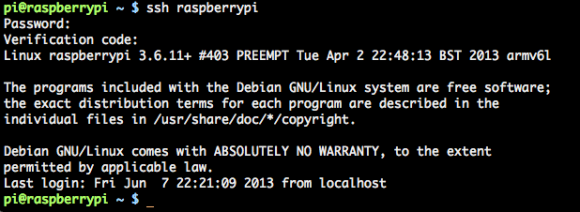
SSH two-factor authentication in action
SSH will now ask for a verification code when you do an interactive login. When a certificate is used, no verification code is asked.
Configuring Ubuntu Desktop
The Ubuntu desktop can also ask for a verification code. Just edit one file:
vim /etc/pam.d/lightdm
And add this line, just like SSH:
auth required pam_google_authenticator.so nullok
The login screen should now ask for a verification code. It looks like:
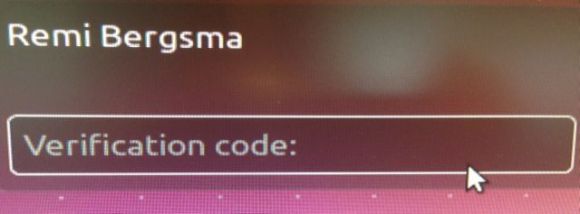
Two-factor authentication in Ubuntu
You can setup any PAM service like this, the basic principles are all the same.
Skip two-factor authentication if logging in from the local network
At first this is all very cool, but soon it becomes a bit annoying, too. When I SSH from a local network, I just don’t want to enter the verification code because I trust my local network. When I SSH from remote, a verification code is required. One way to arrange that, is always login with certificates. But there is another way to configure it: using the pam_access module. Try this config:
auth [success=1 default=ignore] pam_access.so accessfile=/etc/security/access-local.conf
auth required pam_google_authenticator.so nullok
The config file, /etc/security/access-local.conf looks like:
# Two-factor can be skipped on local network
 + : ALL : 10.0.0.0/24
 + : ALL : LOCAL
 - : ALL : ALL
Local login attempts from 10.0.0.0/24 will not require two-factor authentication, while all others do.
Two-factor only for users of a certain group
You can even enable two-factor authentication only for users of a certain group. Say, you’d want only users in the ‘sudo’ group to do use two-factor authentication. You could use:
auth [success=1 default=ignore] pam_succeed_if.so user notingroup sudo
auth required pam_google_authenticator.so nullok
By the way, “[success=1 default=ignore]” in PAM means: on success, skip the next 1 auth provider (two-factor authentication), on failure, just pretend it didn’t happen.
Moving the config outside the user’s home
Some people prefer not to store the authentication data in the user’s home directory. You can do that using the ‘secret’ parameter:
mkdir -p /var/lib/google-authenticator/
mv ~remibergsma/.google_authenticator /var/lib/google-authenticator/remibergsma
chown root.root /var/lib/google-authenticator/*
The PAM recipe will then become:
auth required pam_google_authenticator.so nullok user=root secret=/var/lib/google-authenticator/${USER}
As you’ve seen, PAM is very flexible. You can write almost anything you want.
Try the Google Authenticator two-factor authentication. It’s free and adds another security layer to your home server.


