Archives For 31 March 2012

When you mix architectures (or are moving from 32bit to 64bit like me) and use RRDtool for statistics, you might run into this problem:

ERROR: This RRD was created on another architecture

You can solve this, to dump the RRD file on the server that created it to XML, like this:

rrdtool dump stats.rrd > stats.xml

Then transfer it to the new server, and convert it back to RRD:

rrdtool restore -f stats.xml stats.rrd

The  other server can now read the file. You can test it with the info command:

rrdtool info stats.rrd

Hope this helps someone!

PS: If you want to convert a whole directory to XML, use this little bash oneliner I created for this job:

for f in *.rrd; do rrdtool dump ${f} > ${f}.xml; done

Whether you’re using Mac OSX, Windows or Linux, we’re all using a so-called “window manager”. Most are graphical user interfaces; and that’s a good thing 🙂 But as a sysadmin I need to manage many servers. Servers without a graphical user interface. So, how to handle that?

One could just ssh into a server when you need to do work on a given server. Depending on the terminal program you use, you might be able to have multiple sessions at the same time, preferably in tabs. It looks like this when 3 tabs are open:

Although this works well, it has one drawback for me: it only works on one computer. And when you turn off your computer everything is gone and disconnected. Since I’m working on multiple computers (desktop/laptop), multiple OS’es (OSX, Ubuntu) and multiple places (Work, Home), this no longer worked for me and I started looking for a better solution.

GNU Screen to the rescue! GNU Screen is a full-screen window manager, but terminal based. That is, it works in interactive shells such as a ssh session and is able to keep running while disconnected.

Starting a screen is easy:

screen -S screenname

You can attach and detach a session when needed. To detach, press Ctrl+a+d. To reattach enter:

screen -r screenname

This means that no matter on what computer I login, on any place, I always am able to attach a running screen. It looks like this:
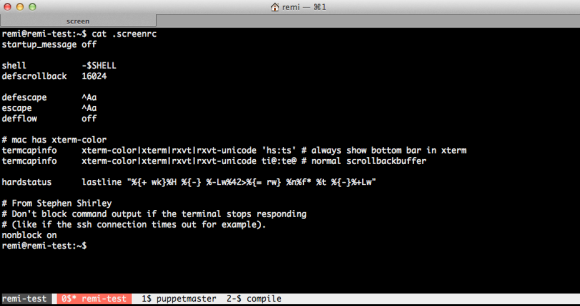
Note the bar at the bottom where the tabs are. You can even give them a name!

GNU Screen can be a bit obscure to configure. After googling a lot and some help from co-workers, I have now configured GNU Screen as you can see on the above image. Configuration is read from the .screenrc file in your homedir. In the image above you can see my .screenrc file.

Commands in GNU Screen are all prefixed by a control command, the default is Ctrl+a. This means that all commands you type will be entered in the terminal you’re connected to, except commands followed directly after you press Ctrl+a. In the manual page you’ll find C-a, which is short for Ctrl+a.

When you want to create a new tab, enter Ctrl+a+c. To change from one tab to the other, you press Ctrl+a+2 to go to tab #2. Ctrl+a+spacebar brings you to the next tab. To name that tab, enter Ctrl+a+A, etc. It takes a bit of time to get used to it, but for me it works very well.

GNU Screen is a window manager, so apart from multiple tabs, you can even split the window to host multiple screens next to each other. To split vertically you enter Ctrl+a+|. Ctrl+a+tab brings you to the newly created space. You then create a new tab there, like Ctrl+a+c. It looks like this:

Like I said, Ctrl+a+tab switches between the left and right screen. In each you can call any tab that is below with Ctrl+a+tabnumner, or toggle between them using the spacebar.

Need to go away and want to protect your screens? Enter Ctrl+a+x and you’re screens will be locked. You need to enter the password of the connected user to unlock.

This is just a quick introduction of what is possible with screen. Have a look at the man page:

man screen

or use Google to get some more configuration examples. Have fun!

Since I’m working with CloudStack I’m also working with CentOS. As I’ve been working with Debian for over 10 years, it sometimes takes some extra time to get things done. Like when you want to install a package that is not in the default repo’s.

This is how to enable the RPMForge repository:

Start to import the key:

rpm --import http://apt.sw.be/RPM-GPG-KEY.dag.txt

Then download the RPMForge release file:

wget http://apt.sw.be/redhat/el6/en/x86_64/rpmforge/RPMS/rpmforge-release-0.5.2-2.el6.rf.x86_64.rpm

Then all you need to do is install this rpm:

rpm -i rpmforge-release-0.5.2-2.el6.rf.x86_64.rpm

You only need to do this once. Now the packages from RPMForge can be installed using yum. Have fun!


The PHP Extension Community Library (PECL) has many great extensions for php5. Unfortunately, most are not packaged for Debian. Of course it is pretty easy to install it by hand. For example the ‘pecl_http’ extension:

pecl install pecl_http
echo "extension=http.so" > /etc/php5/conf.d/http.ini

For this to work you need some -dev packages to be installed. php5-dev and build-essential are the minimum required.

I have two problems with this method:
1. Too many -dev packages will be installed on production servers. I want to have as less packages installed as possible;
2. The software is not easily installable and upgradable;

I’ve yet another requirement: I need to distribute my package in a local Debian repository so it can be automatically installed. Therefore I need to have the right metadata with my new package. The method I describe here does create all files you need to upload the package to a Debian Repository.

Start to create an empty directory for our new package:

mkdir php-pecl-http_1.7.4-1

Then go into this new directory and download the PECL package you want to package for Debian.

pecl download pecl_http

Using ‘dh-make-pecl’ you can create a Debian source package like this:

dh-make-pecl --only 5 pecl_http-1.7.4.tgz

The next step is fixing a problem with ‘pecl_http’. The generated .so file is called http.so and not pecl_http.so. You can skip this step when creating other packages.

sed -i 's/PECL_PKG_NAME=pecl-http/PECL_PKG_NAME=http/1' debian/rules
mv debian/pecl-http.ini debian/http.ini
sed -i 's/pecl-http.so/http.so/1' debian/http.ini

If you want, you can edit the changelog. For example when you want to customize the version number.

vim debian/changelog

Now it’s time to build the package. Look closely to the output when you get an error. You might need some dependencies like php5-dev and build-essential.

Don’t run this as root, but add ‘-rfakeroot’ as oridinary user.

dpkg-buildpackage -rfakeroot

You will find your new package one level below:

ls -la ../

drwxr-xr-x 3 remi staff   4096 Apr  5 16:58 .
drwxr-xr-x 7 remi staff   4096 Apr  5 18:23 ..
-rw-r--r-- 1 remi staff   1134 Apr  5 16:08 channel.xml
-rw-r--r-- 1 remi staff 174503 Apr  5 16:08 pecl_http-1.7.4.tgz
-rw-r--r-- 1 remi staff 146352 Apr  5 16:38 php5-pecl-http_1.7.4-1_amd64.deb
drwxr-xr-x 5 remi staff   4096 Apr  5 16:56 php-pecl-http-1.7.4
-rw-r--r-- 1 remi staff   1516 Apr  5 16:38 php-pecl-http_1.7.4-1_amd64.changes
-rw-r--r-- 1 remi staff   4334 Apr  5 16:58 php-pecl-http_1.7.4-1.diff.gz
-rw-r--r-- 1 remi staff    769 Apr  5 16:38 php-pecl-http_1.7.4-1.dsc
-rw-r--r-- 1 remi staff   4332 Apr  5 16:57 php-pecl-http_1.7.4-1.md.0.diff.gz
lrwxrwxrwx 1 remi staff     19 Apr  5 16:09 php-pecl-http_1.7.4.orig.tar.gz -> pecl_http-1.7.4.tgz

The *.deb *.changes *.diff.gz *.dsc and *.orig.tar.gz files are needed for uploading to a repository. I’m not covering setting up your own Debian Repository. Don’t worry, you can always install the .deb directly like this:

dpkg -i php5-pecl-http_1.7.4-1_amd64.deb

To install from your Debian Repository:

apt-get update
apt-get install php5-pecl-http

In my configuration management (Puppet) I can now ensure this package is installed at all times at all nodes that run php5. Furthermore, I can compile and package on a dedicated compile vm and have as clean as possible production vm’s!