At DevOpsDays Amsterdam 2016 I hosted a 3 hour hands-on workshop with my colleague Fred Neubauer. In these 3 hours we had 12 people build their own cloud based on Cosmic Cloud. It was great fun!

The slides are here:
At DevOpsDays Amsterdam 2016 I hosted a 3 hour hands-on workshop with my colleague Fred Neubauer. In these 3 hours we had 12 people build their own cloud based on Cosmic Cloud. It was great fun!

The slides are here:
 I was the Release Manager for Apache CloudStack versions 4.6, 4.7 and 4.8 and during this time many people told me they thought it’s hard to build and package Apache CloudStack. The truth is, it’s not that hard once you know the steps to take. 😉
Next to that there’s the release pace. You may want to move in a different pace than the project is. There’ve been lots of discussions for example on a fast release cycle, and also on LTS-releases on the other hand. In this blog post I’ll show you how easy it is to create your own CloudStack release to satisfy the demands of your organisation.
Maven
Compiling Apache CloudStack is done using Maven. You need to install this tool in order to work with releases so let’s do it. Let’s assume a CentOS 7 box you want to compile this on. It should pretty much work on any OS.
yum install maven java-1.8.0-openjdk mkisofs ws-commons-util genisoimage gcc
We also install Java and some tools needed to compile Apache CloudStack.
Versioning
When you’re building your own release of Apache CloudStack, you have two options:
You’ve to keep in mind that when you create a new version, you need also to create so-called upgrade-paths: how the database can be upgraded to your version. When you choose option 1, and rebuild an existing version, this is not necessary. This sounds easy, but on the other hand, it’s confusing as there’s no way to tell the difference later on.
Apache CloudStack works with versions like 4.8.0 and 4.7.1, etc. The upgrade mechanism will only consider the first 3 parts. This means, we are free to create 4.8.0.16 (our 16th custom version of 4.8.0) as long as we do not touch the database. That sounds like a nice way to make custom daily releases, and at the same time can be used for those wanting to build LTS (Long Term Support) versions.
Setting the version
The question then is, how can we modify the version of Apache CloudStack? Well, there’s actually a tool supplied in the source that does this for you. It’s called setnextversion.sh. Here’s how it works:
usage: ./tools/build/setnextversion.sh -v version [-b branch] [-s source dir] [-h]
  -v sets the version
  -b sets the branch (defaults to 'master')
  -s sets the source directory
  -h
To build our custom 4.8.0.16 version off the 4.8 branch we run:
./tools/build/setnextversion.sh -v 4.8.0.16 -b 4.8 -s /data/git/cs1/cloudstack/
Output shows a lot of things, most interesting:
found 4.8.0 setting version numbers
[master 27fa04a] Updating pom.xml version numbers for release 4.8.0.16
126 files changed, 130 insertions(+), 130 deletions(-)
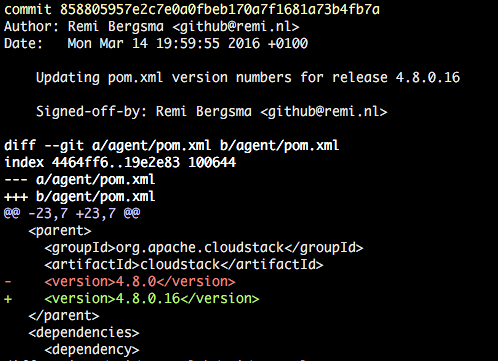
committed as 858805957e2c7e0a0fbeb170a7f1681a73b4fb7a
The result is a new commit that changed the versions in the POMs. You an see it here:
git log

You’ve successfully set the version!
Compiling the custom version
Let’s compile it. This works like with any release build:
mvn clean install -P systemvm
This will take a few minutes. You should see your new version flying by lots of times.

After a few minutes the build completes.
By the way, if you want to skip the unit tests to speed up the process, add -DskipTests to the mvn command.

RPM packages
The source also contains scripts to build packages. To build packages for CentOS 7 for example, do this:
cd ./packaging
./package.sh -d centos7
You should see this:
Preparing to package Apache CloudStack 4.8.0.16
When the script finishes, you can find the RPM packages here:
ls -la ../dist/rpmbuild/RPMS/x86_64/

Installing the new version
You can either use the war that is the result of the compile, or install the generated RPM packages. Installing and upgrading is out-of-scope in this blog, so I assume you know how to install a stock version of CloudStack. I first installed a stock 4.8.0 version, then (as shown above) built 4.8.0.16 and will show the upgrade.
As soon as you start the management server with the new version you will see this:
2016-03-14 12:34:09,986 DEBUG [c.c.u.d.VersionDaoImpl] (main:null) (logid:) Checking to see if the database is at a version before it was the version table is created
2016-03-14 12:34:09,995 INFO  [c.c.u.DatabaseUpgradeChecker] (main:null) (logid:) DB version = 4.8.0 Code Version = 4.8.0.16
2016-03-14 12:34:09,995 INFO  [c.c.u.DatabaseUpgradeChecker] (main:null) (logid:) DB version and code version matches so no upgrade needed.
This is actually very nice. We made a custom version and CloudStack still assumes it’s 4.8.0 and so no upgrade of the data base is needed. This obviously means that you cannot do this when your patch requires a data base change.
When we look at the database, we can confirm we still run a 4.8.0-compatible release:

From this table, one cannot tell we upgraded to our custom version. But when you look closer, the new version is active.
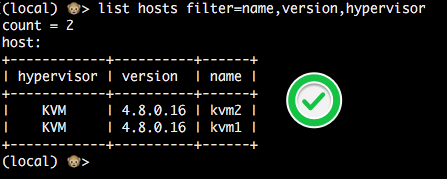
This is the version an agent reports:

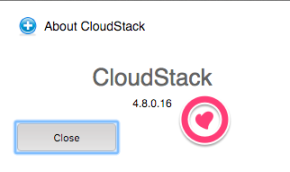
Also, the UI will show the custom version in the About box. This way users can easily tell what version they are running.
Conclusion
Creating your own custom version of Apache CloudStack may sound complicated but we’ve seen it’s pretty easy to do so. Creating a custom release will provide you with a lot of flexibility, especially if you combine it with war dropping. By numbering your version like 4.8.0.x you don’t have to worry about upgrade paths.
Happy releasing!
 Today I hosted a CloudStack hands-on workshop at DevOpsDays Amsterdam, together with my colleague Fred Neubauer. It was really awesome to see all attendees building their own CloudStack cloud. And succeeding!
Here are the slides and instructions: We proposed the workshop to the CloudStack Collaboration Conference Europe, in Dublin next October so we might do it again!

Fred in action!

That’s me in action!

Recently I became a committer in the Apache CloudStack project. Last week when I was working with Rohit Yadav from ShapeBlue he showed me how he had automated the process with a Git alias. I really like it so I’ll share it here as well.
First of all, pull requests are created on Github.com. Rohit created a git alias called simply ‘pr’. This is how it looks like (for the impatient: copy/paste the one-liner below). The command below is for easy reading, it will print a syntax error.
[alias]
pr= "!apply_pr() { set -e;
rm -f githubpr.patch;
wget $1.patch -O githubpr.patch
--no-check-certificate;
git am -s githubpr.patch;
rm -f githubpr.patch;
pr_num=$(echo $1 | sed 's/.*pull\\///');
git log -1 --pretty=%B > prmsg.txt;
echo \"This closes #$pr_num\" >>
prmsg.txt; git commit --amend -m \"$(cat prmsg.txt)\";
rm prmsg.txt; }; apply_pr"
Copy/paste this next two lines into your .gitconfig file (usually located in ‘~/.gitconfig’.):
[alias]
pr= "!apply_pr() { set -e; rm -f githubpr.patch; wget $1.patch -O githubpr.patch --no-check-certificate; git am -s githubpr.patch; rm -f githubpr.patch; pr_num=$(echo $1 | sed 's/.*pull\\///'); git log -1 --pretty=%B > prmsg.txt; echo \"This closes #$pr_num\" >> prmsg.txt; git commit --amend -m \"$(cat prmsg.txt)\"; rm prmsg.txt; }; apply_pr"
This alias allows you to do this:
git pr https://pull-request-url
It will then fetch the patch, extract the pull request number, adds a note that closes the pull request, finally commits all commits to your current branch. All you have to do is review and push.
Let’s demo this on a pull request I openend on the CloudStack documentation. Goes like this:
git pr https://github.com/apache/cloudstack-docs-rn/pull/21
--2015-05-24 19:22:54--
https://github.com/apache/cloudstack-docs-rn/pull/21.patch
Resolving github.com... 192.30.252.130
Connecting to github.com|192.30.252.130|:443... connected.
HTTP request sent, awaiting response... 302 Found
Location: https://patch-diff.githubusercontent.com/raw/apache/cloudstack-docs-rn/pull/21.patch [following]
--2015-05-24 19:22:54--
https://patch-diff.githubusercontent.com/raw/apache/cloudstack-docs-rn/pull/21.patch
Resolving patch-diff.githubusercontent.com... 192.30.252.130
Connecting to patch-diff.githubusercontent.com|192.30.252.130|:443... connected.
HTTP request sent, awaiting response... 200 OK
Cookie coming from patch-diff.githubusercontent.com attempted to set domain to github.com
Length: unspecified [text/plain]
Saving to: 'githubpr.patch'
githubpr.patch [ <=> ] 9.23K --.-KB/s in 0.002s
2015-05-24 19:22:55 (4.96 MB/s) - 'githubpr.patch' saved [9449]

Applying: add note on XenServer: we depend on pool HA these days
Applying: remove cached python classes and add ignore file for it
Applying: explicitly mention the undocumented timeout setting

[master 08e325d] explicitly mention the undocumented timeout setting
 Author: Remi Bergsma <[email protected]>
 Date: Sun May 24 08:28:43 2015 +0200
 3 files changed, 21 insertions(+), 3 deletions(-)
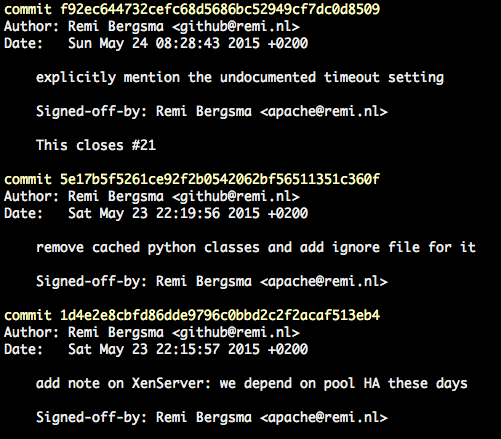
The pull request has 3 commits that are now committed to the current branch. Check the log:
git log

Isn’t that great? Now all you have to do is push it to a upstream repository.
Signed-off-by
This is achieved by adding the following to ‘.gitconfig’:
[format]
 signoff = true
Thanks Rohit for sharing!
 When contributing to open source projects, it’s pretty common these days to fork the project on Github, add your contribution, and then send your work as a so-called “pull request” to the project for inclusion. It’s nice, clean and fast. I did this last week to contribute to Apache CloudStack. When I wanted to contribute again today, I had to figure out how to get my “forked” repo up-to-date before I could send a new contribution.
Remember, you can read/write to your fork but only-read from the upstream repository.
Adding upstream as a remote
When you clone your forked repo to a local development machine, you get it setup like this:
git remote -v
origin [email protected]:remibergsma/cloudstack.git (fetch)
origin [email protected]:remibergsma/cloudstack.git (push)
As this refers to the “static” forked version, no new commits come in. For that to happen, we need to add the original repo as an extra “remote” that we’ll call “upstream”:
git remote add upstream https://github.com/apache/cloudstack
Now, run the same command again and you’ll see two:
git remote -v
origin [email protected]:remibergsma/cloudstack.git (fetch)
origin [email protected]:remibergsma/cloudstack.git (push)
upstream https://github.com/apache/cloudstack (fetch)
upstream https://github.com/apache/cloudstack (push)
The cloned git repo is now configured to both the forked and the upstream repo.
Let’s fetch the updates from upstream:
git fetch upstream
Sample output:
remote: Counting objects: 151, done.
remote: Compressing objects: 100% (123/123), done.
remote: Total 151 (delta 39), reused 0 (delta 0)
Receiving objects: 100% (151/151), 153.30 KiB | 0 bytes/s, done.
Resolving deltas: 100% (39/39), done.
From https://github.com/apache/cloudstack
   2f2ff4b..49cf2ac  4.4        -> upstream/4.4
   aca0f79..66b7738  4.5        -> upstream/4.5
* [new branch]      hotfix/4.4/CLOUDSTACK-8073 -> upstream/hotfix/4.4/CLOUDSTACK-8073
   85bb685..356793d  master     -> upstream/master
   b963bb1..36c0c38  volume-upload -> upstream/volume-upload
We now got the new updates in. Before you continue, be sure to be on the master branch:
git checkout master
Then we will rebase the new changes to our own master branch:
git rebase upstream/master
You can achieve the same by merging, but rebasing is usually cleaner and doesn’t add the extra merge commit.
Sample output:
Updating 4e1527e..356793d
Fast-forward
SSHKeyPairResponse.java                       | 12 ++++++++++++
SolidFireSharedPrimaryDataStoreLifeCycle.java | 33 +++++++++++++++++++++++++++++++++
RulesManagerImpl.java                         |  2 +-
ManagementServerImpl.java                     |  5 +----
4 files changed, 47 insertions(+), 5 deletions(-)
Finally, update your fork at Github with the new commits:
git push origin master
Branches other than master
Imagine you want to track another branch and sync that as well.
git checkout -b 4.5 origin/4.5
This will setup a local branch called ‘4.5’ that is linked to ‘origin/4.5’.
If you want to get them in sync again later on, the workflow is similar to above:
git checkout 4.5
git fetch upstream
git rebase upstream/4.5
git push origin 4.5
Automating this process
I wrote this script to synchronise my clones with upstream:
#!/bin/bash

# Sync upstream repo with fork repo
# Requires upstream repo to be defined

# Check if local repo is specified and exists
if [ -z $1 ]; then
 echo "Please specify repo to sync: $0 <dir>"
 exit 1
fi
if [ ! -d $1 ]; then
 echo "Dir $1 does not exist!"
 exit 1
fi

# Go into git repo and update
cd $1

# Check upstream
git remote -v | grep upstream >/dev/null 2>&1
RES=$?

if [ $RES -gt 0 ]; then
 echo "Upstream repo not defined. Please add it:
 git remote add http://github.com/..."
 exit 1
fi

# Update and push
git fetch upstream
git rebase upstream/master
git push origin master
Execute like this:
./update_origin_with_upstream.sh /path/to/git/repo
Happy contributing!