Archives For 31 January 2012

Good news today when I came home from the office: CloudStack 3.0 stable has been released! I’d really been looking forward to this, because we’ll be using it in a big cloud project at work. With this release, we can finalize our cloud design and proof-of-concept setup. More about that later.

Thanks to the CloudStack team for this great release! 🙂

Sometimes you need an easy way to redirect incoming connections to another system. For example when migrating an old box to a new one. Today I came across an old note from myself explaining this. I thought it might be worth sharing 🙂

You’ll need the ‘redir’ program for this to work:

apt-get install redir

Redir redirects tcp connections coming in to a local port to a specified address/port combination like this:

redir –laddr=10.10.0.1 –lport=80 –caddr=10.10.10.1 –cport=80

This redirects web requests coming in at 10.10.0.1 to 10.10.10.1.

redir –laddr=10.10.0.1 –lport=21 –caddr=10.10.10.1 –cport=21 –ftp=both

And here the same for ftp. Note the –ftp option, this makes sure both passive and active ftp work.

Many years ago, when I didn’t know about this option, I had to rollback an upgrade in the middle of the night, because ftp redirection just didn’t work.. all I had to do was add –ftp=both to redir. I found it out the next morning, and did the upgrade again the following night. I’ll never forget! Just had to smile when I found the note today 🙂

For a Cloud project at work, I made some screenshots of CloudStack to show our management. They wanted to know what an end-user will see in CloudStack 3.0. This is CloudStack from an end-user’s point-of-view:

The login screen is where it all starts..

After logging in, users are presented with a Dashboard. Here is a nice and clear overview of what VM’s are running and stopped. As you can see, there is a nice menu at the right.
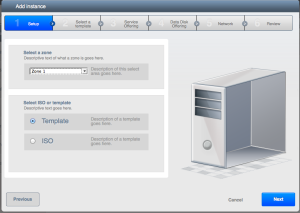
New VM’s can be added to CloudStack using a Wizard. The first step is to choose between a template (which is a pre-made server installation) or an ISO (which is more like booting an installation CD). Here we choose Template.

All available templates are presented to the user. We can choose between CentOS and Debian. Of course, any OS can be added as template. We select Debian here.

Now that we have selected a template, CloudStack wants to know what CPU and RAM the new VM should have. The user selects one of the pre-set options. It is also possible to present a price on this page, so the user knows what he will be billed for.
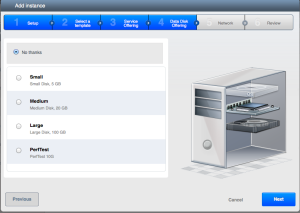
As an optional step, an additional data-disk can be added. This disk can later be detached from this VM, and attached to another. This way data can travel between VM’s.

The final step is to give this VM a name and the Launch it! CloudStack will keep you posted about the status. Soon you will receive a message on screen noting the VM is running. In the menu you select Instances (that is what VM’s are called). When you select a given VM, you see a page with all of its settings. Have a look at the screenshot below.
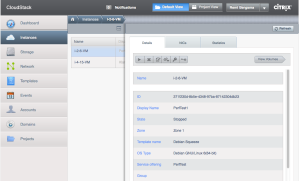
This page shows the details of the VM. Different options are available when the VM is running or stopped etc. When not running, you can upgrade its service offering for example to a more powerful CPU or more RAM. When running, you can connect to the console to manage the VM through that.
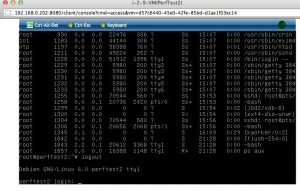
Working on the console (via a browser) looks like this. This is handy when you need to change the network options, or when a VM has a problem. Otherwise, working via a SSH-shell should be easier.

As you can see the CloudStack UI looks pretty nice! Not only is this a great product from a technical point of view, it also has a nice interface for users without a technical background.

CloudStack 3.0 is currently in beta and should be released any time soon.

Update: CloudStack 3.0.0 has been released. The screenshots look almost the same. Two differences:
1. On the login-page you now can choose between English and Japanese language
2. The ‘System’ menu on the left is renamed to ‘Infrastructure’, which indeed is a better name!

As a sysadmin I’ve many things to take care of. One of the most important is backups. As websites and mailarchives become larger and lager, it is an ongoing challenge to fit as many backups in the available backup space.

In the early days we’re backupping using rsync, tar and gzip. The biggest drawback was it takes a lot of space. On the bright side, it’s plain simple and just always works. All you’ve to do is untar an archive and everything is there again (i.e.: happy customer!). It helped me on many occasions. So I kept this old method for a long time and looked around for alternatives.

I’ve experimented with tools like rdiff-backup, but didn’t feel comfortable with it. Rdiff-backup just had disappointed me too many times. The version of client and server needs to be exactly the same. So during an upgrade from say Debian Lenny to Debian Squeeze, you either have no backups of the freshly upgrades machines, or, when you’ve upgraded the backupserver too, no more backups of the not-yet-upgraded machines. May be no problem for a few servers, but I’m managing many servers and this just doesn’t work. Another problem was that the rdiff-backup would got corrupt on some cases. In that case, only the last backup was usable, the others were gone. So the rdiff-backup experiment didn’t work.

Last week, when googling about ‘snapshots’ for another project, I just run into rsnapshot backup.Wow, that looked cool and simple! And since our backup server was suffering from low available disk space, which takes a lot of time to resolve each time, I decided to implement rsnapshot and see if it’d work for my environment.

Installation is simple:

aptitude install rsnapshot

Then edit /etc/rsnapshot.conf and tell the program what to backup, how many times, what to include/exclude and some more details. I found it very simple and powerful. The only thing you’ll need to know is that values are separated by tabs (not spaces) and paths have a trailing slash.

The magical thing rsnapshot uses is called ‘hardlinks‘. So, when rsnapshot finds two files in two backups are the same (i.e.: unchanged) it just makes a hardlink instead of saving two copies. This saves a lot of backup space!

This is how it looks like after rsnapshot has been running for some time:

215M    /backup/rsnapshot/daily.0/www.backupped-site.nl
820K    /backup/rsnapshot/daily.1/www.backupped-site.nl
820K    /backup/rsnapshot/daily.2/www.backupped-site.nl
820K    /backup/rsnapshot/daily.3/www.backupped-site.nl
820K    /backup/rsnapshot/daily.4/www.backupped-site.nl
816K    /backup/rsnapshot/daily.5/www.backupped-site.nl
219M    total

This website is 215MB. Saving 6 backups would normally cost 6x215MB = 1290MB which is 1.2GB. When using rsnapshot, only the changed (added, deleted, updated) files are saved, the rest are hardlinks. That turns out to be a great idea, since the backups now uses only 219MB instead of 1.2GB!

Using less space per backup means we’re able to save more backups for our customers 🙂

Home-key in OSX-Terminal

18 February 2012 — 5 Comments

I’m working in Terminal a lot. Lately I more and more use my MacBook Pro instead of my Ubuntu desktop. I’d to overcome some small issues. One was the missing Home-key, which allows you to jump all the way to the left on the current line.

Although the Mac doesn’t have a Home key, its function is available by pressing Fn+Shift+Left Arrow. And even better: Fn+Shift+Right Arrow jumps all the way to the right.

I feel right at home! 🙂