


OpenVPN is a very powerful tool to connect to a remote network in a secure and easy way. But while it’s quite easy to set it up (see my post about OpenVPN on Raspberry Pi), getting all the pieces together takes some more network understanding and configuration. I created an image to show what’s going on when a OpenVPN client connects to the server.
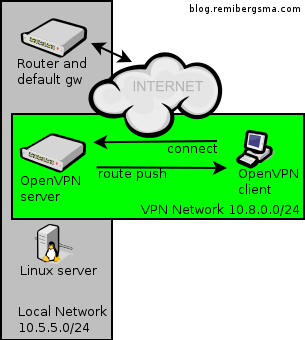
The grey network is the local network you’re connecting to, the green network is created by OpenVPN. After a successful connection, the OpenVPN server can ‘push’ a route to the OpenVPN client to make it aware of the grey network that is available through the OpenVPN connection. In this case you’d add this setting to the OpenVPN server:
push "route 10.5.5.0 255.255.255.0"
Now that the OpenVPN client knows how to find the Linux server on the grey network, it should be working, right? Nope. The Linux server does not know about the green network. So, when a OpenVPN client connects with a 10.8.0.x ip-address, this server does not know where to send the response to. When this happens, the Linux server sends its traffic to the default gateway of the local network: the router of the grey network.
But unfortunately, the router does not know about the green network neither. Since 10.8.0.x is a non-routable address (RFC 1918), it drops the packets because it has no way of knowing where to find this private network. To the OpenVPN client, this may look like there’s something wrong with the VPN connection, because even a simple ping will not work and times out. In reality, this is a routing problem.
The solution? Make the Linux server or at least the router aware of the green network, and tell them where to send traffic to this network. This is done by adding a route like this:
route add -net 10.8.0.0/24 gw 10.5.5.5
Assuming the local network ip-address of the OpenVPN server is 10.5.5.5.
This way the hosts in the grey network know about the green network and send their traffic to the OpenVPN server. Of course the OpenVPN server knows how to reach the OpenVPN client and all is working!
You can extend this further and add routes to the network of the VPN client and make hosts on both networks communicate to each other. This is useful for example to connect a branch-office to the corporate network. I’ll write about this in more detail some other time.
Hopefully this post brings some insight in what goes on when using networks and VPN connections.


