Archives For 30 April 2013

When it not possible to reach a server you want to SSH to directly, you can make use of SSH’s built in capability to chain multiple commands. Suppose you have a network setup like in the image below.

Network overview

Network overview

Firewalls or ACL’s prevent direct access to the ‘web server’ in network #2. In between is a ‘jump host’ in network #1. A ‘jump host’ is a host you can SSH to, and from there reach the next hop. How to SSH to the web server?

You could do this manually:

ssh -l user jump-host

and then from that server:

ssh -l user webserver.dmz

But using the -t switch, you can chain them together like this:

ssh -A -t -l user jump-host \
ssh -A -t -l user webserver.dmz

The -A switch enables forwarding of the ssh-agent. When using key based authentication, you’ll be able to login with typing the certificate’s password only once.

Using this technique, you can also build a SSH tunnel through the jump host:

ssh -A -t -l user jump-host \
-L 8080:localhost:8080 \
ssh -A -t -l user webserver.dmz \
-L 8080:localhost:8080

When you type: http://localhost:8080 in a browser, you are connected over a secure tunnel to the web server in Network #2. Thanks to the chaining of commands, this is now possible.

You can use many chained commands, so this is very flexible.

Recently I was wondering if a Raspberry Pi would be able to run an accurate clock and provide a stable NTP service.

A virtual machine can’t do it, because its system clock has a changing drift factor. The clock compensation technique built into NTP was never designed to handle anything but a static drift factor. This is unfortunate because NTP is a light-wight protocol, so using physical hardware for it may sound wasteful. The Raspberry Pi is physical hardware with a very small footprint. So, how accurately can the Raspberry Pi keep time?

Let’s start with some background before we answer the question.

Clocks in Linux
Two clocks are important in Linux: a ‘hardware clock’, also known as RTC (Real Time Clock), CMOS or BIOS clock. This is the battery backed clock on the motherboard that keeps time even when the machine is shut down. The second clock is called the ‘system clock’, maintained by the operating system, Linux in our case. At boot time, the hardware clock is used to set the system clock and from that point onwards the system clock is used to track time. At shutdown, the system time is used to set the hardware clock as a way to ‘save’ the time between reboots. Linux uses a clocksource to maintain time, several of which exist, mostly depending on the available hardware.

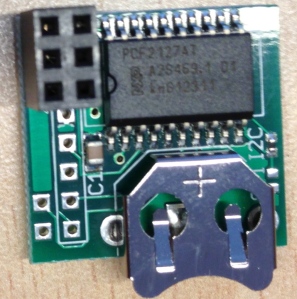
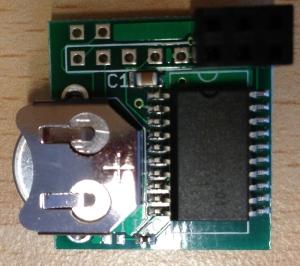
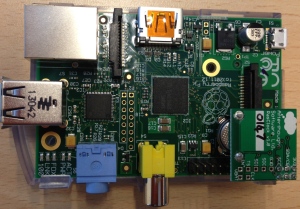
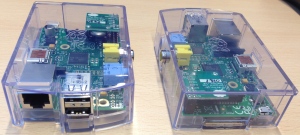
Just like virtual hardware, the Raspberry Pi has no hardware clock. But it is fairly simple to add a hardware clock using the GPIO ports. In a previous blog post, I explained how to set this up.

This is a Raspberry Pi with a hardware clock

This is a Raspberry Pi with a hardware clock

Clock accuracy
Clock accuracy is defined in terms of ppm (parts per million) and it gives a way of comparing accuracies. The hardware clock I use, a RasClock, is said to lose 3 ppm (parts per million). So, 3 of each 1 million seconds may be wrong. This means:

3/10e6 x 24 x 60 x 60 = 0.2592 sec/day may be wrong.

One year after setting the hardware clock, it will be 95 seconds off at max.

Note: an atomic clock’s accuracy is something in the order of 0.0000001 ppm 😉

How Linux keeps time
Because the hardware clock is used only at system start, it doesn’t help in keeping time while the system runs. The OS needs a decent clocksource to be able to keep time. Think of the clocksource as a counter maintained by the kernel. The purpose of the clocksource is to provide a timeline for the system that tells you where you are in time. For example issuing the command ‘date’ on a Linux system will eventually read the clocksource to determine exactly what time it is.

On x86 and/or amd64 hardware, common clocksources are TSC (Time Stamp Counter), acpi_pm and since about 2005 HPET (High Precision Event Timer).

cat /sys/devices/system/clocksource/clocksource0/current_clocksource
cat /sys/devices/system/clocksource/clocksource0/available_clocksource

The first command shows the current clocksource, the second all available ones.

Rasberry Pi’s clocksource
The Raspberry Pi does not ship with a TSC nor HPET counter to use as clocksource. Instead it relies on the STC that Raspbian presents as a clocksource. Based on the source code, “STC: a free running counter that increments at the rate of 1MHz”. This means it increments every microsecond.

How accurate is this STC?
Now that I have a hardware clock hooked to the Raspberry Pi, I can compare the STC clocksource (ie the system clock) to the hardware clock. First I made sure nothing is adjusting the clocksource already, or else you will not get accurate results. To double check:

vim /etc/default/adjtimex

Make sure these vars have their default values:

TICK=10000
FREQ=0

And restart afterwards:

/etc/init.d/adjtimex restart

These values are used to adjust the system clock. A value of FREQ=65536 speeds up the system clock by about 1 ppm, or .0864 sec/day. FREQ=6553600 and TICK=1 are equal and both speed up the system clock by about 100ppm, or 8.64 sec/day. Since we want to find out the precision of the Raspberry Pi’s system clock, we should not adjust anything. The system should not be doing other tasks during the test, other than normal OS operations.

First I synced the hardware clock with the system clock and logged the point in time that I did this:

hwclock --hctosys --utc; date -u

Read both the hardware clock and the system clock to verify:

hwclock -r; date -u

The two were equal in my test. To compare the hardware clock with the system clock in a more detail, a tool called ‘adjtimex’ exists. I used it with the –compare flag to run the test, like this:

adjtimex --compare=1 --utc

Warning: when you install ‘adjtimex’, it generates adjustment values in ‘/etc/default/adjtimex’. Make sure to reset them, like I did above or else you will get incorrect results.

Example output of the above command:

 --- current --- -- suggested --
cmos time system-cmos error_ppm tick freq tick freq
1367834856 -0.002202

Since both clocks just synced, there shouldn’t be much of a difference. I used the following command to log these values during a few days:

while :; do \
date -u +'# Generated at: %Y-%m-%d %H:%M:%S UTC %s %N'\
--date '+1 second'|
tee -a time.log 2>&1 \
&& adjtimex --compare=1 --utc \
| grep -v current | grep -v cmos |\
tee -a time.log 2>&1 \
&& sleep 1;\
done

This command enters an infinite loop and writes results to a logfile. Each loop takes about 2 seconds, so effectively this measures every 2 seconds the difference between the hardware clock and the system clock.

Afterwards, using some vim magic, I combined both logfiles, created a CSV from it and did most of the test analysis in Libre Office. Depending on the period you compare, you may want to filter out some records. Say you want a 1 minute interval in the rest results, instead of 2 seconds. I’ve found awk to be very useful at this:

awk 'NR == 1 || NR % 30 == 0' file.csv > file-1min-interval.csv

I’ve run the test command on two equally equipped and setup Raspberry Pi’s.

timedrift_raspberrypi_stc_versus_rasclock_rtc_full

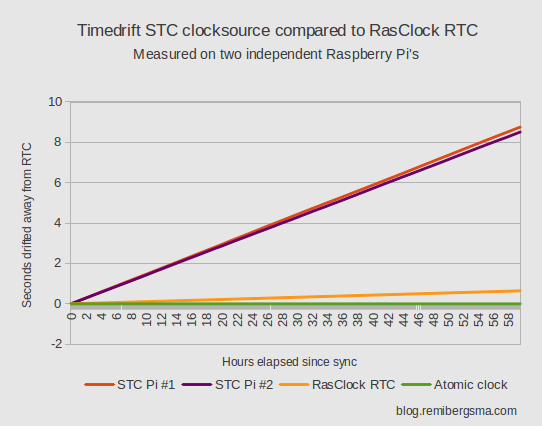
You can see the drift is fairly static and predictable. I’ve measured every 2 seconds during roughly 59 hours.

timedrift_raspberrypi_stc_versus_rasclock_rtc_1hour

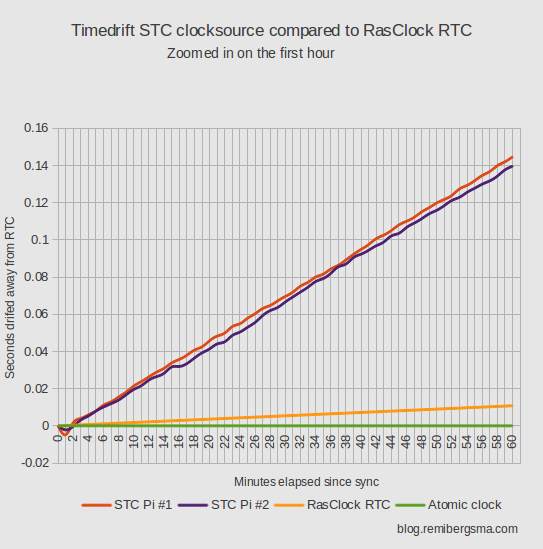
The above chart shows the first hour in more detail.

timedrift_difference_raspberrypi_1_and_2

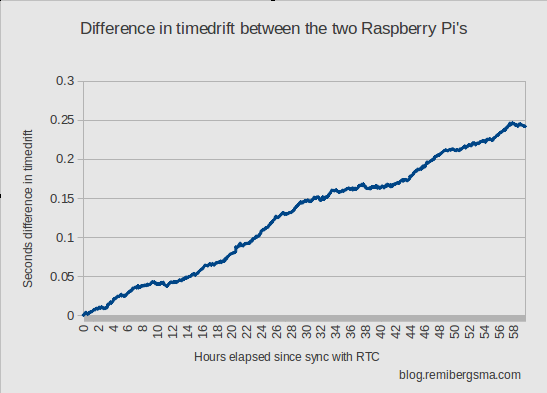
There is a small difference between the two Raspberry Pi’s I tested, probably due to the fact the STC clocksource is entirely done in software (it does not use a hardware crystal of some kind). After 59 hours the difference is 0.242016 seconds in my test. More testing is needed to find out if this difference is consistent. It might even be caused by something else. Although I’m not sure, I wouldn’t worry too much about it

Detailed results:

Pi #1
Total deviation: 8.763317 sec
Accuracy: 8.763317 / ( 59 x 60 x 60 ) x 10e6 = 41.259ppm

Pi #2
Total deviation: 8.521301 sec
Accuracy: 8.521301 / ( 59 x 60 x 60 ) x 10e6 = 40.119ppm

Average accuracy: ( 41.259 + 40.119 ) /2 = 40.689ppm

Deviation in 24h: ( 40.689 / 10e6 ) x 24 x 60 x 60 = ~3.52 sec. So, without adjustments or syncs with other sources, it will drift this many seconds in 24 hours.

Conclusion
While the STC clocksource in Raspbian is not as accurate as a hardware clock, it does a great job in keeping time. The timedrift is linear and it has an accuracy of ~40ppm. It means the Raspberry Pi is able to keep time pretty well just on its own. This a requirement to build a solid NTP service and it is exactly what a VM cannot do. Therefore the Raspberry Pi is an interesting device to consider when planning your NTP service.

We now know what the Raspberry Pi does when it is not synced with other sources. Of course we’ll setup a system where it does sync to make sure it will drift away as little as possible. In a follow-up post we’ll continue from here in building a NTP service on the Raspberry Pi.

The Raspberry Pi does not have a hardware clock on board. Instead, to keep track of time during reboots and downtime the ‘fake-hwclock’ package is used. It contains scripts to save the kernel’s current clock periodically (including at shutdown) and restore it at boot so that the system clock keeps at least close to realtime. Combined with NTP this is a simple, cheap and fairly accurate setup for most use-cases.

For a project at work I wanted to test a Raspberry Pi with a Real Time Clock (RTC) connected through the GPIO pins. This hardware clock needs to be very precise. I found the RasClock, by Afterthought Software, to be precise enough (about 3ppm or ~95 seconds deviation per year) while still affordable (about 15 euro).

Hardware installation

The hardware installation is simple. Just insert the battery and place the RasClock on the last 6 GPIO ports, at the end of the board. That’s it.

This is how the RasClock GPIO module looks like

This is how the RasClock GPIO module looks like

This is the RasClock with a battery backup installed

This is the RasClock with a battery backup installed

This is the RasClock installed on the Raspberry Pi, side view

This is the RasClock installed on the Raspberry Pi, side view

This is the RasClock installed on the Raspberry Pi, top view

This is the RasClock installed on the Raspberry Pi, top view

This is the RasClock installed on my two boxed Raspberry Pi's

This is the RasClock installed on two boxed Raspberry Pi’s

Looks pretty good!

Software installation

I recommend upgrading to the latest Raspbian version. At the time of writing Raspbian runs on kernel 3.6.11. By far the easiest way to upgrade firmware, is to use rpi-update.

Unfortunately the ‘rtc-pcf2127a’ module needed to operate the RasClock, is not in the default Linux kernel provided by Raspbian. Afterthought Software provides both a binary packages and source code for their forked raspberrypi/linux repository. They added an I2C driver for NXP/Philips PCF2127A device from Eckelmann AG.

To install the binary package:

wget http://afterthoughtsoftware.com/files/linux-image-3.6.11-atsw-rtc_1.0_armhf.deb
dpkg -i linux-image-3.6.11-atsw-rtc_1.0_armhf.deb
cp /boot/vmlinuz-3.6.11-atsw-rtc+ /boot/kernel.img

The binary package is nice and quick for testing. Installing from source allows you to only build the needed kernel module, instead of a complete kernel replacement.

In the comments of the Afterthought Software site, someone posted these steps. Thanks for sharing your work!

sudo apt-get -y install build-essential gcc make cmake i2c-tools
mkdir devel
cd devel
wget https://github.com/raspberrypi/linux/archive/rpi-3.6.y.tar.gz
wget https://github.com/afterthoughtsoftware/linux/commit/fd5ff2d88f470ed70ff58393eee61110b181816a.patch
tar vxzf rpi-3.6.y.tar.gz
cd linux-rpi-3.6.y/
SUW=`pwd`
patch -p1 < ../fd5ff2d88f470ed70ff58393eee61110b181816a.patch
zcat /proc/config.gz > .config
sed -i 's/# CONFIG_RTC_DRV_PCF2127A is not set/CONFIG_RTC_DRV_PCF2127A=m/g' .config
echo m | make oldconfig
wget https://github.com/raspberrypi/firmware/raw/master/extra/Module.symvers
make modules_prepare
cd drivers/rtc
make -C $SUW M=`pwd`
sudo cp rtc-pcf2127a.ko /lib/modules/3.6.11+/kernel/drivers/rtc/
sudo depmod

It doesn’t matter if you install the binary package or compile the kernel module on your own. The steps below are the same either way.

Make sure to load the needed modules:

cat >> /etc/modules <<EOL
i2c-bcm2708
rtc-pcf2127a
EOL

Make sure the i2c-tools package is installed:

apt-get install i2c-tools

I talked about the ‘fake-hwclock’ package. Now that we have a hardware clock, we should remove this package and it’s crons.

apt-get remove fake-hwclock
rm /etc/cron.hourly/fake-hwclock
update-rc.d -f fake-hwclock remove
rm /etc/init.d/fake-hwclock

Enable the ‘hwclock.sh’ script (part of util-linux), instead:

update-rc.d hwclock.sh enable

It’s now time to boot the new kernel. When you reboot, the RasClock will be available as /dev/rtc0.

dmesg

The kernel ring buffer should list something like this:

[ 32.737903] rtc-pcf2127a 1-0051: chip found
[ 32.739712] rtc-pcf2127a 1-0051: rtc core: registered rtc-pcf2127a as rtc0
[ 32.739775] i2c i2c-1: new_device: Instantiated device pcf2127a at 0x51

Because this is a new device, we need to set the time in the hardware clock. Do this by copying the system time to the RasClock.

hwclock --systohc --utc

Using the ‘hwclock’ command, you can read the RasClock:

hwclock --show --utc

Output:

Wed 08 May 2013 21:59:49 CEST -0.862324 seconds

Adding the ‘–debug’ flag adds some more interesting output, especially if you want to know exactly what goes on. Example output:

hwclock from util-linux 2.20.1
Using /dev interface to clock.
Assuming hardware clock is kept in UTC time.
Waiting for clock tick...
/dev/rtc0 does not have interrupt functions. Waiting in loop for time from /dev/rtc0 to change
...got clock tick
Time read from Hardware Clock: 2013/05/08 19:56:20
Hw clock time : 2013/05/08 19:56:20 = 1368042980 seconds since 1969
Wed 08 May 2013 21:56:20 CEST -0.752934 seconds

You can also access the hardware clock through the /sys pseudo filesystem like this:

cat /sys/class/rtc/rtc0/date
cat /sys/class/rtc/rtc0/name

The first command returns the date, the second command the name of the chip which is ‘rtc-pcf2127a’.

Using the clock

In my current setup, the RasClock keeps time during reboot and when the Raspberry Pi is turned off. My goal is to build a NTP server that is capable of keeping time also when no NTP peers are available to prevent time drifts. I assume the hardware clock that I have now available is more accurate than the clocksource that drives the system time. I need to experiment to see how the two clocks compare. I’ll come back on the subject in a follow-up post.

When a SSH-key changed, this warning is displayed:

ssh -l username 172.16.12.34

Warning:

@@@@@@@@@@@@@@@@@@@@@@@@@@@@@@@@@@@@@@@@@@@@@@@@@@@@@@@@@@@
@ WARNING: REMOTE HOST IDENTIFICATION HAS CHANGED! @
@@@@@@@@@@@@@@@@@@@@@@@@@@@@@@@@@@@@@@@@@@@@@@@@@@@@@@@@@@@
IT IS POSSIBLE THAT SOMEONE IS DOING SOMETHING NASTY!
Someone could be eavesdropping on you right now (man-in-the-middle attack)!
It is also possible that a host key has just been changed.
The fingerprint for the ECDSA key sent by the remote host is
aa:bb:cc:a2:b6:87:bd:43:f9:ff:<wbr />02:8e:a6:b8:29:42.
Please contact your system administrator.
Add correct host key in /home/remi/.ssh/known_hosts to get rid of this message.
Offending ECDSA key in /home/remi/.ssh/known_hosts:6

In case you know the host identification has changed, you can safely discard this warning.

You could run ‘vim ~/.ssh/known_hosts‘ enter ‘6G‘ to go to the 6th line, ‘dd‘ to delete that line and finally ‘:wq‘ to save the file. But, wouldn’t a one-liner be handy?

Try:

ssh-keygen -R 172.24.111.132

Output:

/home/remi/.ssh/known_hosts updated.
Original contents retained as /home/remi/.ssh/known_hosts.

I’ve tested this on Ubuntu, Debian, SUSE and Red Hat Enterprise Linux.

In case you get this error:

fopen: No such file or directory

There isn’t a ‘known_hosts’ file in ‘~/.ssh/’. You can use the -f flag to specify the right file.

At times it can be very handy to be able to use a local MySQL socket, while the real MySQL server is in fact a remote one. I once used this technique to split a dozen LAMP servers into dedicated (clustered) web servers and MySQL servers. Without having all clients to update scripts, that is.

Today I ran into another use-case: while migrating an old 32bit MySQL Windows server to a modern Linux VM. We wanted to get some statistics from it. The famous ‘mysqltuner.pl‘ script is designed to run from localhost. Well, let’s fake MySQL is on localhost then 😉

For these tricks to work you need a tool called ‘socat‘, which can be installed like this:

apt-get install socat

This is how to create a socket in ‘/var/lib/mysql/mysql.sock’, owned by both user and group ‘mysql’ and forward the connections to ‘mysql-server’ on port 3306:

socat UNIX-LISTEN:/var/lib/mysql/mysql.sock,fork,\
reuseaddr,unlink-early,user=mysql,group=mysql,mode=777 \
TCP:mysql-server:3306 &

You can now connect:

mysql -u user -p

No need to supply a hostname, MySQL connects to the local socket by default and socat takes care of forwarding the connection to the real MySQL server.

It is important to note this works as long as socat is running. You could use a tool called runit to keep socat running at all times. In another post I’ll explain more about runit.

This works with other protocols as well.