


Here are the slides from my talk about CloudStack automation, at the CloudStack Collaboration Conference in Dublin today.
Archives For 30 November 1999

At Schuberg Philis, we manage quite a farm of XenServer clusters. As the number of clusters we operate goes up, so goes the time it takes to manage them all. And, let’s be honest: patching and upgrading isn’t the most exciting work. We needed more automation and I took the challenge 😉
The challenge
Patching itself is not a challenge, as we automated that already using Chef. The challenge comes when maintenance tasks require a hypervisor reboot in order to take effect. In such cases, some magic is needed to keep all VMs running, because we aim for zero down time due to maintenance. This blog describes how I automated rebooting full XenServer clusters while all VMs keep running.
N+1 concept
Our clusters are designed based on N+1, which means that if we have a cluster of 6 XenServer hypervisors, we use ~83% (5/6) of its capacity. In this case, when one hypervisor crashes, we have still room for the VMs on the crashed hypervisor, to start again on one of the remaining hosts.
When executing maintenance on our hypervisors, we also use this concep. In this case, we make one hypervisor empty by live migrating all its VMs to the other hypervisors. Now, without any VMs left on it, we can easily patch or upgrade that hypervisor without impact.
Goal
The goal that I had in mind was that I wanted to be able to run a one-liner to automatically reboot a XenServer cluster. Based on the N+1 principle above, that should be possible. The image below shows the process:
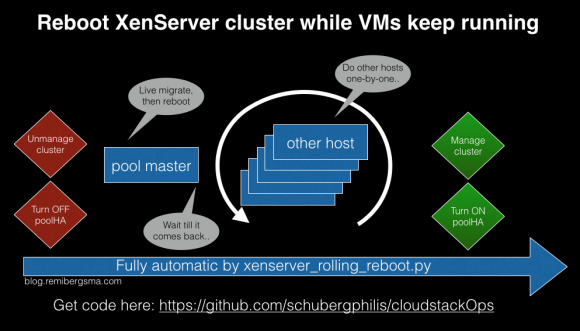
This is what happens:
- Set the specified cluster to unmanage in CloudStack
- Turn OFF XenServer poolHA for the specified cluster
- For any hypervisor it will do this (poolmaster first):
- put it to Disabled aka Maintenance in XenServer
- live migrate all VMs off of it using XenServer evacuate command
- when empty, it will reboot the hypervisor
- will wait for it to come back online (checks SSH connection)
- set the hypervisor to Enabled in XenServer
- continues to the next hypervisor
- When the rebooting is done, it enables XenServer poolHA again for the specified cluster
- Finally, it sets the specified cluster to Managed again in CloudStack
- CloudStack will update its admin according to the new situation Then the reboot cyclus for the specified cluster is done!
About CloudStack and XenServer
Since XenServer has the concept of a pool (you could call it a cluster) and one of the hosts is the pool master (it distributes the work to the other cluster members), it is important to know that we need to start with the pool master.
If you want to be sure CloudStack is not touching the cluster while you are performing maintenance, you can put it to an ‘Unmanaged state‘. In the old days we had to do this to prevent CloudStack from electing a new pool master while the previous one was rebooting. As it now relies on XenHA to handle electing a new pool master, I think it’s not needed per se. I just kept it in the scripts to be sure.
 CloudStackOps
The script I wrote for this is called ‘xenserver_rolling_reboot.py‘ and is part of the CloudStackOps Toolbox. If you haven’t heard of it before, please check this video of a recent talk I did.
You can get the code from Github.
The one-liner
Now the fun part! All I have to do to reboot a XenServer cluster that is called ‘CLUSTER-1‘ is this:
./xenserver_rolling_reboot.py --clustername CLUSTER-1
To be sure, you need to specify –exec to make it actually do something.
./xenserver_rolling_reboot.py --clustername CLUSTER-1 --exec
Demo time 🙂
I recorded a screencast that demonstrates how it works. Check this video:
As we saw, the script live migrates all VMs off of the pool master, then reboots it. After that, it does the same with all the other hosts. One-by-one. Until they are all rebooted. All VMs stay online during the maintenance.
About live migrations
You would think that it’d be easiest to have CloudStack do the live migrations, and I thought that too. The problem is, that CloudStack live migrates the VMs to a random hypervisor in the same cluster. It depends a bit on the deployment planner but I found little difference in this case. Why is that a problem? Well, you could end up ‘pushing VMs forward’ all the time. I want to live migrate a VM as less times as possible. This makes the whole process a lot faster. Let’s have a look on how the live migrations should work in my opinion:
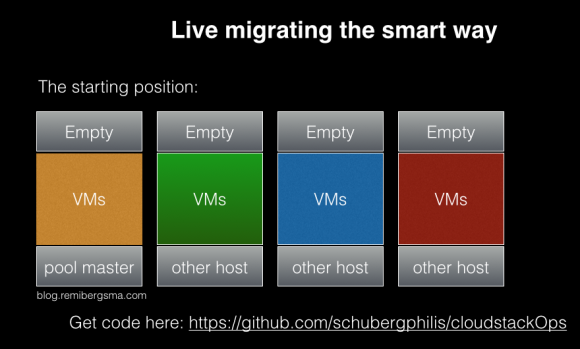
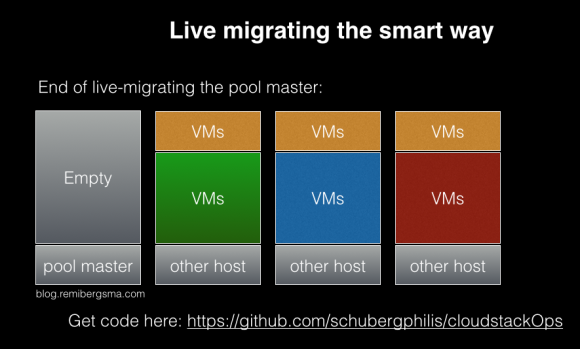
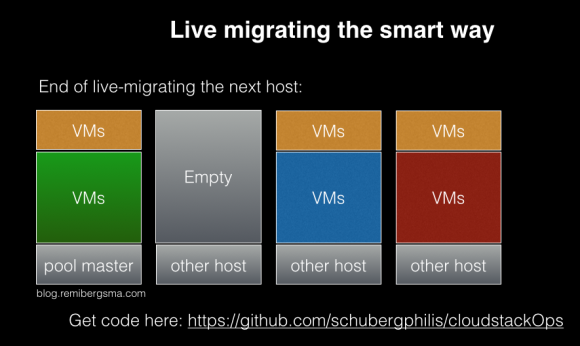
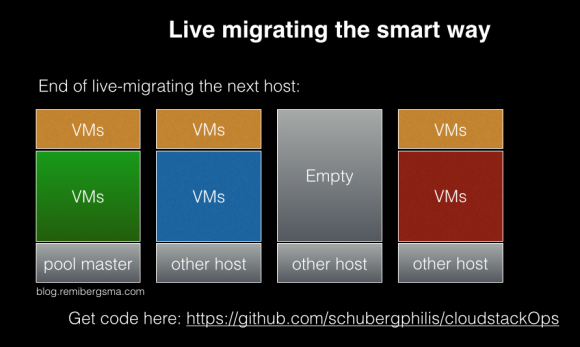
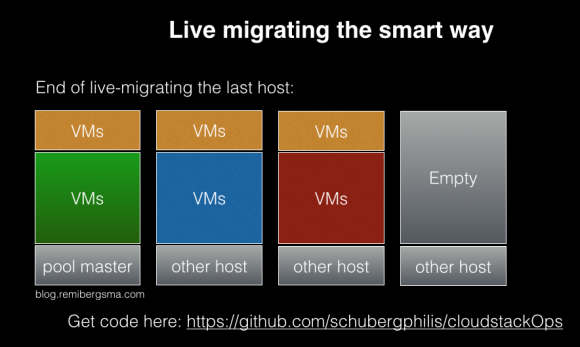
Conclusion: VMs on the pool master will be live migrated twice. All others only once. Optionally we could rebalance the cluster, causing more live migrations. For now, I kept it to the minimum as I’m OK with some hosts being almost empty.
In order to control the live migrations shown in the images above, I decided to talk to Xapi directly instead of to CloudStack.
Speeding up live-migrations
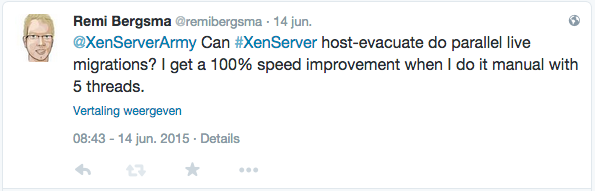
Unfortunately the whole process was quite slow when I first tested it. The first idea was to use ‘xe host-evacuate‘ but this script can only do one live migration at a time. I asked some XenServer folks about it. Conclusion is that it cannot be done at this time.
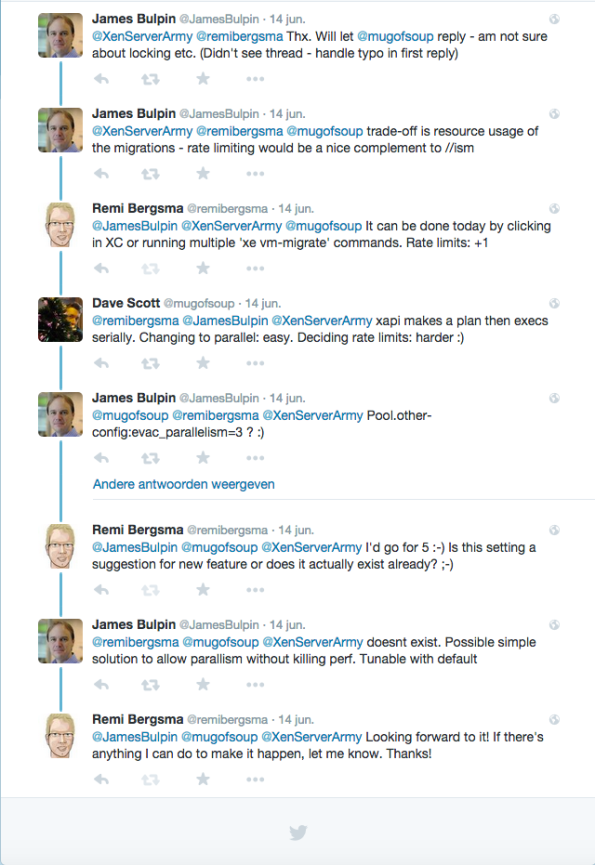
Well, that means I’d to come up with something of my own to speed up the live migrations. To prove it would be possible to migrate faster, we used XenCenter and clicked around. We could easily do 5-10 threads and it was a lot faster. But who wants to click these days? Not me.
After some searches on Google I came up with a very simple solution: use the -P flag of xargs. I wrote a small script that looks up the VMs running on the hypervisor you run the script and it will then calculate a migration plan according to what we discussed above. Then, I’d have a list of ‘xe vm-migrate‘ commands that I run in parallel using xargs. Very simple, very effective.
By using 5 threads, I got twice the speed so that saved a lot of waiting time. I also tried more threads, but it didn’t go any faster. The ‘xenserver_rolling_reboot.py‘ script has a –threads flag, so feel free to play with it. It defaults to 5 threads.
Verified on Production
My team uses this script to do automated patching and rebooting. For the patching itself we use Chef, but that’s the easy part. Rebooting the clusters is what takes time. Now that it is automated, we only have to keep an eye on it. We used it in production to reboot hundreds of XenServer hypervisors without issues.
Conclusion
Automation is key in today’s cloudy environments. This blog shows how I automated the regular maintenance of our XenServer farm. Patching and rebooting is now easy!
 XenServer and Apache CloudStack work nicely together and form an easy-to-go couple for many companies. However, not many people know that recent releases changed the cooperation between the two drastically.
I’m not only talking about the shiny new Apache CloudStack 4.5 release, but the change was back ported to recent releases of 4.3.x and 4.4.x as well. This means that if you run XenServer and CloudStack, you need the review the information below carefully.
 I can understand why almost nobody knows, because this was not well discussed and did not end up in the release notes nor documentation either. I talked to many people about this at meetups and thought it’d be useful to write some of it in a blog. I tested it on both versions 6.2 and 6.5.
What did change?
XenServer works with the concept of a pool-master that coordinates a lot of stuff in the cluster. CloudStack sends its instructions to the pool-master. What did change? CloudStack used to elect a new XenServer pool-master in the event of a failing pool-master. In the new behaviour CloudStack does nothing and relies on the XenServer poolHA feature to be enabled. XenServer itself now elects a new pool-master.
Why is this a problem?
First of all, if you don’t know and upgrade CloudStack, you will not recover automatically anymore from a pool-master failure. This will most likely cause you to have some stress while you work to getting a failed pool-master back up and running. It doesn’t recover automatically anymore, because CloudStack now relies on XenServer to handle this event, but by default this feature is not enabled. No pool-master means no changes are being made (no VMs start, etc).
Why was this changed?
If you ask me, this is a tricky one. The reason for doing it, was sent to the cloudstack-dev list. The mail points to issues CLOUDSTACK-6177 and CLOUDSTACK-5923 but there’s only a vague description there:
“When XS master is down, CS uses pool-emergency-transition-to-master and pool-recover-slaves API to choose a new master, this API is not safe, and should be only used in emergent situation, this API may cause XS use a little bit old (5 minutes old) version of XS DB, some of object may be missing in the old XS DB, which may cause weird behaviour, you may not be able to start VM.”
In other words, there is a small corner-case in which something not specified can go wrong that might prevent starting VMs. Well, if you upgrade CloudStack and do not turn ON the poolHA feature, guess what? You have a 100% change that no VM will start on the whole cluster. Doesn’t make sense to me. At all.
Another thing that bugs me is that there were no replies on the dev-list and that it was silently merged without proper discussion and documentation. I sent an e-mail about it to the cloudstack-dev list, but not too many people seem to care. On the other hand, I do get some questions about it from time to time.
How did we find out?
We had an outage and needed to recover manually, after which we started looking for the Root Cause of this. If you look at the code and the commit messages, you find this changed behaviour that relies on ‘XS HA’ aka XenServer poolHA. This is the commit; it clearly removes the PoolEmergencyTransitionToMaster function that used to elect a new pool-master.
A tricky change
Turning on XenServer poolHA seems easy, but there are pitfalls that can have drastic consequences. Let’s start with the basics. To turn it on, use the ‘xe pool-ha-enable‘ command. You need a Storage Repository that is shared to write heartbeats to. In our case, we already used NFS, so we reused that. If you have no shared SR, be sure to create one.
The XenServer documentation (PDF) says:
“Verify that you have a compatible Storage Repository (SR) attached to your pool. iSCSI, NFS or Fibre Channel are compatible SR types” … “Enable HA on the pool: xe pool-ha-enable heartbeat-sr-uuids=“
So I came up with this:
NFSUUID=$(xe sr-list type=nfs params=uuid --minimal)
xe pool-ha-enable heartbeat-sr-uuids=$NFSUUID
The biggest pitfall is that you need to specify the timeout, or else it will use a 30 second default. You’re right, the Citrix manual (linked above) does not tell you this. This caused another outage, this time we lost a whole cluster. Trust me, it was no fun. Fortunately we had application redundancy over multiple clusters. Anyway, my advise: always specify the timeout.
A 30 second timeout means that when your storage or network is unavailable for 30 seconds, all hosts in the cluster will be fenced and reboot. No VM will keep running on that cluster. We use 180 seconds because that is more or less what the ring buffers can hold in our case. Enable HA like this:
NFSUUID=$(xe sr-list type=nfs params=uuid --minimal)
xe pool-ha-enable heartbeat-sr-uuids=$NFSUUID ha-config:timeout=180
If you did enable it already, first disable it:
xe pool-ha-disable
To check if HA is enabled, run:
xe pool-list params=all | grep -E "ha-enabled|ha-config"
Output looks like this:
 ha-enabled ( RO): true
 ha-configuration ( RO): timeout: 180
To see all HA properties:
xe pool-list params=all | grep ha-
 ha-enabled ( RO): true
 ha-configuration ( RO): timeout: 180
 ha-statefiles ( RO): e57b08d0-aada-4159-c83d-3adea565d22e
 ha-host-failures-to-tolerate ( RW): 1
 ha-plan-exists-for ( RO): 1
 ha-allow-overcommit ( RW): true
 ha-overcommitted ( RO): false
The first three show HA being on, a timeout of 180 seconds and the heartbeats will be written to the storage repository (SR) with uuid e57b08d0-aada-4159-c83d-3adea565d22e.
The setting ‘ha-host-failures-to-tolerate‘ is automatically calculated by XenServer. In our case, it is not important as we do not protect any VMs, we just use the poolHA feature. You can leave this default.
I asked XenServer community manager Tim Mackey about overcommitting when I met him at the CloudStack Day in Austin, TX. He said:
“Setting ha-allow-overcommit to true indicates that XenServer should calculate its HA plan using optimistic placement. Since the point of enabling HA for CloudStack is to handle host failures, but that CloudStack handles all VM level HA, no VMs will actually be protected by XenServer HA. The net result is the value for ha-allow-overcommit shouldn’t matter for CloudStack.”
You need at least three nodes!
Your XenServer pool needs to be at least three XenServers or else the HA feature will not work as expected. Why? Because the poolHA tries to detect isolation. If it cannot see any other host, it assumes it is isolated and self-fences. So, if you have two XenServers and one crashes, the other one becomes isolated and will self-fence. Both are now down, and the bad news is: they will keep fencing because they never are up at the same time. So, they keep thinking they have become isolated from the pool. Nice for a lab, but don’t do this in production.
About Self-Fencing
To prevent corruption, XenServer poolHA fill fence itself if it cannot reach the Storage Repository any more where it is supposed to write its heartbeat. You may find messages like this in the logs:

Warning: Do not protect the VMs
XenServer should only take care of the pool-master failover and the fencing not about restarting VMs as this is CloudStack’s job. The documentation of XenServer instructs you to do it, but just don’t if you use CloudStack. Otherwise both CloudStack and XenServer will try to recover VMs and it will become messy eventually leading to corrupted VMs.
To check HA on VMs is off, run this command:
xe vm-param-get uuid=<UUID> param-name=ha-restart-priority
It should return an empty result. If it does not, make sure to use ‘xe vm-param-set‘ to set it empty.
Warning: Licensing considerations
Before XenServer 6.2, HA was a paid feature. Users of 6.0.2 or 6.1 need a license for this to work. The bad news: if you use a modern CloudStack version, you will need to manually elect a new pool-master.
Warning: PoolHA blocks certain operations
Many operations related to XenServer and CloudStack have changed because they are not allowed when poolHA is enabled.
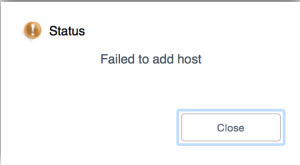
For example, adding a new XenServer to CloudStack has to be done in a different way as well. If you just add it, you’ll get a message like this in the UI:
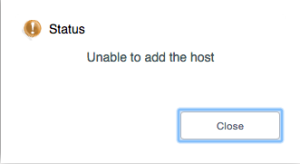
The API does the same:
Error 530: Unable to add the host
Looking at the logs of the management server shows why:
2015-05-23 08:59:03,064 WARN [c.c.h.x.d.XcpServerDiscoverer] (180595423@qtp-818975168-33:ctx-7c741014 ctx-79b8e039) Please join the host 192.168.22.13 to XS pool f4d78d74-1985-d8d7-f1c4-f7b2b5c213b6 through XC/XS before adding it through CS UI
Ah, you need to add it to the XenServer pool first. In other words, when building a new cluster: first you need to make a complete XenServer pool, then add one of them to CloudStack that will discover the others and add them in one go.
When you add an extra XenServer to an existing cluster, be sure to add it to XenServer first and then to CloudStack. Start with disabling poolHA, do your thing and enable poolHA again. if you add more than one new XenServer, adding one to CloudStack will discover them all.
Another example. You can no longer remove the pool-master from CloudStack. You first need to go to the XenServer and designate a new pool-master. That also sounds simple, but it is not allowed when poolHA is enabled. So, you have to:
- disable poolHA
- elect a new pool-master
- remove the XenServer from the pool
- remove the host from CloudStack
- and finally turn on polHA again
Poehee. Same goes for patching, as you change the pool-master as well.
In short: Enabling poolHA brings challenges when automating these operations, as we now need to talk both to CloudStack and XenServer.
Known issue: CloudStack reports Alert state
When one of the XenServer nodes crashes for some reason, be it hardware or else, it sometimes is put into “maintenance mode”. Not in CloudStack, but in the pool itself. CloudStack will report an Alert state and refuse to work with it. You need to manually enable the host again using the ‘xe host-enable‘ command. CloudStack will then automatically enable it again and start using it.
How to go from here?
To be honest I don’t like the “two captain” approach. In my opinion CloudStack is the orchestrator and needs to be in control. Any hypervisor should be dumb and do what the orchestrator (in this case CloudStack) tells it to do. Period. Like how KVM works, I love the simplicity.
I’m investigating if we can get the best of both worlds by detecting whether HA is turned ON (one-liner shown above) and implement a behaviour based on that. If HA is turned OM, do what 4.4+ does today. If it’s turned OFF, do the old behaviour. This essentially makes it possible to choose between the options and I’m quite sure I’ll disable HA again. It is also backwards compatible for those relying on this feature now.
Another thing to improve is the documentation. As a start, I‘ve sent a first pull-request to update it.
Conclusion
If you run XenServer and CloudStack, you may want to enable poolHA on XenServer or else you will have to manually elect a new pool-master in the event of a crash. Be sure to configure it properly and remember that poolHA when enabled brings in extra steps to certain operations. I hope this blogs helps people achieving nice uptimes and easy maintenance.
Update (June 1st):
Things started rolling and Citrix updated their XenServer documentation to include the HA timeout settings. Nice!

At work we’re creating a CloudStack development environment that can be created and destroyed as we go. One of the requirements is to quickly create a couple of hypervisors to run some tests. KVM is easy: they are just Linux boxes with some extra packages. XenServer is a different story.
Imagine you create a XenServer by installing it from ISO, then saving it as a template. Then create two instances from it called xen1 and xen2. If you try to add them to CloudStack, you’ll notice only the first one succeeds.
The logs tell you why it did not work:
Skipping xen2 because 7af82904-8924-49fa-b0bc-49f8dbff8d44 is already in the database.
Hmm.. so would both have the same UUID? Let’s see. To get the UUID of a XenServer, simply run this:
xe host-list
The output of both my XenServers is below:
[root@xen1 ~]# xe host-list
uuid ( RO) : 7af82904-8924-49fa-b0bc-49f8dbff8d44
 name-label ( RW): xen1
 name-description ( RW): Default install of XenServer
[root@xen2 ~]# xe host-list
uuid ( RO) : 7af82904-8924-49fa-b0bc-49f8dbff8d44
 name-label ( RW): xen2
 name-description ( RW): Default install of XenServer
CloudStack is now confused and wants them to have a unique UUID, which makes sense.
It was quite a puzzle to come up with an automatic process. A couple of colleagues of mine all contributed a part and we finally came up with something that works on both XenServer 6.2 and 6.5.
First, you need to generate new UUIDs in ‘/etc/xensource-inventory’ for both the XenServer and the dom0. Do this after you’ve stopped the Xapi process. You should also wipe the state.db of Xapi.
An important part consists of running ‘/opt/xensource/libexec/create_templates‘ and then reset the network, after which the XenServer reboots.
To make it easy for others, we’ve published the script on Github.
It should be run as a ‘first boot’ script. It needs two reboots to fully complete the procedure, and it does this automatically.
When you look at the UUIDs again after running the script:
[root@xen1 ~]# xe host-list
uuid ( RO) : ae2eeb9b-ed7e-4c3c-a619-376f8a632815
 name-label ( RW): xen1
 name-description ( RW): Default install of XenServer
[root@xen2 ~]# xe host-list
uuid ( RO) : 50adc2d0-8420-425c-a1c8-68621bd68931
 name-label ( RW): xen2
 name-description ( RW): Default install of XenServer
They’re unique now! Adding them works fine… but hey, they have the same name in CloudStack? This is due to the name-label that also needs to be set to the new hostname.
xe host-param-set uuid=\$(xe host-list params=uuid|awk {'print \$5'} | head -n 1) \
name-label=\$HOSTNAME
Just use our script and you’ll be fine!
Update:
Rohit from ShapeBlue, a fellow engineer working on CloudStack, almost immediately responded to my blog:
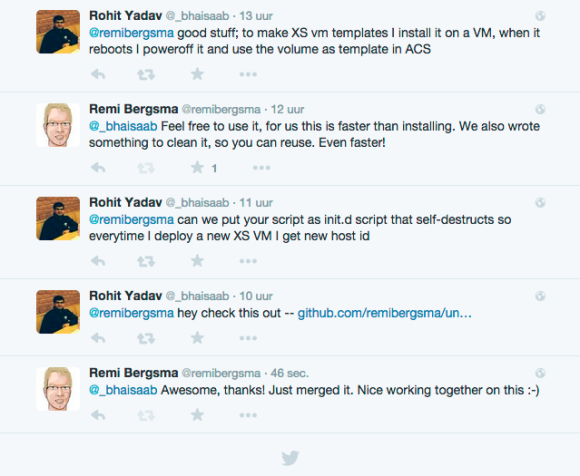
He sent me a pull request that turns the script into an init-script for use in XenServer. That makes it even easier for others to use it. He also updated the documentation:
To use this in a VM template for testing XenServer hosts in VMs:

scp xenserver_make_unique.sh root@xenserver-host-ip:/opt/
scp init.d/xenserver_make_unique root@xenserver-host-ip:/etc/init.d/
ssh root@xenserver-host-ip "chmod +x /etc/init.d/xenserver_make_unique && chkconfig xenserver_make_unique on"

When the XenServer host starts for the first time, it would reset the host uuid by running the script from /opt/xenserver_make_unique.sh, then remove the init.d script and reboot the host.
You only need to do this once in your template, and all XenServers you will create from it will be unique. Enjoy!
 Our XenServer hypervisors use Nicira/NSX for Software Defined Networking (orchestrated by CloudStack).
We had to migrate from one controller to another and that could easily be done by changing the Open vSwitch configuration on the hypervisors, like this:
ovs-vsctl set-manager ssl:10.18.59.84:6632
It will then get a list of all nodes and use those to communicate.
Although this works, I found that when rebooting the hypervisor it would revert to the old setting. Also, when a pool master fail-over happened, Xapi ran a xe toolstack-restart and that caused the whole cluster to revert to the old setting. Oops.
Changing it in Xapi was the solution:
xe pool-set-vswitch-controller address=10.18.59.84
Now the change is persistent 🙂

