Data security is getting more and more important these days. Imaging you work as a sysadmin, on a laptop, and it gets lost. Of course you might lose your work (but you have a backup, right?). The real problem: your sensible data (SSH private key for example) is no longer under your control.
In this blog I explain how you can add an encrypted partition to Linux. As long as you also use a password protected screensaver, with a decent password (to protect a running, logged in laptop), no one can access your data. Even rebooting into single user mode (to by-pass the login screen) won’t help. No access to the encrypted disk without a working passphrase. Wiping your disk and reinstall is an option, but your data is not unveiled.
LUKS: Linux Unified Key Setup
Linux ships with LUKS, that is short for ‘Linux Unified Key Setup’. It’s a tool and technique to setup encrypted devices. This device can be a laptop harddisk, but also a USB-pendrive or a virtual disk (when you have a virtualized server). Encryption with LUKS works on the block level, so filesystems above it are not even aware. This is nice, because it also means you can use LVM inside a LUKS encrypted block device. The encrypted drive is protected with a passphrase that you need to enter at boot.
Below I’ll show you how to set it up. Be aware we are formatting partitions. In other words, you will lose all data on the partition you will experiment with. For testing purposes, use a USB-pendrive or a spare partition. I’m using a virtual disk called /dev/sdc for this demo.
Note: you need the kernel module dm_crypt loaded for this to work.
modprobe dm_crypt
Don’t forget to make it persistent after a reboot.
To format the partition:
cryptsetup luksFormat /dev/sdc
Output:
WARNING!
========
This will overwrite data on /dev/sdc irrevocably.

Are you sure? (Type uppercase yes): YES
Enter LUKS passphrase:
Verify passphrase:
Now that the encrypted disk is created, we’ll open it:
cryptsetup luksOpen /dev/sdc encrypted_disk
Output:
Enter passphrase for /dev/sdc:
To unlock the disk, you need to enter the passphrase you just set. You need to do this every time you want to unlock the disk.
The ‘encrypted_disk‘ part of the command above, is used to map a device name to your encrypted disk. In this case: ‘/dev/mapper/encrypted_disk’ is created. So, the encrypted disk called ‘/dev/sdc’ now has an extra name to refer to its unlocked state called ‘/dev/mapper/encrypted_disk’. This device is also a block device, on which you could run ‘fdisk’ or ‘mkfs.ext4’, etc.
But stop, before you do that. When you’d like to use multiple partitions, I’d suggest using LVM inside the encrypted disk. This isn’t visible from outside; only when you’ve unlocked it the LVM partitions appear. It prevents from entering a password for each and every encrypted disk you create. Also, LVM is more flexible in resizing its logical volumes.
Let me show you how to setup LVM on the encrypted disk:
pvcreate /dev/mapper/encrypted_disk
Output:
Physical volume "/dev/mapper/encrypted_disk" successfully created
vgcreate encrypted /dev/mapper/encrypted_disk
Output:
Volume group "encrypted" successfully created
lvcreate encrypted --name disk1 --size 10G
Output:
Logical volume "disk1" created
lvcreate encrypted --name disk2 --size 10G
Output:
Logical volume "disk2" created
You now have two more block devices called ‘/dev/encrypted/disk1’ and ‘/dev/encrypted/disk2’. Let’s put a file system on top of them:
mkfs.ext4 -m0 /dev/encrypted/disk1
mkfs.ext4 -m0 /dev/encrypted/disk2
The two encrypted partitions are now ready to be used. Let’s mount them somewhere:
mkdir -p /mnt/disk1 /mnt/disk2
mount /dev/encrypted/disk1 /mnt/disk1
mount /dev/encrypted/disk2 /mnt/disk2
This works all pretty cool already. But when you reboot, you’ll have to run:
cryptsetup luksOpen /dev/sdc encrypted_disk
vgscan
lvchange --activate y encrypted/disk1
lvchange --activate y encrypted/disk2
mount /dev/encrypted/disk1 /mnt/disk1
mount /dev/encrypted/disk2 /mnt/disk2
Entering the passphrase is required after the first command. Line 2 scans for new LVM devices (because when unlocking the encrypted device, a new block device appears). Line 3 and 4 activate the two logical volumes, and finally they are mounted.
Automating these steps
It is possible to automate this. That is, Linux will then ask for the passphrase at boot time and mount everything for you. Just think about that for a while. When booting a laptop this is probably what you want. But if it is a server in a remote location, it might not, as you need to enter it on the (virtual) console for it to continue booting. No SSH access at that time.
Anyway, you need to do two things. First is to tell Linux to unlock the encrypted device at boot time. Second is to mount the logical volumes.
To start, lookup the UUID of the encrypted disk, /dev/sdc:
cryptsetup luksDump /dev/sdc | grep UUID
The result should be something like:
UUID: b8f60c1d-ffeb-4aaf-8368-9e5d4d29fc52
Open /etc/crypttab and enter this line:
encrypted_disk UUID=b8f60c1d-ffeb-4aaf-8368-9e5d4c29fc52 none
The first field is the name of the device that is created, use the same as when using luksOpen above. The second field is the UUID we just found. The final field is the password, but this should be set to ‘none‘ as this prompts for the passphrase. Entering the passphrase in this file is a bad idea, if you ask me.
Final step is to setup /etc/fstab to mount the encrypted disks automatically. Add these lines:
/dev/encrypted/disk1 /mnt/disk1 ext4 defaults 0 0
/dev/encrypted/disk2 /mnt/disk2 ext4 defaults 0 0
I’m using device names here, because LVM gives me the /dev/encrypted/disk[12] name every time. When you did not use LVM, it’s probably wise to use UUID’s in /etc/fstab instead. This makes sure the right filesystem is mounted, regardless of the device’s name.
Time to reboot. During this reboot, Linux will ask for the passphrase of the /dev/sdc device. On RHEL 6 it looks like:
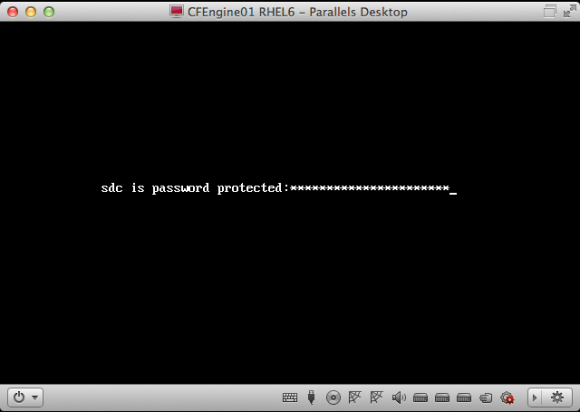
RHEL 6 asks for the LUKS passphrase of /dev/sdc during boot
It might look different on your OS. The Ubuntu version looks a bit prettier, for example.
Enter the passphrase, hit enter, and Linux should continue booting normally. Then login to the console (or SSH) and verify if the two disks are mounted.
...
/dev/mapper/encrypted-disk1 on /mnt/disk1 type ext4 (rw)
/dev/mapper/encrypted-disk2 on /mnt/disk2 type ext4 (rw)
...
Ubuntu makes this very easy to setup: they just have a checkbox during install that says ‘encrypt disk’ and will setup LUKS. But, you end up with everything in one big / partition without LVM. That’s why I prefer to configure it myself, and with these instructions so can you.
Conclusion
It is cool that these security features are now mainstream and easy to use. Do yourself a favor, and setup LUKS today!


 OpenVPN is great, it allows for easy access in a secure way. But how do you keep it secure? I mean, what if someone leaves your company? Do you disable access to the OpenVPN server? You should! In this blog I’ll show you how to do it.
