Archives For 30 November 1999

I’m currently finalizing the CFEngine 3 setup at my $current_work because by the end of the month I will start a new job. In a little over a year, I fully automated the Linux sysadmin team. From now on, only 2 sysadmins are needed to keep everything running. Since almost everything is automated using CFEngine 3, it’s very important that CFEngine is running at all times so it can keep an eye on the systems and thus prevent problems from happening.

I’ve developed an init script, that makes sure CFEngine is installed and bootstrapped to the production CFEngine policy server. This init script is added in the post-install phase of the automatic installation. This gets everything started and from there on CFEngine kicks in and takes control. That same init script is also maintained with CFEngine. This is done so it cannot easily be removed or disabled.

Also, when CFEngine is not running (anymore) it should be restarted. A cron job is setup to do this. This cron job is also setup using CFEngine. It is using regular cron on the OS, of course. If all else fails, this cron job can also install CFEngine in the event it might be removed. Last thing it does, is automatically recover from ‘SIGPIPE’ bug we sometimes encounter on SLES 11.

To summarize:
– an init script (runs every boot) makes sure CFEngine is installed and bootstrapped
– a hourly cron job makes sure the CFEngine daemons are actually running
– CFEngine itself ensures both the cron job and init script are properly configured

This makes it a bit harder to (accidentally) remove CFEngine, don’t you think?!

Reporting servers that do not talk to the Policy server anymore
Now, imagine someone figures a way to disable CFEngine anyway. How would we know? The CFEngine Policy server can report this using a promise. It reports it via syslog, so it will show up in Logstash. The bundle looks like this:

bundle agent notseenreport
{
        classes:
                "display_report" expression => "Hr08.Min00_05";

        vars:
                # Default to empty list
                "myhosts" slist => { };

                display_report::
                        "myhosts" slist => { hostsseen("24","notseen","name") };

        reports:
                "CFHub-Production: Did not talk to $(myhosts) for over 24 hours now";
}

We’ve set this up on both Production and Pre-Production Policy servers.

How to temporary disable CFEngine?
On the other side, sometimes you want to temporary disable CFEngine. For example to debug an issue on a test server. After a discussion in our team, we came up with an easy solution: when a so-called ‘Do Not Run‘ file exists on a server, we should instruct CFEngine to do nothing. We use the file ‘/etc/CFEngine_donotrun‘ for this, so you’d need ‘root‘ privileges or equal to use it.

In ‘promise.cf‘ a class is set when the file is found:

"donotrun" expression => fileexists("/etc/CFEngine_donotrun");

For our setup we’re using a method detailed in ‘A CFEngine Case Study‘. We added the new class:

!donotrun::
        "sequence"  slist => getindices("bundles");
        "inputs" slist => getvalues("bundles");

donotrun::
        "sequence"  slist => {};
        "inputs" slist => {};

reports:
   donotrun::
        "The 'DoNotRun' file was found at /etc/CFEngine_donotrun, exiting.";

In other words, when the ‘Do Not Run‘ file is found, this is reported to syslog and no bundles are included for execution: CFEngine then does effectively nothing.

An overview of servers that have a ‘Do Not Run‘ file appears in our Logstash dashboard. This makes them visible and we look into then on a regular basis. It’s good practice to put the reason why in the ‘Do Not Run‘ file, so you know why it was disabled and when. Of course, this should only be used for a small period of time.

Making sure CFEngine runs at all times makes your setup more robust, because CFEngine fixes a lot of common problems that might occur. On the other hand, having an easy way to temporary disable CFEngine also prevents all kind of hacks to ‘get rid of it’ while debugging stuff (and then forgetting to turn it back on). I’ve found this approach to work pretty good.

Update:
After publishing this post, I got some nice feedback. Both Nick Anderson (in the comments) and Brian Bennett (via twitter) pointed me into the direction of CFEngine’s so called ‘abortclasses‘ feature. The documentation can be found on the CFEngine site. To implement it, you need to add the following to a ‘body agent control‘ statement. There’s one defined in ‘cf_agent.cf‘, so you could simply add:

abortclasses => { "donotrun" };

Another nice thing to note, is that others have also implemented similar solutions. Mitch Lewandowski told me via twitter he uses a filed simply called ‘/nocf‘ for this purpose and Nick Anderson (in the comments) came up with an even funnier name: ‘/COWBOY‘.

Thanks for all the nice feedback! 🙂

Now that I’m using CFEngine for some time, I’m exploring more and more possibilities. CFEngine is in fact a replacement of a big part of our Zenoss monitoring system. Since CFEngine does not only notice problems, but usually also fixes them, this makes perfect sense.

Recently I created a promise that monitors the disk space on our servers. Since we use Logstash to monitor our logs, all CFEngine needs to do is log a warning and our team will have a look. I will write about Logstash another time 😉

To monitor disk space, I use two bundles: one that is included from ‘promises.cf’ and a second one that is called from the first one.

The ‘diskspace’ bundle looks like this:

bundle agent diskspace
{
        vars:
                "disks[root][filesystem]"         string => "/";
                "disks[root][minfree]"            string => "500M";
                "disks[root][handle]"             string => "system_root_fs_check";
                "disks[root][comment]"            string => "/ filesystem check";
                "disks[root][class]"              string => "system_root_full";
                "disks[root][expire]"             string => "60";

                "disks[var][filesystem]"          string => "/var";
                "disks[var][minfree]"             string => "500M";
                "disks[var][handle]"              string => "var_fs_check";
                "disks[var][comment]"             string => "/var filesystem check";
                "disks[var][class]"               string => "var_full";
                "disks[var][expire]"              string => "60";

 		apache_webserver::
	                "disks[webdata][filesystem]"          string => "/webdata";
	                "disks[webdata][minfree]"             string => "1G";
	                "disks[webdata][handle]"              string => "webdata_fs_check";
	                "disks[webdata][comment]"             string => "/webdata filesystem check";
	                "disks[webdata][class]"               string => "webdata_full";
	                "disks[webdata][expire]"              string => "60";

		someserver01::
	                "disks[tmp][filesystem]"          string => "/tmp";
	                "disks[tmp][minfree]"             string => "1G";
	                "disks[tmp][handle]"              string => "tmp_fs_check";
	                "disks[tmp][comment]"             string => "/tmp filesystem check";
	                "disks[tmp][class]"               string => "tmp_full";
	                "disks[tmp][expire]"              string => "30";

        methods:
                "disks"                           usebundle => checkdisk("diskspace.disks");

}

All it does is define the configuration, depending on the classes that are set. Some are disks monitored on all servers (like ‘/’ and ‘/var’ in this example) and some are monitored only when the specified class is set (like ‘apache_webserver’ and ‘someserver01’). These are classes I defined in ‘promises.cf’ based on several custom criteria.

The ‘checkdisk’ bundle does the real job:

bundle agent checkdisk(d) {
        vars:
                "disk"  slist => getindices("$(d)");

        storage:
                "$($(d)[$(disk)][filesystem])"
                        handle => "$($(d)[$(disk)][handle])",
                        comment => "$($(d)[$(disk)][comment])",
                        action => if_elapsed("$($(d)[$(disk)][expire])"),
                        classes => if_notkept("$($(d)[$(disk)][class])"),
                        volume => min_free_space("$($(d)[$(disk)][minfree])");
}

Although this may look cryptic, it is a nice and abstract way to organize the promise. This is ‘implicit’ looping in action: if the ‘disk’ variable contains more than one item, CFEngine will automatically process the code for each item. In this case, this means a promise is created for all the disks specified.

If you prefer a percentage, instead of fixed free size, you could use ‘freespace’ instead of ‘min_free_space’ in the ‘checkdisk’ bundle.

When a disk is below threshold, this log message is written:

2013-11-01T17:35:42+0100    error: /diskspace/methods/'disks'/checkdisk/storage/'$($(d)[$(disk)][filesystem])': Disk space under 2097152 kB for volume containing '/' (802480 kB free)
2013-11-01T17:35:42+0100    error: /diskspace/methods/'disks'/checkdisk/storage/'$($(d)[$(disk)][filesystem])': Disk space under 2097152 kB for volume containing '/tmp' (1887956 kB free)

Apart from reporting, you could even instruct CFEngine to clean up certain files when disk space becomes low or to run a script. You would then use the specified ‘class’ that is set when the disk has low free disk space (‘tmp_full’ for example). Anything is possible!

Back in June, just before I went off for holiday, I attended a CFEngine training in Amsterdam. When I returned from holiday a few weeks later, me and my team started making plans to implement CFEngine in our environment. After two months of hard work, I’m proud to say we manage about 350 out of our 400 Linux servers with CFEngine!

The ride has been fun, although not always easy. In this post I’ll give a quick overview of our CFEngine implementation, where I found useful info, etc.

CFEngine is different
To start, let me tell you that one of the most difficult parts of learning CFEngine is to get used to the terminology and to ‘think’ CFEngine. For example, a ‘class’ in CFEngine is not what you think it is. It has nothing to do with object oriented programming. It’s more like a ‘context’ that you can use to make decisions. There’s no ‘flow control’ in CFEngine either: no IF/THEN/ELSE, no FOR/FOREACH/WHILE etcetera. In CFEngine classes are used for decision making, and, since CFEngine is smart, it does looping automatically. This results in clean and easy-to-read code.

CFEngine works on top of a theoretical model called ‘Promise Theory‘ by Mark Burgess (author of CFEngine). This theory models the behavior of autonomous agents in an environment without central authority, based on only promises of behavior made by each agent, and shows that even without central control , the system can converge to a stable state.

To get used to it, read ‘Learning CFEngine 3‘ by Diego Zamboni, as it will walk you through all of it with a lot of examples. The quote above is also from the book.

The basic idea is that each agent makes promises only about its own behavior, since that is all it can control. In CFEngine 3, everything is a promise.

Examples:
– a file promises to have a certain content and to be executable
– a service promises to be running
– a user account promises to exist (or not to exist) and have certain properties

When CFEngine finds a promise is not kept, it will do everything it knows about to make the promise true. If it cannot reach the promised state at first, it tries to the next best. Over time, the system converges to the desired (promised) state.

Once you get it and get used to it, it actually makes sense and is pretty easy to implement.

With great power comes great responsibility
This one-liner says it all. When you have a configuration management system that manages a lot of servers, you better be careful what promises you have it keep. This is why you need to manage CFEngine promises like software. You need version control and it needs to be flexible as well. I’ve read a lot about this subject and I believe Git is the way to go. This blog by Brian Bennett pretty much nails it. I got a lot of inspiration from it, thanks Brian!

I implemented these ‘branches’ in Git:
– development (aka master)
– beta
– pre-production
– production

This works perfectly: develop new promises in the ‘development’ branch, then merge to ‘beta’ branch to test on some of our own test servers. When everything works together and seems stable, we merge to the next branch ‘pre-production’. This is then tested on ~15 real production servers so it better be good. But when it isn’t, the impact is still not too high and it should be fixed before it ever hits ‘production’. Production branch is everything that is stable and is used on all ~350 servers.

Every time we merge to either ‘pre-production’ or ‘production’, we create a Git ‘tag’ with a date, that allows for easy roll backs. Whenever we need to get back to a certain state, we can always just checkout a tag. This is also very useful for audit trails, by the way.

Actually, we’re using another branch called ‘hotfix’. Whenever there’s an emergency to fix, we branch a ‘hotfix’ from ‘production’ and do the fix. This is for example when a promise misbehaves. This branch is then merged to production when ready, and also to ‘development’. Git handles this nicely: whenever the hotfix makes it all the way from ‘development’ to ‘production’, Git recognizes this commit was already processed earlier and ignores it.

Git commits, branches and tags in CFEngine repo

Git commits, branches and tags in CFEngine repo


This is a screenshot from ‘Gitk’ that shows the commits, branches (green) and tags (yellow). As you can see, ‘production’ and ‘pre-production’ are at the same level now, so nothing new is tested in ‘pre-production’ at the moment. Quite some work is tested in the ‘beta’ branch and there are already some fixes committed in ‘master’. Recently there was a ‘hotfix’ branch that has now been merged. It should give an idea of how it works. It provides a clear overview and we now know about every change on the configuration of our servers. Clicking on a commit show what changed, who did it, etc.

CFEngine Policy hubs
For each of the 4 branches we’ve created a CFEngine policy hub. The policy hub is a server running CFEngine software that serves the given branch to the agents (the Linux servers connected to it). Linux servers can even switch between them by ‘bootstrapping’ to one of the 4 policy hubs. Although we only use that on our test servers.

Manage what’s ‘in flight’ with a CFEngine Trello board
Trello provides an intuitive and modern web interface that allows you to manage ‘cards’ on different ‘lists’ on a ‘board’. To get an idea, see the example Trello board below (click on it to enlarge).

Trello CFEngine board

Trello CFEngine board


New cards are usually created in ‘Feature requests’ or ‘Bugs’ and then transferred to ‘Working on it!’. The number of cards in this stage should be limited, as you can only work on a number of things at the same time. This is actually Kanban style. Next, we’ve created a list for each Git ‘branch’ we have and cards flow from ‘beta’ to ‘pre-production’ and finally ‘production’. Moving cards is just dragging & dropping. Each month, cards in ‘production’ are archived. This creates an overview of what new work is to be done (‘Feature requests’ and ‘Bugs’), what we’re currently working on and what’s in each of the branches. Trello has the overview, Git has the code and the details. Also, Trello is perfect for communication between team members. Notes, comments, documents, lists, etcetera can all be created with ease.

Testing promises
To be able to test the promises on our local laptops, we’re using a tool called Vagrant. Vagrant sets up Virtual Machines (for example using Virtual Box) and allows you to ‘destroy’ and ‘create’ them within minutes. All team members have a local Git checkout, that is also available in the Vagrant boxes. This allows us to test any change before even committing. We have Vagrant boxes setup for all Linux distributions we support. It’s so easy and so fast to test changes that everybody does. And even when an error slips through, other team members will soon notice and it’s usually fixed within minutes, before it ever hits the ‘beta’ branch.

Bugs
We encountered a strange bug when using SLES 11 and CFEngine 3.5: CFEngine (community edition) got running with the ‘SIGPIPE’ signal blocked. When CFEngine restarts SSH, this too gets running with ‘SIGPIPE’ blocked. This results in ‘sudo’ no longer working. It would just return nothing at all. It took us quite some time to figure out it was the ‘SIGPIPE’ signal that was blocked. The root cause probably lies in an old ‘Bash’ version (3.51) that SLES uses, combined with something CFEngine triggers. We’ve now implemented an automated work-around (made a CFEngine promise) that fixes the problem. We did some nice team work on this one!

Conclusion
CFEngine’s learning curve might be steep, but the result is definitely rewarding. Combined with Git and Trello it allows for fine control and great overview of configuration changes. Our whole team is involved in changes, they are reviewed and result in high quality code. This eventually makes the Linux servers we manage more stable. Also, it’s a great feeling to be in-control and know what’s going on our servers.

From this point on, we’ll continue to both scale horizontally (add more servers) and vertically (add more promises). After two months of daily working with CFEngine, I’ve to say I really like it and I enjoy writing promises.

I’ll keep you posted, I promise 😉

Data security is getting more and more important these days. Imaging you work as a sysadmin, on a laptop, and it gets lost. Of course you might lose your work (but you have a backup, right?). The real problem: your sensible data (SSH private key for example) is no longer under your control.

In this blog I explain how you can add an encrypted partition to Linux. As long as you also use a password protected screensaver, with a decent password (to protect a running, logged in laptop), no one can access your data. Even rebooting into single user mode (to by-pass the login screen) won’t help. No access to the encrypted disk without a working passphrase. Wiping your disk and reinstall is an option, but your data is not unveiled.

LUKS: Linux Unified Key Setup
Linux ships with LUKS, that is short for ‘Linux Unified Key Setup’. It’s a tool and technique to setup encrypted devices. This device can be a laptop harddisk, but also a USB-pendrive or a virtual disk (when you have a virtualized server). Encryption with LUKS works on the block level, so filesystems above it are not even aware. This is nice, because it also means you can use LVM inside a LUKS encrypted block device. The encrypted drive is protected with a passphrase that you need to enter at boot.

Below I’ll show you how to set it up. Be aware we are formatting partitions. In other words, you will lose all data on the partition you will experiment with. For testing purposes, use a USB-pendrive or a spare partition. I’m using a virtual disk called /dev/sdc for this demo.

Note: you need the kernel module dm_crypt loaded for this to work.

modprobe dm_crypt

Don’t forget to make it persistent after a reboot.

To format the partition:

cryptsetup luksFormat /dev/sdc

Output:

WARNING!
========
This will overwrite data on /dev/sdc irrevocably.

Are you sure? (Type uppercase yes): YES
Enter LUKS passphrase: 
Verify passphrase:

Now that the encrypted disk is created, we’ll open it:

cryptsetup luksOpen /dev/sdc encrypted_disk

Output:

Enter passphrase for /dev/sdc:

To unlock the disk, you need to enter the passphrase you just set. You need to do this every time you want to unlock the disk.

The ‘encrypted_disk‘ part of the command above, is used to map a device name to your encrypted disk. In this case: ‘/dev/mapper/encrypted_disk’ is created. So, the encrypted disk called ‘/dev/sdc’ now has an extra name to refer to its unlocked state called ‘/dev/mapper/encrypted_disk’. This device is also a block device, on which you could run ‘fdisk’ or ‘mkfs.ext4’, etc.

But stop, before you do that. When you’d like to use multiple partitions, I’d suggest using LVM inside the encrypted disk. This isn’t visible from outside; only when you’ve unlocked it the LVM partitions appear. It prevents from entering a password for each and every encrypted disk you create. Also, LVM is more flexible in resizing its logical volumes.

Let me show you how to setup LVM on the encrypted disk:

pvcreate /dev/mapper/encrypted_disk

Output:

Physical volume "/dev/mapper/encrypted_disk" successfully created 
vgcreate encrypted /dev/mapper/encrypted_disk

Output:

Volume group "encrypted" successfully created
lvcreate encrypted --name disk1 --size 10G

Output:

Logical volume "disk1" created
lvcreate encrypted --name disk2 --size 10G

Output:

Logical volume "disk2" created

You now have two more block devices called ‘/dev/encrypted/disk1’ and ‘/dev/encrypted/disk2’. Let’s put a file system on top of them:

mkfs.ext4 -m0 /dev/encrypted/disk1
mkfs.ext4 -m0 /dev/encrypted/disk2

The two encrypted partitions are now ready to be used. Let’s mount them somewhere:

mkdir -p /mnt/disk1 /mnt/disk2
mount /dev/encrypted/disk1 /mnt/disk1
mount /dev/encrypted/disk2 /mnt/disk2

This works all pretty cool already. But when you reboot, you’ll have to run:

cryptsetup luksOpen /dev/sdc encrypted_disk
vgscan
lvchange --activate y encrypted/disk1
lvchange --activate y encrypted/disk2
mount /dev/encrypted/disk1 /mnt/disk1
mount /dev/encrypted/disk2 /mnt/disk2

Entering the passphrase is required after the first command. Line 2 scans for new LVM devices (because when unlocking the encrypted device, a new block device appears). Line 3 and 4 activate the two logical volumes, and finally they are mounted.

Automating these steps
It is possible to automate this. That is, Linux will then ask for the passphrase at boot time and mount everything for you. Just think about that for a while. When booting a laptop this is probably what you want. But if it is a server in a remote location, it might not, as you need to enter it on the (virtual) console for it to continue booting. No SSH access at that time.

Anyway, you need to do two things. First is to tell Linux to unlock the encrypted device at boot time. Second is to mount the logical volumes.

To start, lookup the UUID of the encrypted disk, /dev/sdc:

cryptsetup luksDump /dev/sdc | grep UUID

The result should be something like:

UUID: b8f60c1d-ffeb-4aaf-8368-9e5d4d29fc52

Open /etc/crypttab and enter this line:

encrypted_disk UUID=b8f60c1d-ffeb-4aaf-8368-9e5d4c29fc52 none

The first field is the name of the device that is created, use the same as when using luksOpen above. The second field is the UUID we just found. The final field is the password, but this should be set to ‘none‘ as this prompts for the passphrase. Entering the passphrase in this file is a bad idea, if you ask me.

Final step is to setup /etc/fstab to mount the encrypted disks automatically. Add these lines:

/dev/encrypted/disk1 /mnt/disk1 ext4 defaults 0 0
/dev/encrypted/disk2 /mnt/disk2 ext4 defaults 0 0

I’m using device names here, because LVM gives me the /dev/encrypted/disk[12] name every time. When you did not use LVM, it’s probably wise to use UUID’s in /etc/fstab instead. This makes sure the right filesystem is mounted, regardless of the device’s name.

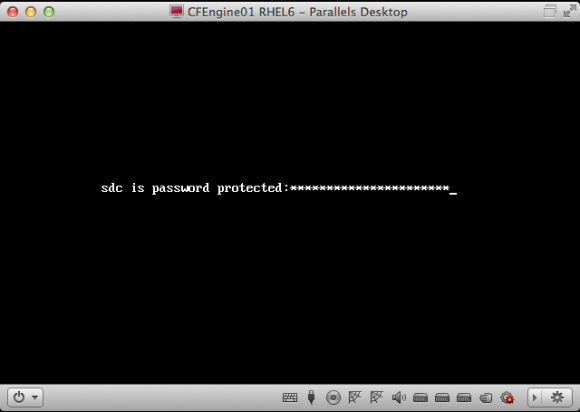
Time to reboot. During this reboot, Linux will ask for the passphrase of the /dev/sdc device. On RHEL 6 it looks like:

RHEL 6 asks for the LUKS passphrase of /dev/sdc during boot

RHEL 6 asks for the LUKS passphrase of /dev/sdc during boot

It might look different on your OS. The Ubuntu version looks a bit prettier, for example.

Enter the passphrase, hit enter, and Linux should continue booting normally. Then login to the console (or SSH) and verify if the two disks are mounted.

...
/dev/mapper/encrypted-disk1 on /mnt/disk1 type ext4 (rw)
/dev/mapper/encrypted-disk2 on /mnt/disk2 type ext4 (rw)
...

Ubuntu makes this very easy to setup: they just have a checkbox during install that says ‘encrypt disk’ and will setup LUKS. But, you end up with everything in one big / partition without LVM. That’s why I prefer to configure it myself, and with these instructions so can you.

Conclusion
It is cool that these security features are now mainstream and easy to use. Do yourself a favor, and setup LUKS today!

When it not possible to reach a server you want to SSH to directly, you can make use of SSH’s built in capability to chain multiple commands. Suppose you have a network setup like in the image below.

Network overview

Network overview

Firewalls or ACL’s prevent direct access to the ‘web server’ in network #2. In between is a ‘jump host’ in network #1. A ‘jump host’ is a host you can SSH to, and from there reach the next hop. How to SSH to the web server?

You could do this manually:

ssh -l user jump-host

and then from that server:

ssh -l user webserver.dmz

But using the -t switch, you can chain them together like this:

ssh -A -t -l user jump-host \
ssh -A -t -l user webserver.dmz

The -A switch enables forwarding of the ssh-agent. When using key based authentication, you’ll be able to login with typing the certificate’s password only once.

Using this technique, you can also build a SSH tunnel through the jump host:

ssh -A -t -l user jump-host \
-L 8080:localhost:8080 \
ssh -A -t -l user webserver.dmz \
-L 8080:localhost:8080

When you type: http://localhost:8080 in a browser, you are connected over a secure tunnel to the web server in Network #2. Thanks to the chaining of commands, this is now possible.

You can use many chained commands, so this is very flexible.