


CloudMonkey is an easy way to interact with the CloudStack API without the need to do any code writing. Think of it like a way to “query” the CloudStack infrastructure. Very useful in day-to-day operations to get a “quick look” at things.
Version 5.3 is on its way, and recently I had a look at it. I used my MacBook Pro for this, and it came with some challenges to get it working. So, I’m writing down here how to get CloudMonkey 5.3 working on either MacOSX Mavericks (10.9) or the new Yosemite (10.10).
Installing CloudMonkey from source
Since I wanted to look at the latest (not yet released) version I used the source from git. If you want to use the latest stable version, please skip to the next section where I discuss installing using PIP.
Let’s install from source:
git clone https://github.com/apache/cloudstack-cloudmonkey.git
Something like this should happen:
Cloning into 'cloudstack-cloudmonkey'...
remote: Counting objects: 782, done.
remote: Total 782 (delta 0), reused 0 (delta 0)
Receiving objects: 100% (782/782), 236.67 KiB | 359.00 KiB/s, done.
Resolving deltas: 100% (427/427), done.
Checking connectivity... done.
If it doesn’t work, you might need to install Git or install the Command Line Developer tools. Just follow the on-screen instructions and you’ll be fine.
Next, compile the source:
make build
It’ll give some output, and as long as it doesn’t error out you’re fine. Then install using sudo:
sudo make install
CloudMonkey has now been installed to /usr/local/bin.
Installing CloudMonkey from PIP
Alternatively, you can use PIP to install. PIP is a tool to easy install Python software and there’s a PIP for CloudMonkey as well. At the time of writing, there is a 5.2 version that you can install.
First install to the latest version of PIP:
sudo easy_install --upgrade pip
If CloudMonkey is already installed, uninstall it first (your config is saved):
sudo pip uninstall cloudmonkey
Then install it again:
sudo pip install cloudmonkey
Running CloudMonkey
To run it, just type:
cloudmonkey
CloudMonkey should then welcome you:
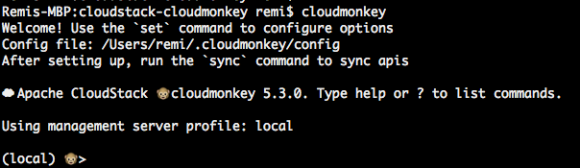
When you see this, CloudMonkey is installed successfully.
On Mac OSX Yosemite this worked out-of-the box, although on Mavericks it did not:
Remis-MBP:git remi$ cloudmonkey
Traceback (most recent call last):
  File "/usr/local/bin/cloudmonkey", line 5, in <module>
    from pkg_resources import load_entry_point
  File "/System/Library/Frameworks/Python.framework/Versions/2.7/Extras/lib/python/pkg_resources.py", line 2603, in <module>
    working_set.require(__requires__)
  File "/System/Library/Frameworks/Python.framework/Versions/2.7/Extras/lib/python/pkg_resources.py", line 666, in require
    needed = self.resolve(parse_requirements(requirements))
  File "/System/Library/Frameworks/Python.framework/Versions/2.7/Extras/lib/python/pkg_resources.py", line 565, in resolve
    raise DistributionNotFound(req)  # XXX put more info here
pkg_resources.DistributionNotFound: requests
Remis-MBP:git remi$
There’s a lot written on this online, but most stuff did not work for me. This did the trick for me:
sudo curl https://bitbucket.org/pypa/setuptools/raw/bootstrap/ez_setup.py | python
It (re)installs ‘setuptools’ and that made it work.
Configuring CloudMonkey
Before CloudMonkey will do anything useful, you need to point it to a CloudStack API endpoint. I’m using my DevCloud environment here. The API keys can be generated in the UI:
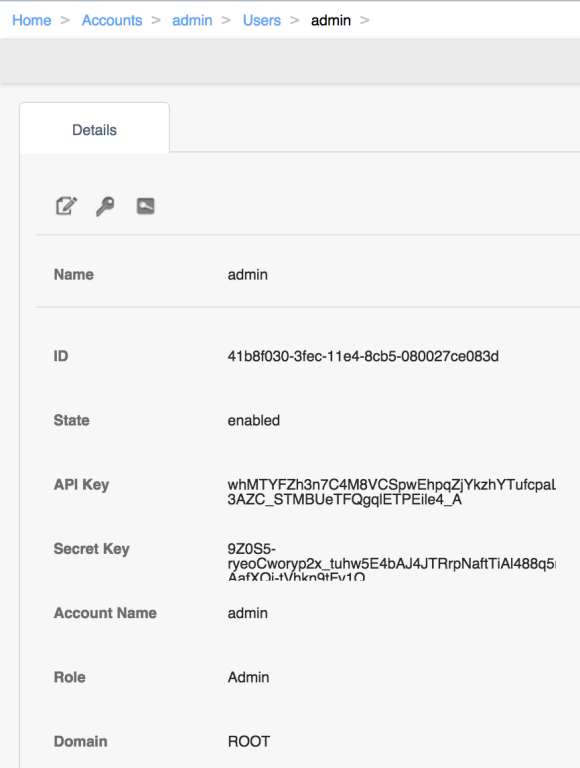
Copy the API keys from the CloudStack UI
If no keys are displayed, click the icon on the right to generate keys. Then setup CloudMonkey:
set apikey whMTYFZh3n7C4M8VCSpwEhpqZjYkzhYTufcpaLPH9hInYGTx4fOnrJ3dgL-3AZC_STMBUeTFQgqlETPEile4_A
set secretkey 9Z0S5-ryeoCworyp2x_tuhw5E4bAJ4JTRrpNaftTiAl488q5rvUt8_pG7LxAeg3m_VY-AafXQj-tVhkn9tFv1Q
set url http://127.0.0.1:8080/client/api
Make sure to copy your own keys, as the ones here will only work on my local test CloudStack environment.
Finally, test the connection by syncing the API’s. Run this inside CloudMonkey:
sync
CloudMonkey responds:
466 APIs discovered and cached
Depending on your permissions (root, admin, user) and version of CloudStack, you’ll see more or less APIs being discovered.
A cool new (experimental) feature is tab completion, aka paramcompletion. Enable it like (run inside CloudMonkey):
set paramcompletion true
You’ll then be able to use the TAB key to auto-complete the UUIDs. Let me show you with an example:
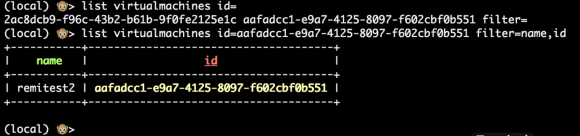
CloudMonkey auto-complete feature in action (called paramcomplete)
I typed:
li<tab> vi<tab>m<tab> id<tab><tab>aa<tab><enter>
This auto-completes to the line you see in the image, and it displays the result as well.
Conclusion
CloudMonkey is a great tool to query the CloudStack infrastructure. Setting it up is not hard as we’ve seen. Justplay with it, and you’ll discover a great number of features. If you find bugs, be sure to contact Rohid Yadav, the author of CloudMonkey. The documentation can be found here.
Have fun with CloudMonkey!


