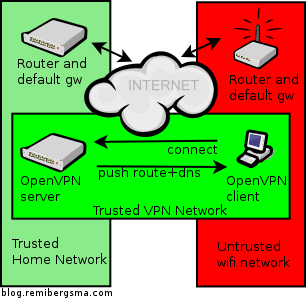
A lot of people seem interested in safe browsing over untrusted wifi and using a Raspberry Pi with an OpenVPN server to accomplish that. In this blog post, I’ll continue the series and explain how to set up secure browsing on mobile devices based on iOS.
When I’m not at home I use my iPhone or iPad and connect to the internet using either 3G or public wifi. I want to configure my mobile device to setup an encrypted VPN tunnel and route all traffic through it, so I have a safe browsing experience. Fortunately, there now is an OpenVPN app available on iOS that allows you to do that! Please install this app using the App Store, and continue reading to set it all up.
Preparing and importing the certificate
I’d suggest creating a separate certificate for each device you want to connect to your OpenVPN server. Although, it is possible to reuse the certificates on multiple devices, I’d recommend not to do so. First of all you will not be able to connect at the same time. Security-wise it is also smart to use one certificate for each device: whenever you lose your device, you can easily revoke the certificate and still connect from your other devices.
cd /etc/openvpn/easy-rsa/2.0/
. ./vars
./build-key remiiphone
You will now have a private key and certificate generated for your mobile device (check the ./keys directory). To be able to work with it on a mobiel device, we convert it to pkcs12 format using this command:
openssl pkcs12 -export -in keys/remiiphone.crt -inkey keys/remiiphone.key -certfile keys/ca.crt -name remiiphone -out remiiphone.p12
The password it asks is to protect the file. Remember the password, we will need it when installing on the mobile device. The file ‘remiiphone.p12’ should be created.
Next step is to bring this file to our mobile device. I did first scp it from the Pi to my iMac, then send myself an e-mail with the .p12 file attached. Since the file is password protected, it is safe to e-mail.
When you open the e-mail on your mobile device, and click the .p12 attachment you will be asked to install the certificate. Click install and confirm installation. If your device has a passcode, you will be asked to enter it. Afterwards, you need to type the password you choose when generating the p12 file. Finally, because I use a self-signed certificate, from an untrusted CA, iOS mentions the certificate is ‘Not Trusted’. Don’t worry, it’s fine.
The screenshots below show you how it looks like:

Installing the p12 certificate

Unsigned profile warning
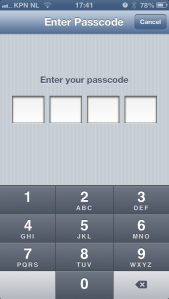
Enter device code
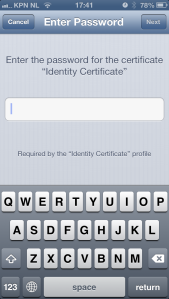
Enter password
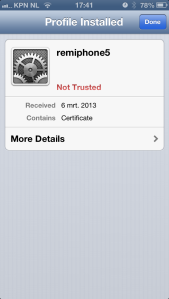
Installed certificate
Your certificate is now installed on iOS and it is ready to be used by the OpenVPN app.
Preparing and importing the OpenVPN configuration file
Next step is to provide the OpenVPN app with a configuration file. When you use the .ovpn extension, you can easily import it later on. But let’s start with setting up the configuration file.
client
dev tun
proto udp
remote pi.example.org 1194
comp-lzo
redirect-gateway
<ca>
-----BEGIN CERTIFICATE-----
...
q0c4PYC3BB7pIOA2fH7Clkb8TduDcz0kzPqStD3mVjLXx1+KVxVeGMgbj0QLbPoG
...
-----END CERTIFICATE-----
</ca>
# other options (mostly defaults)
nobind
persist-key
persist-tun
user nobody
group nogroup
resolv-retry infinite
Let me explain: This tells the OpenVPN app we’ll be using client mode and use the ‘tun’ device (the only supported in iOS). The server is using udp (choose udp or tcp) and can be found on pi.example.org using port 1194. Please adjust accordingly. Line 5 tells it to use compression, and line 6 sends all traffic through the tunnel. This is exactly what we want: this allows secure browsing.
The thing that took me some time to figure out is that you need to specify the CA certificate in the OpenVPN app. Even though it was included in the .p12 file we imported, iOS would strip it and therefore not import it. That’s why you should include it in your .ovpn file. Replace lines 8-12 with your CA certificate. It needs more lines, for sure. Just paste everything between the CA tags in the file and you’ll be fine. If you’ll get this error message, your CA is probably not right:
CORE_ERROR PolarSSL: error parsing ca certificate : X509 - The certificate format is invalid, e.g. different type expected [ERR]
Finally, I have some more settings in the file that are mostly defaults. Note: it is also possible to add your private key and certificate directly to the .ovpn file, in the same way as the CA is done above. I’d recommend not to do that because your .ovpn file is then all somebody needs to be able to connect. Since there is no password protection, e-mailing the file is insecure and dangerous!
Save the file, call it pi.ovpn or so, and e-mail this file to yourself as well. The e-mail app on iOS will allow you to import this configuration to the OpenVPN app by clicking on the file. The OpenVPN app will show your imported configuration. Confirm by tapping the green + icon. Next step, select the certificate to use with this profile. Here you will select the certificate we imported into iOS in the previous step. As a result, we can omit the username and password fields, as we use our certificate instead.
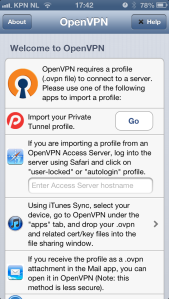
Welcome screen

Import .ovpn file
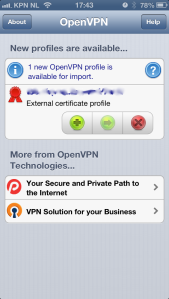
Confirm import
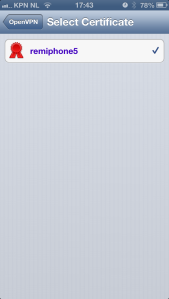
Select certificate

Configuration imported
Connecting..
Your OpenVPN client configuration is now imported and ready for use. Let’s test it! All you have to do to connect, is to tap on the OFF button just below the status ‘Disconnected’. You should now be connected to your OpenVPN server. Note the VPN icon on top of the screen while you’re connected.
The best way to verify everything is working properly, is to open your mobile Safari and visit a website that displays your ip address (such as ifconfig.me). It should show your OpenVPN server’s public ip address, instead of your mobile or wifi ip address. Try disconnecting and compare the ip addresses. Cool hah?!
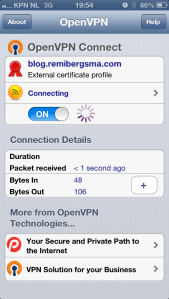
Connecting
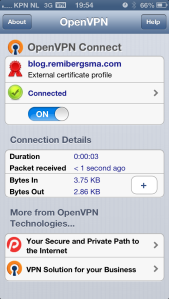
Connected!