Archives For 30 November 1999

Someone asked me if it were possible to download a web site and make it available offline. To some extend, this can be done. Interactive forms will not work (searching, ordering, etc), but you can use ‘wget‘ to transform a website into a static version.

It goes like this:

wget \
 --recursive \
 --no-clobber \
 --page-requisites \
 --html-extension \
 --convert-links \
 --restrict-file-names=windows \
 --domains example.org \
 --no-parent \
 --wait=1 \
 --limit-rate=500K \
 example.org/

Let me explain:
The ‘–recursive’ option downloads the entire web site and ‘–domains’ tells wget not to follow links outside example.org. Otherwise you will download far too many pages. ‘–page-requisites’ makes sure we’ll get all the elements that compose the page (images, CSS, etc), ‘–html-extension’ saves files with the .html extension so they will work on a stand-alone pc, ‘–convert-links’ converts links so they’ll work off-line and ‘–no-clobber’ prevents any existing files to be overwritten

Using a ‘–limit-rate’ you can prevent wget from using all available bandwidth. Wile downloading will take longer, it is now possible to browse the web while wget is downloading.

Give it a try, it works pretty nice and is great if you’re about to make big changes to your site and you want to save a copy of the old version.

The Raspberry Pi is a $35 credit-card sized computer, with an ARM-based CPU. It uses very little power (only 3 Watt), so it’s ideal for a server that’s always-on. I was thinking what’d be a nice task for my Raspberry Pi and came up with an OpenVPN server. This enables me to connect to my home from anywhere, for example to access some files or to access the internet from there.

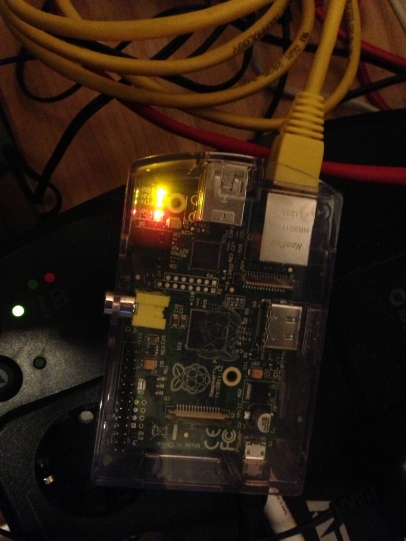
Before we start, Let’s have a look what’s on board the Raspberry Pi so you’ve an idea what we talk about:

RaspiModelB

Here’s mine in action:

RaspberryPi

Now, let’s see how we can turn it into a OpenVPN server. Actually this is very easy due to the fact that the Raspberry Pi is running (a modified) Debian Weezy called Raspbian. Since it’s Debian, you can use apt-get to install software:

apt-get install openvpn

After the install finishes, you need to generate keys for the server and the client(s). OpenVPN ships with the ‘easy-rsa’-tool. It’s easiest to copy the example folder and work from there.

cp -R /usr/share/doc/openvpn/examples/easy-rsa /etc/openvpn
cd /etc/openvpn/easy-rsa/2.0

The ‘easy-rsa’-tool has a file called ‘vars’ that you can edit to set some defaults. That will save you time later on but it’s not required to do so.

Load the vars like this (note the two dots):

. ./vars

Then we need to generate keys:

./clean-all
./build-ca
./build-key-server server
./build-key client-name
./build-dh

The first line makes sure we start from scratch. The second generates a key for the Certificate Authority. The key for the server itself is generated on the third line. Repeat the forth line for each client that needs to connect. Finally, we need the Diffie Hellman key as well, which is generated on the fifth line. Make sure you use a 2048 bit key, as suggested in the comments.

We need to copy the keys to the OpenVPN folder.

cd /etc/openvpn/easy-rsa/2.0/keys
cp ca.crt ca.key dh2048.pem server.crt server.key /etc/openvpn

Last step is to configure the server. You can copy the example config and make sure it points to the certs you just created.

cp /usr/share/doc/openvpn/examples/sample-config-files/server.conf.gz /etc/openvpn
gunzip /etc/openvpn/server.conf.gz
vim /etc/openvpn/server.conf

When you’re done, start OpenVPN like this:

/etc/init.d/openvpn start

Response looks like:

[ ok ] Starting virtual private network daemon: server.

Verify it by running:

ifconfig tun0

You’ll see:

tun0 Link encap:UNSPEC HWaddr 00-00-00-00-00-00-00-00-00-00-00-00-00-00-00-00 
 inet addr:10.8.0.1 P-t-P:10.8.0.2 Mask:255.255.255.255
 UP POINTOPOINT RUNNING NOARP MULTICAST MTU:1500 Metric:1
 RX packets:49 errors:0 dropped:0 overruns:0 frame:0
 TX packets:16 errors:0 dropped:0 overruns:0 carrier:0
 collisions:0 txqueuelen:100 
 RX bytes:3772 (3.6 KiB) TX bytes:1212 (1.1 KiB)

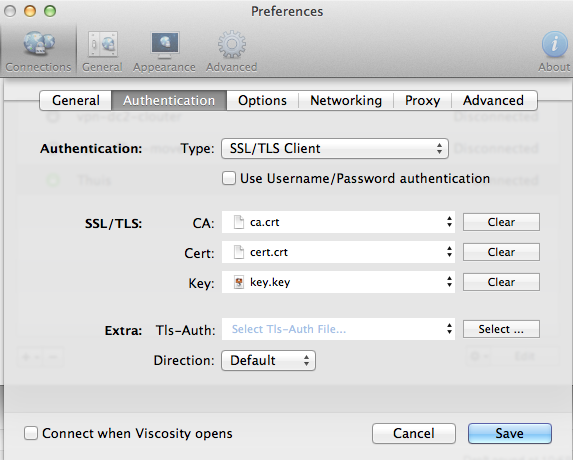
Now you should be able to connect to the OpenVPN server with a client. I’m using Viscosity on Mac OSX, but there’re many clients available on almost any platform (Windows, Mac OSX, Linux). You need the client.crt, client.key and ca.crt files plus the ip-address of your Raspberry Pi.

viscosity-vpn-config

Connecting should now work without trouble. Have a look at ‘/var/log/syslog’ to access the logfiles. You’d be able to see which client connects:

Jan 5 22:07:56 raspberrypi ovpn-server[14459]: 1.2.3.4:64805 [client-name] Peer Connection Initiated with [AF_INET]1.2.3.4:64805

Now that all is working, time for a last tip: when you want to access the network behind the Raspberry Pi through your OpenVPN connection, configure OpenVPN to push the right route to the clients. Edit the OpenVPN server config, and add a parameter like this:

push "route 10.1.7.0 255.255.255.0"

Be sure to enter the network- and netmask address that match your network setup. The route is automatically added on connect, and removed on disconnect.

Finally, enable routing on the Rasperry Pi:

echo 1 > /proc/sys/net/ipv4/conf/all/forwarding

Have fun with it, you can do a lot of great things with this little machine!

Update: Also see these follow-up posts that contain more detailed info on some interesting use cases and help you set it up:

HOWTO connect to hosts on a remote network using OpenVPN and some routing

Secure browsing via untrusted wifi networks using OpenVPN and the Raspberry Pi

Sometimes a MySQL slave may get corrupted, or its data may otherwise be unreliable. Usually I clone the data from a slave that is still ok and fix it from there. However, today I run into an issue that made me doubt on the data of any slave. To be absolutely sure the data is consistent on both master and slave, I decided to deploy a new slave with a clone of the master and then redeploy the other slaves from the newly created slave like I normally do with a script.

This blog post describes both methods of restoring replication.

Restoring data directly from the master
We will create a dump from the master server and use it on a slave. To be sure nothing changes during the dump, we issue a ‘read lock’ on the database. Reading will work, writes will wait until we unlock, so please choose the right time to do this maintenance.

To lock all tables run:

FLUSH TABLES WITH READ LOCK;

Now that we have the lock, record the position of the master and write it down. We need it later to instruct the slaves where to continue reading updates from the master.

SHOW MASTER STATUS\G

Example output:

File: bin-log.002402
Position: 20699406

Time to create a sql dump of the current databases. Do this in another session and keep the first one open. This will make sure you’ll keep your lock while dumping the database.

mysqldump -ppassword -u username --add-drop-database databasename table1 table2 > masterdump.sql

After the dump is complete, go back to fist screen and release lock:

UNLOCK TABLES;

This is all we need to do on the master.

Restoring from an already running slave
As an alternative to creating a dump from the master, you can also use a slave’s data. This has the advantage of not having locks on the master database and thus not interrupting service. On the other hand, you will have to be sure this slave’s data is correct.

First stop the slave

SLAVE STOP;

And verify it has stopped

SHOW SLAVE STATUS\G

Output:

Slave_IO_Running: No
Slave_SQL_Running: No
Master_Log_File: bin-log.002402
Read_Master_Log_Pos: 20699406

Record the ‘Relay_Master_Log_File’ and ‘Exec_Master_Log_Pos’. This is the position this slave is at. We will need it later to instruct the new slave.

Create a sql dump of the slave’s data:

/usr/bin/mysqldump --add-drop-database -ppassword -u user -h mysqlserver --databases databasename

Now that we have a dump, we can start the slave again.

SLAVE START;

In the period between the ‘stop’ and ‘start’ slave, everything still works except that updates from the master are not processed. As soon as you start the slave again, the slave catches up with the master.

This method has the advantage that is it easily scriptable. Whenever there’s a problem, you’d run a script with the above commands and have everything fixed in a matter of seconds. That’s a real time saver!

Setting up the new slave
Use scp to securely copy the sql dump we just created above to the slave. Alternatively you may run the ‘mysqldump’ commands directly from the slave as well. Then login and run these commands:

STOP SLAVE;
RESET SLAVE;

Restore the sql dump:

mysql -ppassword -u user databasename < masterdump.sql

You now have a slave with up to date data. We’ll have to instruct the slave where to start updating. Use the result from the ‘master status’ or ‘slave status’ query above depending on the method of your choice.

CHANGE MASTER TO
 master_host='mysqlmaster',
 master_user='replicate_user',
 master_password='replicate_password',
 master_log_file='bin-log.002402',
 master_log_pos=20699406;

Then start the slave:

SLAVE START;

And check the status after a few seconds:

SHOW SLAVE STATUS\G

Output:

Slave_IO_Running: Yes
Slave_SQL_Running: Yes

The slave now runs again with up to date data!

DRBD (Distributed Redundant Block Device) is an open source storage solution that is best compared with a RAID-1 (mirror) between two servers. I’ve implemented this for both our cloud storage as our cloud management servers.

We’re in the process of replacing both cloud storage nodes (that is: everything except the disks and its raid array) and of course no downtime is allowed. Although DRBD is made for redundancy (one node can be offline without impact), completely replacing a node is a bit tricky.

Preventing a ‘split brain’ situation
The most important thing to remember is that only one storage node is allowed to be the active node at all times. If this is violated, a so-called ‘split brain’ happens. DRBD has methods in surviving such a state, but it is best to prevent it from happening.

When discussing this project in our Team, it was suggested to boot the replaced storage node without any networking cables. Usually this is a safe way to prevent the node from interacting with others. In this case, it is not such a good idea: since the new secondary server has the same disks and configuration as the old one unexpeced thing may happen. When booting without networking cables attached, both nodes cannot find one another and the newly booted secondary may decode to become primary itself. A split brain situation will then occur: both nodes will be primary at the same time and access the data. You won’t be able to recover from this, unless you manually decide which node is the master (and lose the changes on the other node). In this case this can be easily decided, but it’s a lot of unneccessary trouble.

Instead, boot the replaced node with network cables connected so the replication network will be up and both nodes immediately will see each other. In our case, this means connecting the 10Gbps connection between the nodes. This connection is used by DRBD for syncing and by Heartbeat for sending the heartbeats. This prevents entering the ‘split brain’ state and immediately starts syncing.

Note: If you want to replace everything including the disks, you’ll have to manually join the cluster with the new secondary node and then sync the data. In this case it doesn’t matter whether the networking cables are connected or not, since this new node won’t be able to become primary anyway.

The procedure
Back to our case: replacing all hardware except for the disks. We managed to successfully replace both nodes using this procedure:

  1. shut down the secondary node
  2. replace the hardware, install the existing disks and 10Gbps card
  3. boot the node with at least the 10Gbps connection active
  4. the node should sync with the primary
  5. when syncing finishes, redundancy is restored
  6. make sure all other networking connections are working. Since the main board was replaced some MAC-addresses changes. Update UDEV accordingly
  7. when all is fine, check if DRBD and Heartbeat are running without errors on both nodes
  8. then stop heartbeat on the primary node. A fail-over to the new secondary node will occur
  9. if all went well, you can now safely shut down the old primary
  10. replace the hardware, install the existing disks and 10Gbps card
  11. boot the node with at least the 10Gbps connection active
  12. the node should sync with the primary
  13. when syncing finishes, redundancy is restored
  14. make sure all other networking connections are working. Since the main board was replaced some MAC-addresses changes. Update UDEV accordingly
  15. the old primary is now secondary
  16. If you want, initialize another fail-over (In our case we didn’t fail-over again, since both nodes are equal powerful)

Congratulations: the cluster is redundant again with the new hardware!

Using the above procedure, we replaced both nodes of our DRBD storage cluster without any downtime.

When migrating an ip-address to another server, you will notice it will take anywhere between 1 and 15 minutes for the ip-address to work on the new server. This is caused by the arp cache of the switch or gateway on the network. But don’t worry: you don’t just have to wait for it to expire.

Why it happens
ARP (Address Resolution Protocol) provides a translation between ip-addresses and mac-addresses. Since the new server has another mac-address and the old one stays in the cache for some time, connections will not yet work. The cache usually only exists for some minutes and prevents asking for the mac-address of a certain ip-address over and over again.

One solution to this problem is to send a command to the gateway to tell it to update its cached mac-address. You need the ‘arping’ utility for this.

Installing arping
There are two packages in Debian that contain arping:

arping - sends IP and/or ARP pings (to the mac address)
iputils-arping - Tool to send ICMP echo requests to an ARP address

I’ve had best results with the ‘iputils’ one, so I recommend to install that one. This is mainly because the other package’s command does not implement the required -U flag.

aptitude install iputils-arping

I haven’t installed arping on CentOS yet, but was told the package is in the RPMForge repository.

Using arping
The command looks like this:

arping -s ip_address -c1 -U ip_addresss_of_gateway

Explanation:
-s is the source ip-address, the one you want to update the mac-address of
-c1 sends just one arping
-U is Unsolicited arp mode to update neighbours’ arp caches
This is followed by the ip-address of the gateway you want to update. In most cases this is your default gateway for this network.

Example: you moved 192.168.0.100 to a new server and your gateway is 192.168.0.254, you’d run:

arping -s 192.168.0.100 -c1 -U 192.168.0.254

After you’ve send the arping, the gateway will update the mac-address it knows of the ip-address and traffic for this ip-address will start flowing to the new server.

Bottom line: whenever you migrate an ip-address to another server, use arping to minimize downtime.