Posts

After all the hard work in the past months it’s now time for some weeks off 🙂 One last thing to solve was the Zimbra auto responder: I had enabled it through the web interface but while testing it, I found it only replied mails sent to my main e-mail address. There is no way to fix this in the web interface, so I had a look at the command line options and found a way to add extra e-mail addresses. Ssh to the machine, become user ‘zimbra’ and run this command: 

zmprov ma [email protected] +zimbraPrefOutOfOfficeDirectAddress [email protected]

By running this command you tell Zimbra to also reply to [email protected] instead of only [email protected]. By specifying a + before the command, you can run this command multiple times to add more e-mail addresses, if you have them. Otherwise you’ll overwrite the previous setting. I have added all 3 e-mail addresses I use, so they’ll get auto responses while I’m out of the office. Hope this is helpful to others as well.

HOWTO remove null characters from a file

— 11,145 views — 4 Comments

Sometimes files may be filled up with null characters that look like ^@ when you open them in a text editor. This may happen when a disk becomes full, or when you rename a logfile while an application is still writing to it.

I ran into this problem today, and I fixed it using a command called ‘tr’. This is a utility capable of translating or deleting characters from standard input/output. It means you can use it to ‘pipe’ input to it, and send the output to a new file. For example:

cat file.log | tr -d '\000'  > new_file.log 

Note: when using this in a script, you might need to escape that backslash.

What does this command do? Using the -d switch we delete a character. A backslash followed by three 0’s represents the null character. This just deletes these characters and writes the result to a new file. Problem solved!

At work, it is of my tasks to make sure we keep the mailboxes of our clients free of spam. Some weeks ago the number of spam mails went up massively and we worked hard to update the filters to keep unwanted mails out. In this blog I’ll describe a few of the things we did.

Using the famous SpamAssassin tool it is possible to score e-mails. One can score on the contents of subject, body, headers etcetera. A lot of good rules are already supplied and it’s possible to write your own. When a new spam run comes in, we used to create new rules for the spam mails that slipped trough. That works, and afterwards the mails are tagged as spam.

As you can imagine, this procedure is both time consuming and a bit late: only after we see mails slipping through we can create rules to catch them. Of course this procedure will always be some sort of a last resort if all else fails but I wanted to setup something more proactive.

To start from the beginning, how is all this spam sent?
It can’t be send from one or a few locations only, because then it’d be easy to block. Instead, most spam is sent by botnets these days. Botnets usually have hundreds of thousands pc’s under control and one of the main things they do is sending spam. For example to advertise online casino’s, fake banking sites or other scams. Because there are so many infected PC’s, it’s not easy to block them all. Or is it?

When thinking about this, I realized most (if not all) members of these botnets are infected Windows pc’s. Also, these mails are often directly sent from the PC to the final destination mailserver (instead of using the SMTP server of their ISP).

If we could detect the OS of the client that connects to our mailserver, we could then apply certain actions based on the OS. The idea here is that most ISP’s use Linux, Unix or Mac servers. And if they are using Windows, it is likely to be some Server version instead of ‘Windows Vista’, ‘Windows XP’, etcetera. Interesting!

What we want to do here is known as Passive OS Fingerprinting. A tool that implements this is for example P0f. You run P0f as a deamon on the mailserver that accepts the incoming connections. Based on the traffic that flows by, P0f is able to guess the OS of the client that connects. It is passive, so the client never knows we’re doing this. Nothing is in between the client and the mailserver, P0f is just analyzing the traffic. Now that P0f knows the OS of the client, we can decide what to do with this information. In our setup it works like this:

1. When the OS is Windows, but not Windows Server, activate Greylisting. When another or unknown OS is detected, start mail delivery immediately;

The idea behind this is that mail sent from infected Windows PC’s is usually poorly written. They cannot handle the fact the mailserver sends a 400 series temporary error message and most give up after just one attempt. This technique is called Greylisting and it alone reduces the number of spam mails significantly. But, Greylisting has drawbacks as well. The biggest drawback in my opinion is that it can delay mail up to 30 minutes or more. Most customers we serve find this annoying.

2. At the time the connection is accepted and the mail is delivered, we set a ‘X-P0f-OS:’-header with the detected OS;

Combining Greylisting and P0f creates a more ideal solution: Windows PC’s should not send mail directly to the recipients mailserver, but use the Provider SMTP server instead. One could say that when such a PC is sending mails directly, it is at least suspicious. That is, in my opinion, enough reason to Greylist them. There must be some spam software that understands Greylisting (now or in the future) and that will eventually connect again after some time and deliver the mail. That’s why there is an action #3:

3. This header is consulted later on in the delivery process, and when Windows appears (again, not Windows Server), Spamassassin assigns some points to the spam-score.

Because mail that is sent directly from a Windows PC is suspicious to me. The OS score helps reaching the score needed for Spamassassin to tag it. The interesting thing is that this is proactive: you just don’t know what new mail spammers will send, but what you do know is that the next mail is probably send by an infected Windows PC.

This setup is now up and running, so I’ll let you all know what my experiences are after some time. When I find the time, I will also write some blogs in more detail on how to setup such a system.

Any other methods you use to stop spam effectively?

I had an interesting problem lately regarding AWStats. Due to some delay, the log files weren’t processed in the right order and then AWStats ignored all old logs. This resulted in some days being blank in the stats and of course this is not something we want. Since we also have multiple web servers in our cluster, things started to get a bit complicated.

The log files from each of the web servers were concatenated and then split to a separate log file for each virtual host using the Apache2 split-logfile script.

The logs for an example virtual host looked like this:

1.2.2.1 - - [01/Aug/2012:05:50:50 +0200] "GET /nonexistent_page.html HTTP/1.1" 404 224 "-" "Java/1.6.0_04"
1.2.2.1 - - [01/Aug/2012:05:50:51 +0200] "GET /nonexistent_page.html HTTP/1.1" 404 224 "-" "Java/1.6.0_04"
1.2.2.1 - - [28/Jul/2012:04:02:06 +0200] "GET /nonexistent_page.html HTTP/1.1" 404 224 "-" "Java/1.6.0_32"

As you can see, AWStats processes August 1 and then refuses the older July records. To resort the log files, I ran:


cat website.unsorted.log | sort -t ' ' -k 4.9,4.12n -k 4.5,4.7M -k 4.2,4.3n -k 4.14,4.15n -k 4.17,4.18n -k 4.20,4.21n > website.log

As an alternative the AWStats scriptlogresolvemerge.pl can be used as well. Since I already had concatenated the log files and split them, the sort option above was faster to implement.

Now the log file looks like this:

1.2.2.1 - - [28/Jul/2012:04:02:06 +0200] "GET /nonexistent_page.html HTTP/1.1" 404 224 "-" "Java/1.6.0_32"
1.2.2.1 - - [01/Aug/2012:05:50:50 +0200] "GET /nonexistent_page.html HTTP/1.1" 404 224 "-" "Java/1.6.0_04"
1.2.2.1 - - [01/Aug/2012:05:50:51 +0200] "GET /nonexistent_page.html HTTP/1.1" 404 224 "-" "Java/1.6.0_04"

One last thing to solve was the AWStats history file. Since it had run before but with the wrong ordenend logfile, it had a wrong ‘LastLine’ setting. Experimenting with this showed it was best to remove the line, and replace it with a newline (so we won’t break the indexes). I used sed to fix it:


sed -i \
-e 's/^LastLine .*//' \
awstats072012.*

AWStats now updates the stats correctly and everybody is happy! Thanks to my colleagues Pim, Vincent and Mischa because they all helped solving some pieces of the puzzle. Yes, it’s nice having some technically skilled colleagues 🙂


My mother’s iPhone had issues and was replaced by a new one. That did Apple handle very well 🙂 The down side of a new iPhone is, of course, that all settings and photo’s were lost. Fortunately, I was smart enough to enable iCloud backups last year when I setup her iPhone.

So, when the new iPhone came in today, all I did was restore the iCloud backup in a few swipes and clicks. An hour or so later (due to downloading) everything was as before. Very cool!

I recommend everybody to setup iCloud backups. You find the settings in the iCloud screen. It’s easy and you never know…


Last week I wrote a small blog about OpenVPN on OSX Mountain Lion using Tunnelblick. I managed to get things to work using the latest Tunnelblick beta. But after a week working with it, I’m not too happy how it works right now. The two issues I have are:

1. DNS servers do not always get set properly, it feels unstable to me. I’ve seen /etc/resolv.conf with the right content, but still the old DNS servers were used by Mountain Lion. This is annoying: while connected to the vpn, hosts behind it do not resolve because the DNS server advertised by the OpenVPN server is not being used. This happened a few times last week, although most of the time it works ok. What goes wrong more often is the opposite: when disconnecting the connection, the OpenVPN advertised DNS server is still being used; but since we’re disconnected, it doesn’t resolve anymore and so nothing works. I’ve then to manually restore the right DNS servers. No fun, but I accepted it for now. I thought there’d be an update soon enough that’d solve this.

2. Problem two is more annoying: the connection is not stable, it’s slow and when working in a shell it is annoying to wait for the cursor to move. It frustrates me. I’d already blamed the guys in the office for heavy downloading only to discover it was Tunnelblick that was the problem. Sorry guys 😉 Connections to public hosts are fine by the way; I wasn’t really able to pinpoint this issue. It kept me from working effectively. If somebody knows what to do to get this working properly, let me know!

So I thought it’d be wise to look for an alternative, and I came across Viscosity. I just wanted to compare and see if it has the same issues. Don’t get me wrong: I always prefer open source software, but it does have to work. Tunnelblick and Mountain Lion clearly doesn’t work for me. Viscosity is $9 for a license, that sounds ok to me.

Downloading and installing is easy, like any other OSX app you open the dmg and drag the application to the application folder. That’s it. What surprised me was that it has an import feature that imports from Tunnelblick. One click, that’s all..

Now that’s cool. From the upper menu, you can now connect. I just works, a few seconds later I’m connected and.. DNS is handled properly. I tried connecting, disconnecting and all but can’t find any problem. It uses the OpenVPN specified DNS servers while connected, and the DHCP specified DNS servers while disconnected. Just like when I was running Tunnelblick on Lion. Also, I haven’t seen the slow connection issue. It’s a bit early to tell if that is gone for good. Since I have 30 days to try Viscosity, I’ll soon enough know 🙂

For me this is a fast en good solution. I hope Tunnelblick is able to sort out what goes wrong with Mountain Lion. Otherwise Viscosity probably has a lot of new users to welcome in the coming months. Kudos to the Sparklabs team!

Update: I did go back to Tunnelblick a few times but had no lock and didn’t want to spend more time on it. Then I bought Viscosity that just works and has been stable from the start.

I’ve upgraded my 3 year old MBP with a fast SSD. I decided to install from scratch instead of migrating or cloning the old disk. The good thing is that everything is now fast and clean. The downside is that all customisations I did over the past years are also gone.

One thing I customised was shortcuts. I forgot how easy this can be done in OSX, so I’ll describe it below so others can benefit as well.

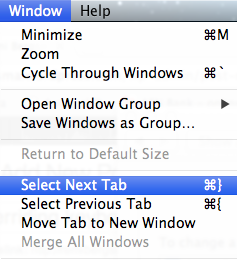
For example, I want the shortcuts in Terminal for Next and Previous tab to be CMD+right arrow, and CMD+left arrow. In Terminal you can see the default shortcuts for this in the menu:

It looks ok, but you cannot directly press ‘}’ on most keyboards; It’s SHIFT+], so this makes the default shortcut CMD+SHIFT+]. I prefer a shortcut with just two keys. To change these you’d go to:

System Preferences | Keyboard | Keyboard Shortcuts

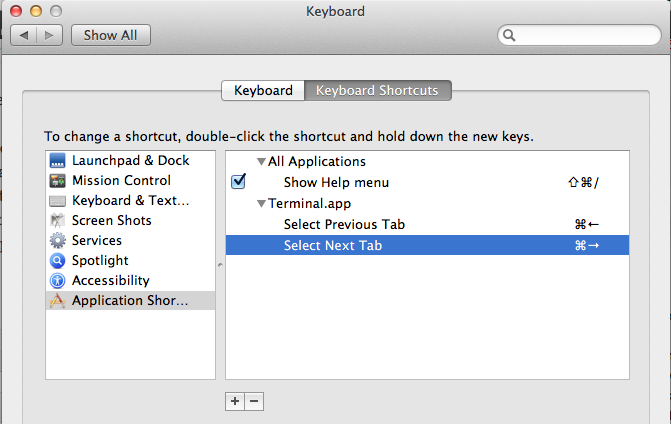
From the left, choose ‘Application Shortcuts’ and then click the + icon to add a new shortcut. First, select the application you want to change the shortcut for, ‘Terminal.app’ in this example. Then, specify the exact menu title for the command you’d like to change the shortcut for. As you can see above, you’d enter ‘Select Next Tab’ to change that command. Repeat for ‘Select Previous Tab’. Just press the shortcut and it will appear in the box. Afterwards it should look like this in the keyboard preferences pane:

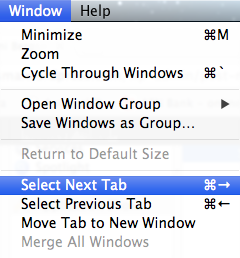
Now, go back to the Terminal application and have a look at the same menu as before. It should now list the shortcut you just added.

Try changing tabs by pressing CMD+left/right arrow.. it works!

One thing to note, it that the shortcuts I used in this example, by default belong to changing windows instead of tabs. When you want to change windows in Terminal using a shortcut, you’ll need to add new shortcuts for these as well. Alternatively, you use the CMS+` shortcut which still cycles through your windows, it just cannot go back. For me this works ok as this works in any application.

Changing shortcuts in Mac OSX is easy and allows you to make them work exactly as you prefer. I’ve done this in Mountain Lion, but I believe this can be done in Lion as well.

I just upgraded to OSX Mountain Lion and had some trouble this morning getting my OpenVPN connection (using Tunnelblick) to work. It would connect, but the DNS resolving was unstable. I managed to get it to work on the latest stable by changing the DNS-server setting to ‘set nameserver 3.0b10’ but then internet traffic would not work. The best solution for me at the moment is to upgrade to Beta release 3.3beta16 3.3beta18.

After upgrading, everything works as expected!

More info:

  1. Mountain Lion DNS issues with Tunnelblick
  2. Discussion the issue

Update: see this blog I wrote as well (experience after one week)

Update 2: TunnelBlick 3.3 beta 18 has just been released and the release notes state it has fixed more Mountain Lion bugs.

Removing old equipment from datacenter

— 125 views — No comments

We’ve virtualized many servers already this year. Last month we moved the MD equipment that still needs to be virtualized. Today we removed the old MN servers that are no longer needed due to our new private cloud. All our main equipment is now together in the DC-2 datacenter in Amsterdam!

I’m upgrading our MySQL master/slave setup and am moving it to new (virtual) hardware in our cloud environment. One of the things I did last night was moving the MySQL slaves to a new master that I had prepared in the new environment. This post describes how I connected the slaves to their new master in the cloud.

First, you’ll need to make sure the new master has the same data as the old one.
1. Make sure no more updates occur on the old master
2. Create a sql dump of the master using mysqldump
3. Import that dump into the new master using mysql cmd line tool

At this point both masters should have the same data.
4. Now, shut down the old master as it can be retired 😉
5. Before allowing write access to the new master, note it’s position by executing this query:

mysql> show master status\G;
File: mn-bin.000005
Position: 11365777
Binlog_Do_DB: database_name
Binlog_Ignore_DB:
1 row in set (0.00 sec)

We’ll need this information later on when instructing the slaves to connect to their new master.

6. It’s now safe to allow write access again to the new master
7. Do this on any slave, it will connect it to the new master:

CHANGE MASTER TO
master_host=’master_hostname’,
master_user=’replicate_user’,
master_password=’password’,
master_log_file=’log-bin.000005‘,
master_log_pos= 11365777

Note the ‘master_log_file’ and ‘master_log_pos’. Their values are the ones we selected from the master at step 5. Then check if it worked (allow a few seconds to connect):

mysql> show slave status\G;

Look for these lines, they should say ‘Yes’:

Slave_IO_Running: Yes
Slave_SQL_Running: Yes

And the status should be:

Slave_IO_State: Waiting for master to send event

That’s it, the slave is now connected to a new master. Test it by updating the master, and checking whether the slave receives the update too.