Posts

After restoring an OpenLDAP server I found these lines in the logs:

Mar  5 06:50:03 ldap slapd[4815]: <= bdb_equality_candidates: (uidNumber) index_param failed (13)
Mar  5 06:50:04 ldap slapd[4815]: <= bdb_equality_candidates: (uid) index_param failed (13)

This means OpenLDAP is query’ing its database, but found no index for fields it often uses. In this case ‘uid’ and ‘uidNumber’. It seems due to restoring the backup, these indexes got lost. Here is how to add the indexes again:

Stop the OpenLDAP server:

/etc/init.d/slapd stop

Open the config file where we’ll add the indexes:

vim /etc/ldap/slapd.d/cn\=config/olcDatabase\=\{1\}hdb.ldif

Add the new indexes, after the first ‘olcDbIndex: objectClass eq in’ line. In my case this was in the file:

...
olcDbIndex: objectClass eq
...

And I changed that to:

...
olcDbIndex: objectClass eq
olcDbIndex: uid eq
olcDbIndex: uidNumber eq
olcDbIndex: uniqueMember eq
olcDbIndex: gidNumber eq
...

Be sure not to touch other settings in that file. Just add the lines after the first index. After that, make sure to reindex the database:

slapindex -F /etc/ldap/slapd.d/

Since I ran that as root user, I need to fix permissions afterwards:

chown -R openldap:openldap /var/lib/ldap

Make sure when you do a ‘ls -la’ on /var/lib/ldap, all files (including the folder itself) are owner and group ‘openldap’, otherwise OpenLDAP will not start.

Now it’s time to start OpenLDAP again:

/etc/init.d/slapd start

And all should be well again! When it does not start and look like this:

PANIC: fatal region error detected; run recovery

Be sure to check the permissions as stated above!

Just a quick instruction on howto restore an OpenLDAP server using a ‘ldif’-backup-file:

1. Setup the server

2. Configure the ‘slapd’ package, be sure to use the right database name. It’s a bit confusing: you enter it as ldaptree.company.com, but this will be used to create an empty database. Make sure it matches your backup ldif structure.

3. Make sure OpenLDAP is stopped

4. Read the backupdata into the OpenLDAP database using slapadd program

slapadd -c -l backup.ldif

The -c continues on errors, which might be necessary for example because the ‘root’ is already created. You can also run without it, and fix any errors by hand in the backup.ldif file. -l specifies the file to read from.

5. Fix permissions, make sure ‘openldap’ is both user/group owner

6. Start OpenLDAP and the server should be up & running again!

Perl processes that got stock kept me from sleep last night. I’m not sure what happened, but probably they were waiting for the database that reached a max_connections limit for this particular user. When Apache reached its max processes, monitoring paged me. Fortunately this is all running in a cluster, so no service was interrupted.

A few days ago I found myself killing Apache processes from a user that created an endless loop. Also, some scripts our users upload generate a lot of load (which is ok for a while, but not too long). So I thought I’d write something in bash to help me with all this 🙂

The script below is what I’ve come up with so far and it seems to work pretty well. What it does, is allowing user processes to run for 10 minutes and then kick in and kill the process if it’s still there.

Apache processes are running as the owner of the account (using mod_ruid) so I can actually see to what user the Apache processes belong. Perl, of course, is also run as the account user. Making use of this is the base idea of the script. Sample ‘ps aux’:

user1        24891  1.1  1.8 112132 61000 ?        S    18:54   0:02 /usr/sbin/apache2 -k start
www-data     24894  0.1  0.8  82624 30240 ?        S    18:54   0:00 /usr/sbin/apache2 -k start
user2        24900  0.2  0.9  82984 31552 ?        S    18:54   0:00 /usr/sbin/apache2 -k start
www-data     25201  4.8  1.2  95540 43296 ?        S    18:57   0:00 /usr/sbin/apache2 -k start
www-data     25202  1.0  0.8  82972 30016 ?        S    18:57   0:00 /usr/sbin/apache2 -k start
user2        25213  6.0  0.1   8992  5692 ?        S    18:57   0:00 /usr/local/bin/perl -- /var/www/site.com/HTML/script.cgi

For safety, I ignore FTP (pure-ftp in my case) and SSH processes. And of course only UID’s from 1000 and up are taken into account. So the ‘www-data’ processes never gets killed’; ‘user1’ and ‘user2’ processes will be killed when they do not complete within 10 minutes.

#!/bin/bash

2012-03-04, remi: Kill processes from users (id 1000 and up) that have been running for more than 600 seconds

For safety, I exclude some processes that users might run that are OK (ftp,ssh,etc)

get processes

ps -eo uid,pid,cmd:9,lstart –no-heading |     tail -n+2 |     # we never want to kill pure-ftp     grep -v “pure-ftpd” |     #  nor sshd     grep -v “sshd” |     #  nor bash     grep -v “bash” | # ignore all sbin processes, incl Apache     grep -v “/usr/sbin” |     # loop remaining processes     while read PROC_UID PROC_PID PROC_CMD PROC_LSTART; do         # only interested in user processes, so ignore system processes         if [ $PROC_UID -ge 1000 ]; then                 # how long is this process running?                 SECONDS=$[$(date +%s) - $(date -d"$PROC_LSTART" +%s)]                 # 600 seconds should be more than enough                 if [ $SECONDS -gt 600 ]; then                         # now, output pid’s to be killed on the final line of this script                         echo $PROC_PID                         # do save log for debugging                         cat /proc/$PROC_PID/cmdline >> /var/log/killed.log 2>&1                         echo “, details: " >> /var/log/killed.log                         date >> /var/log/killed.log                         ls -la /proc/$PROC_PID/ >> /var/log/killed.log 2>&1                 fi         fi      done |      # finally, kill them!      xargs kill

Problems occur when the ‘cmd’ argument has spaces. Since the script delimiters its parameters by spaces also, a syntax error occurs. I worked around that by limiting the output to only 9 characters ‘cmd:9’. In my specific case that did the trick but I’d like to know if there’s a better way to handle it 🙂

Just run this script from cron every minute:

* * * * *  /usr/local/bin/killSlowUserProcesses.sh > /dev/null 2>&1

I hope this will bring me a good night’s sleep tonight 😉

Update: I’ve disabled killing of Apache processes since mod_ruid switches users around including back/forth to www-data. The process might be running for some time, it is not certain the current user has been running it all the time. I need to think about this one for some more time 😉 Updated the above script, added this line:

    grep -v "/usr/sbin" |

HOWTO quickly add a route in Mac OSX

— 284,728 views — 28 Comments

Adding a route manually can be necessary sometimes. When on Linux, I know the command by head:

sudo route add -net 10.67.0.0/16 gw 192.168.120.254

On the Mac the command is similar, but a bit different 🙂 Just as a note to myself and anyone else interested:

sudo route -n add -net 10.67.0.0/16  192.168.120.254

This sets up a route to the 10.67.0.0/16 net through gateway 192.168.120.254. First one on Linux, second one on Mac OSX.

CloudStack 3.0 released today!

— 104 views — No comments

Good news today when I came home from the office: CloudStack 3.0 stable has been released! I’d really been looking forward to this, because we’ll be using it in a big cloud project at work. With this release, we can finalize our cloud design and proof-of-concept setup. More about that later.

Thanks to the CloudStack team for this great release! 🙂

Redirecting incoming tcp connections with redir

— 4,402 views — 5 Comments

Sometimes you need an easy way to redirect incoming connections to another system. For example when migrating an old box to a new one. Today I came across an old note from myself explaining this. I thought it might be worth sharing 🙂

You’ll need the ‘redir’ program for this to work:

apt-get install redir

Redir redirects tcp connections coming in to a local port to a specified address/port combination like this:

redir –laddr=10.10.0.1 –lport=80 –caddr=10.10.10.1 –cport=80

This redirects web requests coming in at 10.10.0.1 to 10.10.10.1.

redir –laddr=10.10.0.1 –lport=21 –caddr=10.10.10.1 –cport=21 –ftp=both

And here the same for ftp. Note the –ftp option, this makes sure both passive and active ftp work.

Many years ago, when I didn’t know about this option, I had to rollback an upgrade in the middle of the night, because ftp redirection just didn’t work.. all I had to do was add –ftp=both to redir. I found it out the next morning, and did the upgrade again the following night. I’ll never forget! Just had to smile when I found the note today 🙂

CloudStack from an end-user’s point of view

— 6,854 views — No comments

For a Cloud project at work, I made some screenshots of CloudStack to show our management. They wanted to know what an end-user will see in CloudStack 3.0. This is CloudStack from an end-user’s point-of-view:

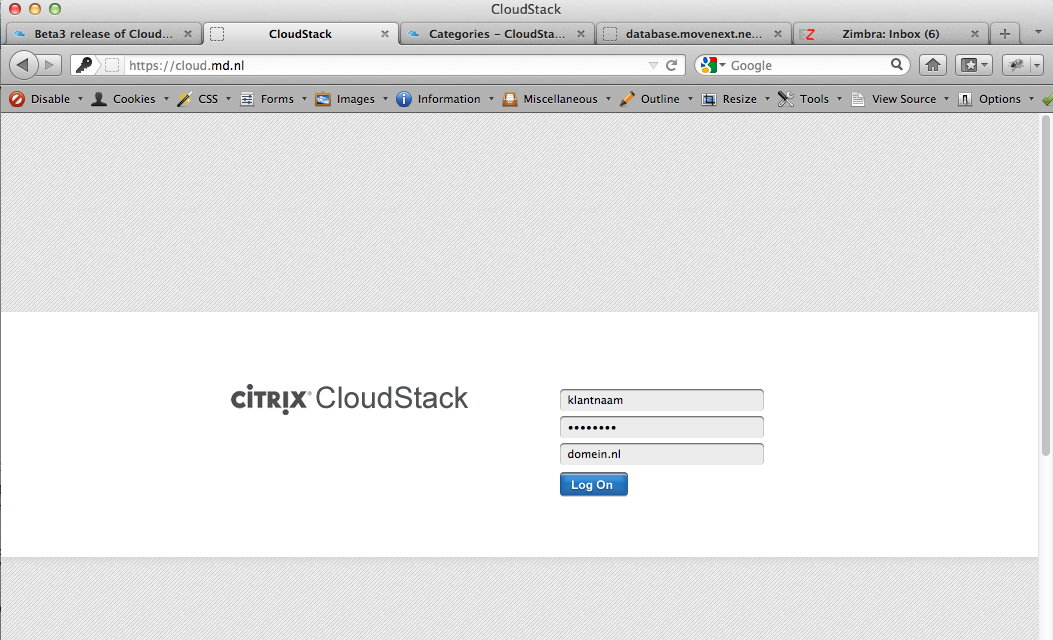
The login screen is where it all starts..

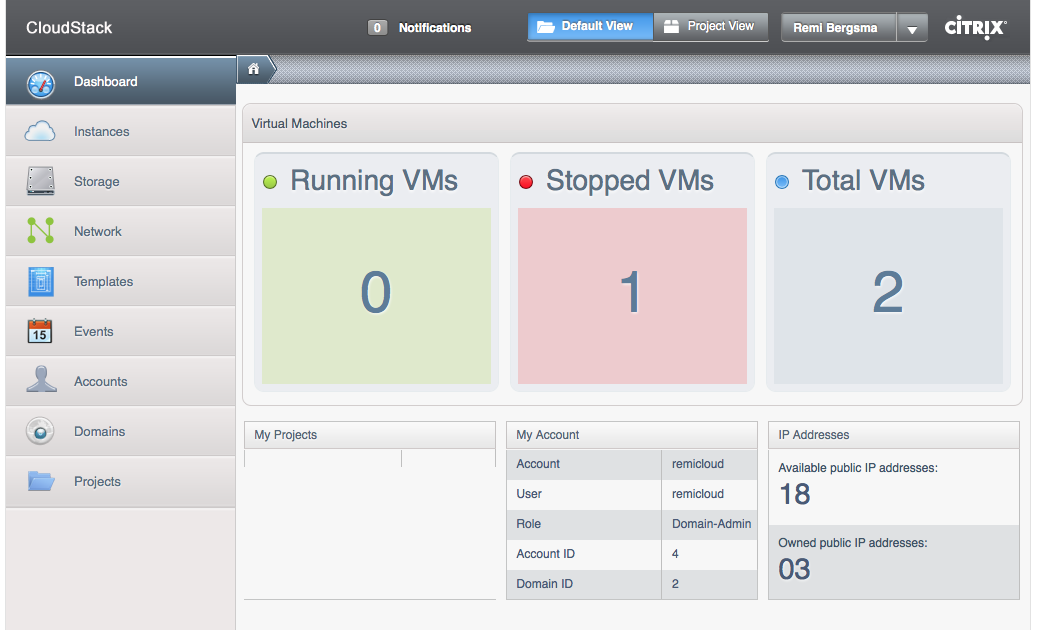
After logging in, users are presented with a Dashboard. Here is a nice and clear overview of what VM’s are running and stopped. As you can see, there is a nice menu at the right.

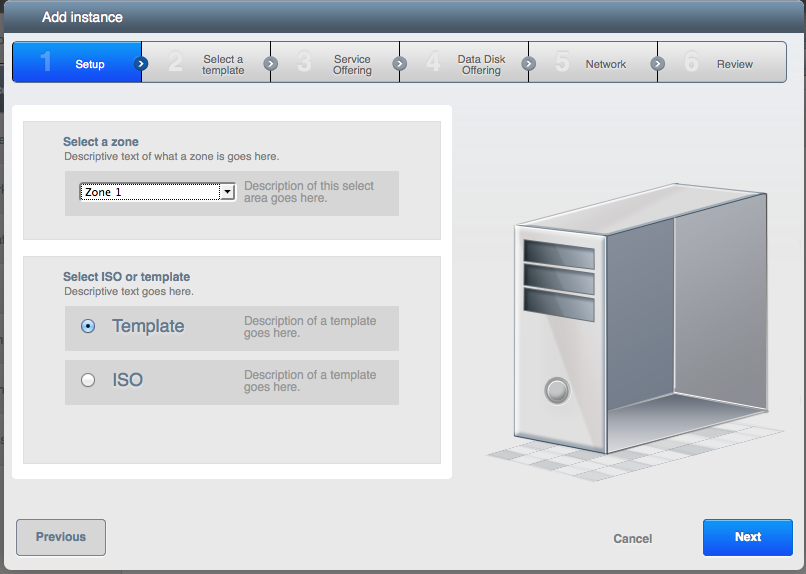
New VM’s can be added to CloudStack using a Wizard. The first step is to choose between a template (which is a pre-made server installation) or an ISO (which is more like booting an installation CD). Here we choose Template.

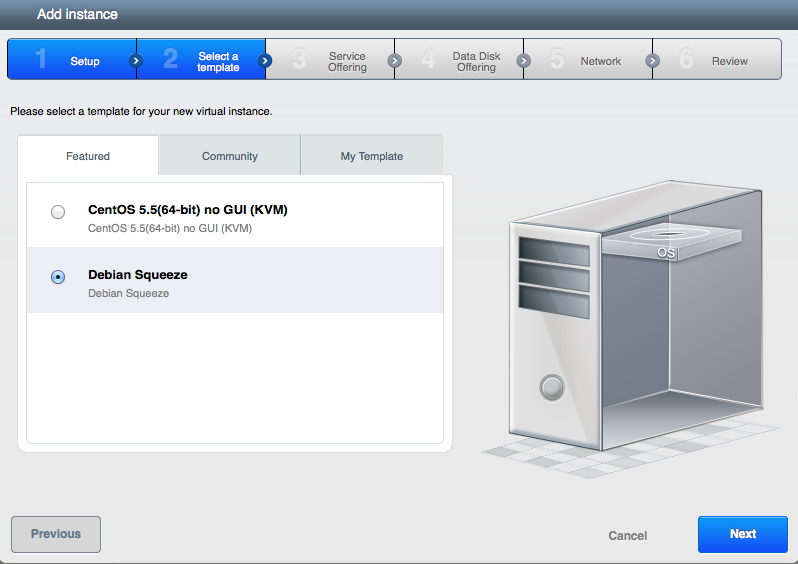
All available templates are presented to the user. We can choose between CentOS and Debian. Of course, any OS can be added as template. We select Debian here.

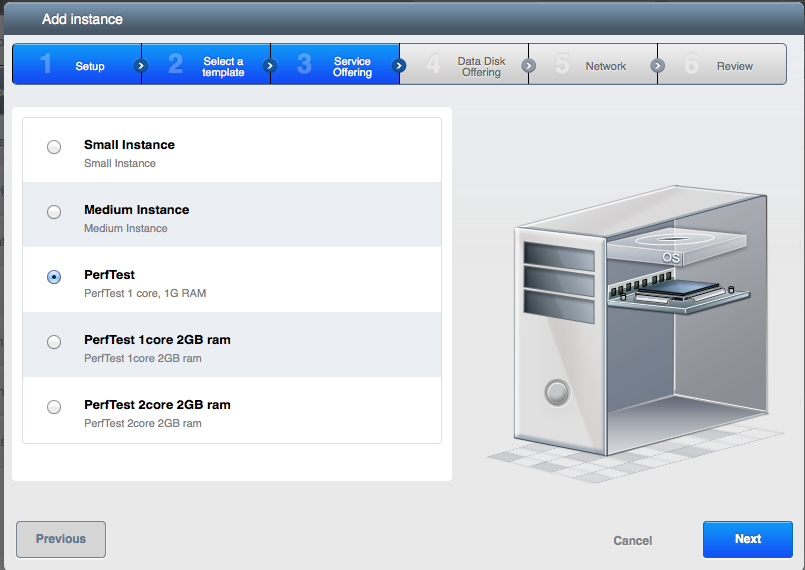
Now that we have selected a template, CloudStack wants to know what CPU and RAM the new VM should have. The user selects one of the pre-set options. It is also possible to present a price on this page, so the user knows what he will be billed for.

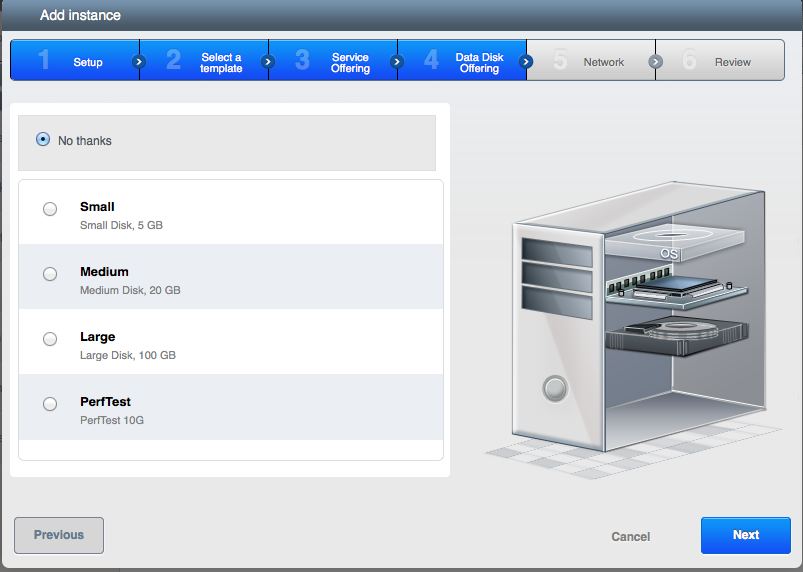
As an optional step, an additional data-disk can be added. This disk can later be detached from this VM, and attached to another. This way data can travel between VM’s.

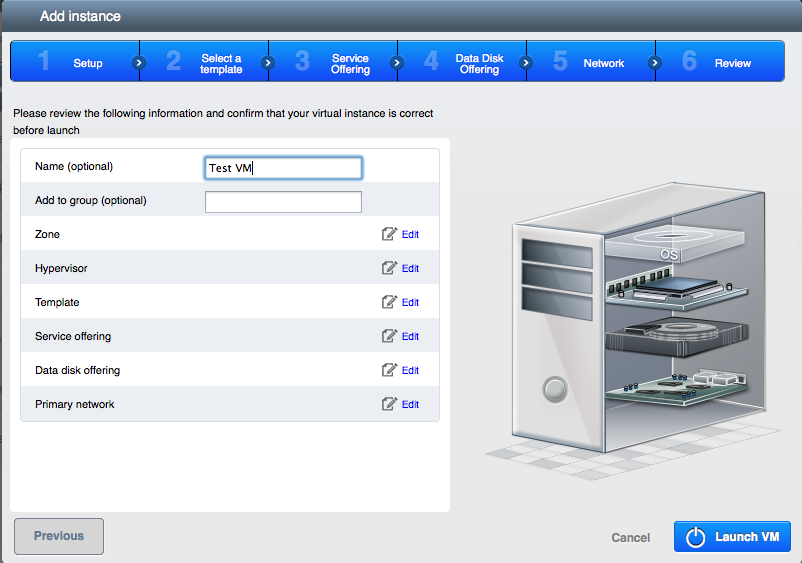
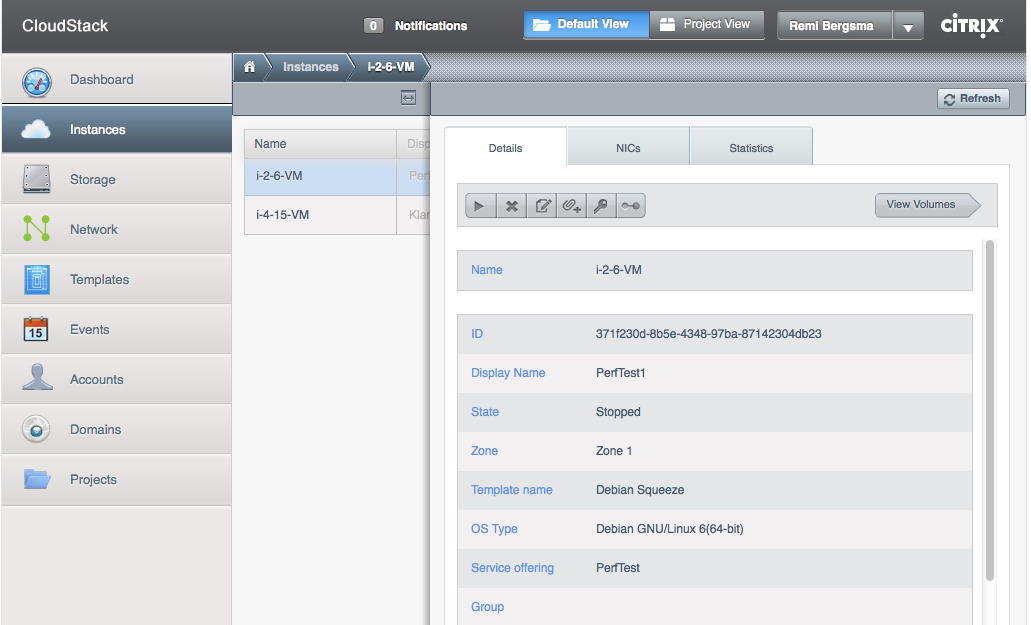
The final step is to give this VM a name and the Launch it! CloudStack will keep you posted about the status. Soon you will receive a message on screen noting the VM is running. In the menu you select Instances (that is what VM’s are called). When you select a given VM, you see a page with all of its settings. Have a look at the screenshot below.

This page shows the details of the VM. Different options are available when the VM is running or stopped etc. When not running, you can upgrade its service offering for example to a more powerful CPU or more RAM. When running, you can connect to the console to manage the VM through that.

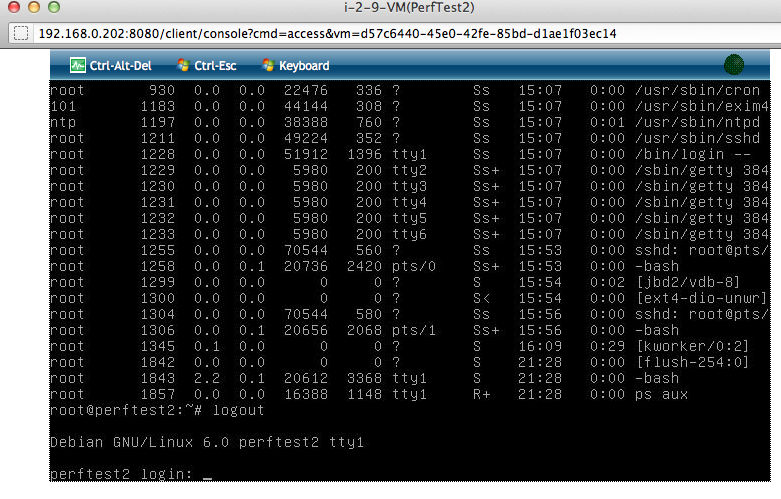
Working on the console (via a browser) looks like this. This is handy when you need to change the network options, or when a VM has a problem. Otherwise, working via a SSH-shell should be easier.

As you can see the CloudStack UI looks pretty nice! Not only is this a great product from a technical point of view, it also has a nice interface for users without a technical background.

CloudStack 3.0 is currently in beta and should be released any time soon.

Update: CloudStack 3.0.0 has been released. The screenshots look almost the same. Two differences:
1. On the login-page you now can choose between English and Japanese language
2. The ‘System’ menu on the left is renamed to ‘Infrastructure’, which indeed is a better name!

Backuping using rsnapshot made my life easier

— 2,737 views — 1 Comment

As a sysadmin I’ve many things to take care of. One of the most important is backups. As websites and mailarchives become larger and lager, it is an ongoing challenge to fit as many backups in the available backup space.

In the early days we’re backupping using rsync, tar and gzip. The biggest drawback was it takes a lot of space. On the bright side, it’s plain simple and just always works. All you’ve to do is untar an archive and everything is there again (i.e.: happy customer!). It helped me on many occasions. So I kept this old method for a long time and looked around for alternatives.

I’ve experimented with tools like rdiff-backup, but didn’t feel comfortable with it. Rdiff-backup just had disappointed me too many times. The version of client and server needs to be exactly the same. So during an upgrade from say Debian Lenny to Debian Squeeze, you either have no backups of the freshly upgrades machines, or, when you’ve upgraded the backupserver too, no more backups of the not-yet-upgraded machines. May be no problem for a few servers, but I’m managing many servers and this just doesn’t work. Another problem was that the rdiff-backup would got corrupt on some cases. In that case, only the last backup was usable, the others were gone. So the rdiff-backup experiment didn’t work.

Last week, when googling about ‘snapshots’ for another project, I just run into rsnapshot backup.Wow, that looked cool and simple! And since our backup server was suffering from low available disk space, which takes a lot of time to resolve each time, I decided to implement rsnapshot and see if it’d work for my environment.

Installation is simple:

aptitude install rsnapshot

Then edit /etc/rsnapshot.conf and tell the program what to backup, how many times, what to include/exclude and some more details. I found it very simple and powerful. The only thing you’ll need to know is that values are separated by tabs (not spaces) and paths have a trailing slash.

The magical thing rsnapshot uses is called ‘hardlinks‘. So, when rsnapshot finds two files in two backups are the same (i.e.: unchanged) it just makes a hardlink instead of saving two copies. This saves a lot of backup space!

This is how it looks like after rsnapshot has been running for some time:

215M    /backup/rsnapshot/daily.0/www.backupped-site.nl
820K    /backup/rsnapshot/daily.1/www.backupped-site.nl
820K    /backup/rsnapshot/daily.2/www.backupped-site.nl
820K    /backup/rsnapshot/daily.3/www.backupped-site.nl
820K    /backup/rsnapshot/daily.4/www.backupped-site.nl
816K    /backup/rsnapshot/daily.5/www.backupped-site.nl
219M    total

This website is 215MB. Saving 6 backups would normally cost 6x215MB = 1290MB which is 1.2GB. When using rsnapshot, only the changed (added, deleted, updated) files are saved, the rest are hardlinks. That turns out to be a great idea, since the backups now uses only 219MB instead of 1.2GB!

Using less space per backup means we’re able to save more backups for our customers 🙂

Home-key in OSX-Terminal

— 5,581 views — 6 Comments

I’m working in Terminal a lot. Lately I more and more use my MacBook Pro instead of my Ubuntu desktop. I’d to overcome some small issues. One was the missing Home-key, which allows you to jump all the way to the left on the current line.

Although the Mac doesn’t have a Home key, its function is available by pressing Fn+Shift+Left Arrow. And even better: Fn+Shift+Right Arrow jumps all the way to the right.

I feel right at home! 🙂

Impressed by upcoming CloudStack 3.0

— 618 views — 3 Comments

For about 6 weeks we’ve been working on finding out if -and how- it’d be possible to create our own cloud. My colleague Pim did a very good job on sorting out all the different software solutions (of course Open Source) and came up with CloudStack as the one we’d definitely to test with. So we did!

We’ve tested both the current stable 2.2 release and the upcoming 3.0 release, which is currently in beta. It took us quite some time to get the right hardware to test with. At first we used Ubuntu as OS but that turned out to be the wrong choice – for now. Ubuntu just isn’t very well supported and CloudStack more or less wants you to use RHEL or one of its free alternatives, like CentOS. We wanted to use Ubuntu at first because we had a lot of Debian experience. Although Google was our friend in helping sorting out differences between Debian-style and RedHat-style (for example in the networking setup). Looking back, moving to CentOS was no problem at all. We even have Kickstart running to be able to do quick unattended installs for the compute nodes. Cool! By the way, this is about the OS on the Compute nodes and Management-server. VM’s can of course be of any kind. In our case they definitely will run Debian.

CloudStack 2.2 works great now, but since we wanted so use some features of 3.0 we decided to give the 3.0 beta’s a go. The main feature 3.0 has, that 2.2 hasn’t, was the ability to move a VM from cluster to cluster (powered down, that is). Also networking has improved in 3.0. Another bonus is the gorgeous UI.

Our biggest hurdle was basically to understand how networking in CloudStack was meant to work. At the time we were testing beta1, the manuals were not complete yet so this proved to be a challenge at times… And – to be honest – we’d also some expectations of how we thought it’d work, that later on proved to be wrong. So we spend quite some time in playing with CloudStack, finding out how exactly it works, debug whenever something went wrong, etc. We listed the questions we had and in many occasions the CloudStack community was of great help. The good thing was that of all the the things we didn’t understand of that didn’t work, we were able to find a resolution to. Either we just had configured something wrong, or we found a bug (which was ok for a beta). It all looks very promising!

At the moment we’re testing beta3 and it has A LOT of improvements, both in UI, docs and functionality. Great job!

We went to Antwerp to visit “Build an Open Source Cloud Day“. There we learned a lot, and were able to talk to some experts on the subject. This helped us, back at the office, to start from scratch and setup CloudStack the right way (for us). Now we could really start experimenting! We’ve both setup a Basic and a Advanced zone to see what suites us most.

We’ve some performance testing to do, and make a decision about the storage we’ll be using. More about that in a later post.

Currently we’re finalizing designing our cloud and we’re pretty sure CloudStack will power it! By the end of the month 3.0 GA release will be there and then we’ll be able to build our cloud in production in march / april. Really looking forward to that!

I’ll keep you guys posted 🙂