


A lot of people seem interested in safe browsing over untrusted wifi and using a Raspberry Pi with an OpenVPN server to accomplish that. In this blog post, I’ll continue the series and explain how to set up secure browsing on mobile devices based on iOS.
When I’m not at home I use my iPhone or iPad and connect to the internet using either 3G or public wifi. I want to configure my mobile device to setup an encrypted VPN tunnel and route all traffic through it, so I have a safe browsing experience. Fortunately, there now is an OpenVPN app available on iOS that allows you to do that! Please install this app using the App Store, and continue reading to set it all up.
Preparing and importing the certificate
I’d suggest creating a separate certificate for each device you want to connect to your OpenVPN server. Although, it is possible to reuse the certificates on multiple devices, I’d recommend not to do so. First of all you will not be able to connect at the same time. Security-wise it is also smart to use one certificate for each device: whenever you lose your device, you can easily revoke the certificate and still connect from your other devices.
cd /etc/openvpn/easy-rsa/2.0/
. ./vars
./build-key remiiphone
You will now have a private key and certificate generated for your mobile device (check the ./keys directory). To be able to work with it on a mobiel device, we convert it to pkcs12 format using this command:
openssl pkcs12 -export -in keys/remiiphone.crt -inkey keys/remiiphone.key -certfile keys/ca.crt -name remiiphone -out remiiphone.p12
The password it asks is to protect the file. Remember the password, we will need it when installing on the mobile device. The file ‘remiiphone.p12’ should be created.
Next step is to bring this file to our mobile device. I did first scp it from the Pi to my iMac, then send myself an e-mail with the .p12 file attached. Since the file is password protected, it is safe to e-mail.
When you open the e-mail on your mobile device, and click the .p12 attachment you will be asked to install the certificate. Click install and confirm installation. If your device has a passcode, you will be asked to enter it. Afterwards, you need to type the password you choose when generating the p12 file. Finally, because I use a self-signed certificate, from an untrusted CA, iOS mentions the certificate is ‘Not Trusted’. Don’t worry, it’s fine.
The screenshots below show you how it looks like:

Installing the p12 certificate

Unsigned profile warning
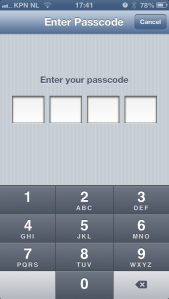
Enter device code
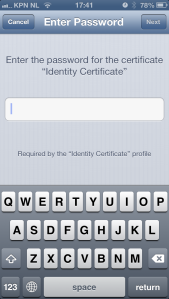
Enter password
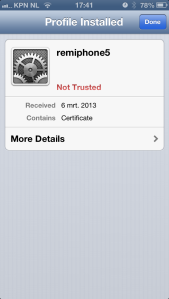
Installed certificate
Your certificate is now installed on iOS and it is ready to be used by the OpenVPN app.
Preparing and importing the OpenVPN configuration file
Next step is to provide the OpenVPN app with a configuration file. When you use the .ovpn extension, you can easily import it later on. But let’s start with setting up the configuration file.
client
dev tun
proto udp
remote pi.example.org 1194
comp-lzo
redirect-gateway
<ca>
-----BEGIN CERTIFICATE-----
...
q0c4PYC3BB7pIOA2fH7Clkb8TduDcz0kzPqStD3mVjLXx1+KVxVeGMgbj0QLbPoG
...
-----END CERTIFICATE-----
</ca>
# other options (mostly defaults)
nobind
persist-key
persist-tun
user nobody
group nogroup
resolv-retry infinite
Let me explain: This tells the OpenVPN app we’ll be using client mode and use the ‘tun’ device (the only supported in iOS). The server is using udp (choose udp or tcp) and can be found on pi.example.org using port 1194. Please adjust accordingly. Line 5 tells it to use compression, and line 6 sends all traffic through the tunnel. This is exactly what we want: this allows secure browsing.
The thing that took me some time to figure out is that you need to specify the CA certificate in the OpenVPN app. Even though it was included in the .p12 file we imported, iOS would strip it and therefore not import it. That’s why you should include it in your .ovpn file. Replace lines 8-12 with your CA certificate. It needs more lines, for sure. Just paste everything between the CA tags in the file and you’ll be fine. If you’ll get this error message, your CA is probably not right:
CORE_ERROR PolarSSL: error parsing ca certificate : X509 - The certificate format is invalid, e.g. different type expected [ERR]
Finally, I have some more settings in the file that are mostly defaults. Note: it is also possible to add your private key and certificate directly to the .ovpn file, in the same way as the CA is done above. I’d recommend not to do that because your .ovpn file is then all somebody needs to be able to connect. Since there is no password protection, e-mailing the file is insecure and dangerous!
Save the file, call it pi.ovpn or so, and e-mail this file to yourself as well. The e-mail app on iOS will allow you to import this configuration to the OpenVPN app by clicking on the file. The OpenVPN app will show your imported configuration. Confirm by tapping the green + icon. Next step, select the certificate to use with this profile. Here you will select the certificate we imported into iOS in the previous step. As a result, we can omit the username and password fields, as we use our certificate instead.
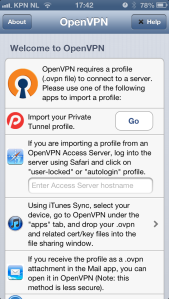
Welcome screen

Import .ovpn file
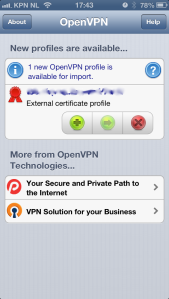
Confirm import
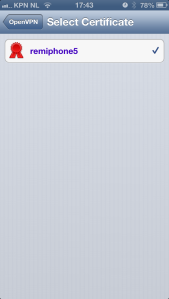
Select certificate

Configuration imported
Connecting..
Your OpenVPN client configuration is now imported and ready for use. Let’s test it! All you have to do to connect, is to tap on the OFF button just below the status ‘Disconnected’. You should now be connected to your OpenVPN server. Note the VPN icon on top of the screen while you’re connected.
The best way to verify everything is working properly, is to open your mobile Safari and visit a website that displays your ip address (such as ifconfig.me). It should show your OpenVPN server’s public ip address, instead of your mobile or wifi ip address. Try disconnecting and compare the ip addresses. Cool hah?!
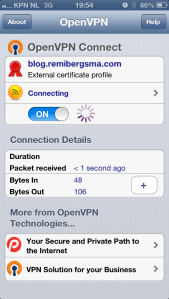
Connecting
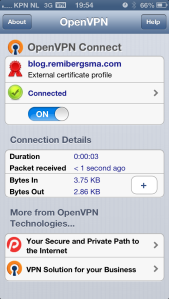
Connected!


Makes perfect sense but didn’t work for me. maybe my editor is forcing carriage returns when I paste the certificate key. I don’t know. What does this need to be so difficult? Maybe their next rev will make the “helpful” app work better.
What exactly goes wrong?
Finally! After 10-15 hours of searching this subject i must say yours is by far the best.
My goal was to use public wifi or 3G to connect to my openvpn server at my ubuntu home laptop. From my laptop i want this traffic to continue out on the internet, so everything is using my own ISP at home. After tunnel has been created, which there are alot of youtube videos etc to help out with config, certificates etc, the problems which i could never understand was: (iphone wouldnt reach web)
port forwarding 1194 udp port in router, to my laptop
dynamic dns host (no-ip.biz)
static routing through routers web interface, so internet can see my openvpn fantasy net 10.x.x.x
route adding, ip forwarding and NAT on ubuntu (i still dont really understand all of this)
But i got it to work, thanks Remi for your excellent guides! 😀
You’re welcome 🙂 Great to hear it works for you, thanks for letting me know!
Thanks for your post!
I emailed and installed the crt. But when I need to select the certificate it displays “No certificates are present in the Keychain” Any idea?
Hi, did you get any error message during install? Did it look like on the screenshots? Tell me a bit more and I’ll do my best to help.
This is a great explanation!!! I could only add ( because I’m a windows user) , the CA.crt need to be renamed to .txt then Open. I use ca.key by mistake.
I managed to get this all working, but my VPN-connection seems to drop after some seconds . also, when I browse to ifconfig.me, after loading for a while, I eventually seem to get my wifi-ip as a result…
I followed this tutorial (http://www.raspberrypi.org/phpBB3/viewtopic.php?f=36&t=21566) for my vpn-server, but altered the use of TCP port 34567 to UDP port 1194 (like you do).
Any thoughts on this?
Worked great for me. Thanks for posting these instructions! I did add a few more lines to the end of my config:
float
ns-cert-type server
cipher AES-256-CBC
I also, successfully, use these settings in my other client.conf files for my laptop client based on how I have open-vpn setup on my router.
This actually solved my problem, Steve. Thanks a lot!
Good to hear and glad to help Jeroen!
What exactly do I need to copy from certificate to config file?
Thanks
Hi Jan,
You should copy the ca.crt file in the ca code block, as shown. Copy everything from (and including) ‘—–BEGIN CERTIFICATE—–‘ until (and including) ‘—–END CERTIFICATE—–‘.
Let me know if this is what you needed to know. Feel free to ask more questions if you’re stuck some where 😉
Kind regards,
Remi
Thank you Remi that helped, it was a stupid mistake 🙂
Don’t worry, great it works now 🙂
You don’t actually need the p12 file at all; you can embed everything directly into the OVPN file. The process is the same as what you already did for the ca file; you just do the same thing for cert and key. (See https://community.openvpn.net/openvpn/wiki/Openvpn23ManPage#lbAV for the broad strokes.)
In our case we’re using tls-auth, so we had to embed that key too. Since the usual tls-auth line (the one that specifies the key file) also specifies the key direction we had to split that out to its own settling/line, using “key-direction” (e.g., “key-direction 1”).
Finally: mute-replay-warnings is (as far as I know) a server-side option, not a client-side one.
Thanks for your message!
In my testing I found including everything in the .ovpn file a bit scary. Because the .ovpn file is then all somebody needs to be able to connect since there is no password protection. Anyway, it is correct that it does work.
Will look into the ‘mute-replay-warnings’ option, as I’m not sure why I included it 😉
Here’s the description of ‘mute-replay-warnings’:
“Silence the output of replay warnings, which are a common false alarm on WiFi networks. This option preserves the security of the replay protection code without the verbosity associated with warnings about duplicate packets.”
Our server sends out email whenever it sees unexpected entries in its log. After adding mobile OpenVPN clients we started seeing lots of emails with lots of replay warnings. ‘mute-replay-warnings’ made them go away.
Thanks! I’ve removed it from the client config in the example above.
Hi…
I want to make an iPhone app Just like OpenVPN, would you please tell me the exact steps, which are needed..thanks in advance.
Great tutorial!
For those of us who are trying to do this and want to use tls-auth, here’s what you put into the configuration file:
key-direction 1
… contents of ta.key
Source:
https://forums.openvpn.net/topic12594.html
Thanks!
Hi Remi,
I need to configure openvpn with 3 servers…
openvpn server and client and third as bridge of two.
If we connect from first server it will return 3rd server ip.
54.234.156.64 —first Instance
23.20.136.17— Second Instance
23.20.151.40 —Third instance
when you run on 54.234.156.64
wget -qO- ifconfig.me/ip
you need to get back – 23.20.151.40
regards
sg
Hi Geetha,
Did you already solve your issue? If not, could you explain a bit more what goal you are after? Thanks!
Got this working with out tls-auth on iOS, after enabling it on the server and testing with Windows 7 and its working with ta.key, then adding ta.key to the .ovpn file as suggested for iOS I get The certificate format is invalid errors. What am I missing?
I’d like to block some of my applications’ access to internet not through OpenVPN (otherwise it’s not very secure, because for example when the VPN connection drops, the browser still tries to load the page using the available internet connection). Is it possible to do so on a jailbroken iphone?
I’ve never had a jailbroken phone, so I don’t know. But in general, what exactly do you want to do?
Great guide thankyou, finally go this working on my iphone over wifi. For some reason though it just wont work over 3g for me, i get server poll timeout.
Hi Remi..
Ref: geetha 16 July 2013 at 07:37
I am using Slackware 14 64 OS and configured OpenVPN client server on it successfully.
We’r having 3 three servers, we can take them any one is server, client and bridge of two.
If we connect from the first server, it will return the 3rd server ip address by using the below command, the connection go through via bridge mode. (as of my knowledge)
#wget -qO- ifconfig.me/ip
for example,
54.234.156.64 —first Instance
23.20.136.17— Second Instance
23.20.151.40 —Third instance
we will execute the above command from the first instance – 54.234.156.64, it will return the third server ip address – 23.20.151.40
But I’ve no idea about which one is client or server we need to configure.. this is scenario i observed from my client.
Regards,
Sg..
My installation on iPhone 5S is not working. I hear that the iOS 7 requires an update for OpenVPN app because of 64-bit OS. Any idea whether this is true?
Yes, iPhone 5S is a problem:
https://forums.openvpn.net/topic13838-30.html
Thanks! Worked flawlessly!
Thanks for this easy howto.
works fine by first run with iPhone 5S and iPad Air.
good job!
Maybe you can help with my iPhone 5 client for Openvpn. I have two Openvpn servers, one on a Pi and one on an Ubuntu 14 machine. The server configurations seem identical. Using the OpenVPN client, my iPhone 5 using iOS 8.1.1 can connect to the Pi server under UDP, but cannot connect to the Ubuntu 14 server under UDP. Other clients, Android and Windows using the Openvpn client, connect fine to both under UDP. I changed the Ubuntu server to TCP and now all the clients, including the iPhone, can connect, but I would prefer to have both servers use UDP.
Hi Remi, Nice post. Ive read this one (carefully) and many others. Im having a bear of a time getting my openvpn setup working with a Ubuntu OpenVPN (digital ocean) server a Mac Laptop (the one I travel with) and my home Lan (DD-WRT).
No trouble getting clients to connect. Big problems routing between clients no less routing to IP’s on my LAN.
At this point I think I am a little over my head. Id actually like to learn more than simply have this fixed for me.
Any chance you would consider a /paid/ hour tutoring me? Happy to make it work on Den Haag time (my father is from Den Haag).
My linkedin profile is https://www.linkedin.com/in/tamirsch . If you connect with me I will accept ;>