


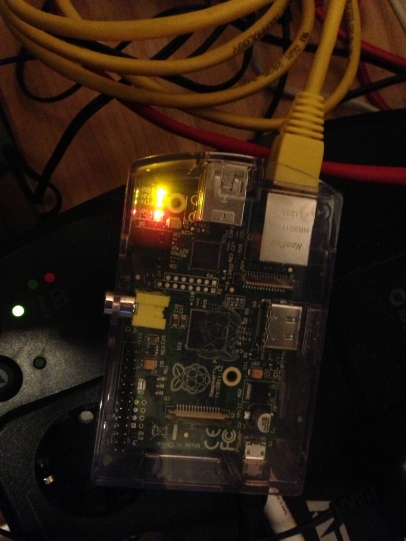
The Raspberry Pi is a $35 credit-card sized computer, with an ARM-based CPU. It uses very little power (only 3 Watt), so it’s ideal for a server that’s always-on. I was thinking what’d be a nice task for my Raspberry Pi and came up with an OpenVPN server. This enables me to connect to my home from anywhere, for example to access some files or to access the internet from there.
Before we start, Let’s have a look what’s on board the Raspberry Pi so you’ve an idea what we talk about:

Here’s mine in action:
Now, let’s see how we can turn it into a OpenVPN server. Actually this is very easy due to the fact that the Raspberry Pi is running (a modified) Debian Weezy called Raspbian. Since it’s Debian, you can use apt-get to install software:
apt-get install openvpn
After the install finishes, you need to generate keys for the server and the client(s). OpenVPN ships with the ‘easy-rsa’-tool. It’s easiest to copy the example folder and work from there.
cp -R /usr/share/doc/openvpn/examples/easy-rsa /etc/openvpn
cd /etc/openvpn/easy-rsa/2.0
The ‘easy-rsa’-tool has a file called ‘vars’ that you can edit to set some defaults. That will save you time later on but it’s not required to do so.
Load the vars like this (note the two dots):
. ./vars
Then we need to generate keys:
./clean-all
./build-ca
./build-key-server server
./build-key client-name
./build-dh
The first line makes sure we start from scratch. The second generates a key for the Certificate Authority. The key for the server itself is generated on the third line. Repeat the forth line for each client that needs to connect. Finally, we need the Diffie Hellman key as well, which is generated on the fifth line. Make sure you use a 2048 bit key, as suggested in the comments.
We need to copy the keys to the OpenVPN folder.
cd /etc/openvpn/easy-rsa/2.0/keys
cp ca.crt ca.key dh2048.pem server.crt server.key /etc/openvpn
Last step is to configure the server. You can copy the example config and make sure it points to the certs you just created.
cp /usr/share/doc/openvpn/examples/sample-config-files/server.conf.gz /etc/openvpn
gunzip /etc/openvpn/server.conf.gz
vim /etc/openvpn/server.conf
When you’re done, start OpenVPN like this:
/etc/init.d/openvpn start
Response looks like:
[ ok ] Starting virtual private network daemon: server.
Verify it by running:
ifconfig tun0
You’ll see:
tun0 Link encap:UNSPEC HWaddr 00-00-00-00-00-00-00-00-00-00-00-00-00-00-00-00
 inet addr:10.8.0.1 P-t-P:10.8.0.2 Mask:255.255.255.255
 UP POINTOPOINT RUNNING NOARP MULTICAST MTU:1500 Metric:1
 RX packets:49 errors:0 dropped:0 overruns:0 frame:0
 TX packets:16 errors:0 dropped:0 overruns:0 carrier:0
 collisions:0 txqueuelen:100
 RX bytes:3772 (3.6 KiB) TX bytes:1212 (1.1 KiB)
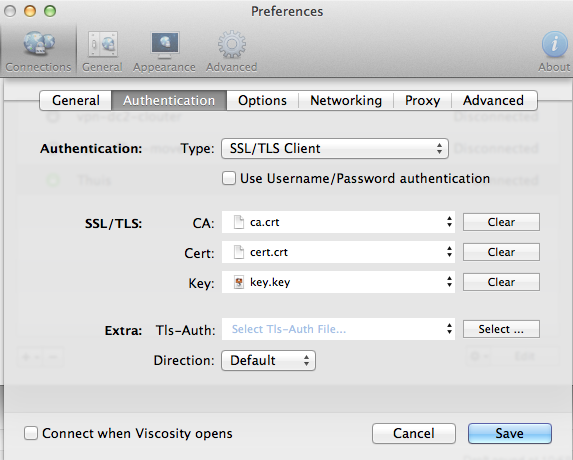
Now you should be able to connect to the OpenVPN server with a client. I’m using Viscosity on Mac OSX, but there’re many clients available on almost any platform (Windows, Mac OSX, Linux). You need the client.crt, client.key and ca.crt files plus the ip-address of your Raspberry Pi.
Connecting should now work without trouble. Have a look at ‘/var/log/syslog’ to access the logfiles. You’d be able to see which client connects:
Jan 5 22:07:56 raspberrypi ovpn-server[14459]: 1.2.3.4:64805 [client-name] Peer Connection Initiated with [AF_INET]1.2.3.4:64805
Now that all is working, time for a last tip: when you want to access the network behind the Raspberry Pi through your OpenVPN connection, configure OpenVPN to push the right route to the clients. Edit the OpenVPN server config, and add a parameter like this:
push "route 10.1.7.0 255.255.255.0"
Be sure to enter the network- and netmask address that match your network setup. The route is automatically added on connect, and removed on disconnect.
Finally, enable routing on the Rasperry Pi:
echo 1 > /proc/sys/net/ipv4/conf/all/forwarding
Have fun with it, you can do a lot of great things with this little machine!
Update: Also see these follow-up posts that contain more detailed info on some interesting use cases and help you set it up:
HOWTO connect to hosts on a remote network using OpenVPN and some routing
Secure browsing via untrusted wifi networks using OpenVPN and the Raspberry Pi


Hi,
thanks for your tutorial everything works great, but I wasn’t able to setup access of network behind the Raspberry pi. Where can i find my network and netmask address?
Tomas
Hi Tomas,
Cool you’ve got it running too 🙂
You can find your network and netmask address using the ifconfig utility. This onleliner shows your netmask:
Also, make sure the hosts you are connecting to through the VPN do know the route back to your ip. If the VPN server is not the default gateway on the hosts you’re connecting to, you will need to add a route so they know how to reply.
When you assign 10.8.0.0/24 addressess to your VPN clients (the default), add something like this to the hosts you are connecting to:
Then it should work 🙂
PS: For network address calculations, have a look at the cmd line program called sipcalc.
Ok. I’m almost there :). So you say that vpn server(Raspberry pi), have to point to default gateway (in my case ip of my router 192.168.0.1). Pointing is done trough setting this: push “route 192.168.0.1 255.255.255.0” in the /etc/openvpn/server.conf of my Raspberry pi. Then I need to run this command: route add -net 10.8.0.0/24 gw 192.168.0.109 ( the ip address of my vpn server Raspberry pi) on all of my computers in vpn network.
Am i right? I believe not, because it doesn’t work 🙂
Hi Tomas,
It’s the other way around: when the pi is NOT the default gateway for the hosts you connect to on the local network, these hosts need to know the route back to the VPN client.
Example:
server1 is on the local network and has ip 192.168.0.11
the pi is on the same network and had 192.168.0.2
you also have a router with address 192.168.0.1
You connect to some public ip-address and that’s how you connect to your pi using OpenVPN. When you connect, your OpenVPN clients get a route ‘pushed’ saying that 192.168.0.0/24 is behind the OpenVPN. So, when you connect to 192.168.0.11 the OpenVPN client knows this is behind the pi, and routes it to the pi. The pi also knows this ip, because it is on the local network. So far, so good. Now the server1 wants to respond to the OpenVPN client. The address is something like 10.8.0.6. Since server1 does not know 10.8.0.0/24 (only 192.168.0.0/24) it sends this to the default gateway. And this is your router that will probably drop it because it is unrelated and it too does not know 10.8.0.0/24.
The solution? Add a route to 10.8.0.0/24 on the server1 so it knows how to respond. You might also be able to add this to your router, so packets that are sent to the default gateway make it to the pi. Because the pi knows 10.8.0.0/24 and routes it over the VPN to the client.
This way the circle is complete and all should be working 🙂
I hope this helps!
Thanks a lot Remi, that made it clear :). And another question, what if I want to use my Raspberry as VPN proxy? What do i need to setup to redirect http requests of my computer trough VPN to my VPN server?
Hi Tomas,
So, if I understand this correctly, you want to use a proxy server on the VPN client, that is in the network behind the VPN server? You should be able to reach this server already, so just ‘forget’ the VPN and enter the correct proxy url as you’d do when you’re on the local network: it’s the same.
In case you want to use the pi as a proxy, I think the machine is not powerful enough for that task since you’d have a pretty bad disk performance. But a Proof-of-Concept will probably work.
Good luck and have fun with the pi!
Thanks Remi 🙂
You’re welcome! I’ve written another blog on this subject to clarify the subject a bit more. See link below.
Hi Remi
First, thanks for a great article. I’ve managed to get the OpenVPN server set up on the Raspberry PI and can connect to it from a Mac running Viscosity. However I run into trouble when I try to use the VPN connection to connect to the internet (i.e. I’ve configured the client to “send all traffic over VPN connection in Viscosity”). The Pi is receiving packets (as per ifconfig) but isn’t sending anything back. To eliminate one cause I still get the problem when I flush iptables with sudo iptables -F (hence I don’t think its firewall related)
So its probably a config setting in a network file that I’m missing – I’m a complete newbie at this !
If you have any suggestions I can try that would be great.
Thanks
Hi Sam, I think you might need to allow the Pi to forward packets (make it work like a router). Try:
If this works, make it permanent by editing /etc/sysctl.conf:
Good luck!
Thanks for the suggestion Remi but I already have net.ipv4.ip_forward=1 set in sysctl.conf. I’ve managed to get packets sent and received by adding this line to /etc/openvpn/server.conf
push “dhcp-option DNS 10.8.0.1”
Trying to browse BBC news now results in a timeout and this error message :-
“The server at news.bbc.co.uk can’t be found, because the DNS lookup failed”
From more research I’m wondering if I need to install bind9 and set that up to allow DNS requests from 10.8.0.1 (?) Again not entirely sure how best to do that ..
To try and further eliminate causes :-
– Vivacity client connection is set to “send all traffic over VPN connection”
– VPN connects without issue and I can see packets received and sent both from Vivacity connection details and ifconfig on the Pi
– I’m flushing iptables so firewall restrictions shouldn’t be a cause
– I can ping sites by IP and name (e.g. news.bbc.co.uk) from the Pi
– I can browse by IP to a WordPress site hosted locally on the Pi via the VPN connection
I think I’m close and missing something obvious. Any suggestions would be much appreciated 🙂
Hi Sam,
Before spending a lot of time on setting up your own nameserver, just test with a public one. Use 8.8.8.8 or 8.8.4.4; these are Google’s public DNS servers. Quite easy to remember, and easy for testing as well!
Can you access servers on the remote network from the VPN client?
To further debug this, I’d use ‘traceroute’ and ‘tcpdump’ to find out what’s going on.
Remi
I’m stuck on the first steps. For some reason clean-all doesn’t finish and subsequently when I run build-ca it prints that I should source vars and then clean-all. I’ve done everything I could think of. Can I not configure this over ssh? Can it not find this pkcs11-tool? I don’t know where it is or if it is aliased something else.
You can do this over SSH, no problem. When sourcing the vars, did you run ‘. ./vars’ aka: ‘dot space dot slash vars’? Instead of the first dot, you can also enter ‘source’: ‘source ./vars’.
After sourcing, you should see environment vars named like KEY_* when running ‘export’. When you see them, sourcing went ok. When not, something went wrong and we should look at any error messages in logs etc.
Hope this helps!
It was simple actually, I chown’d /etc/openvp/easy-rsa to change ownership to user: pi and then everything went smoothly. I was playing around with ssh’ing into the pi from my iphone and the interface is cumbersome on the app i’m using.
Nice! Thanks for letting know how you fixed it!
Almost there… OpenVPN gui on Windows 7 says it’s completed the initialization process and it looks connected. I can ssh into the pi still but no response from any servers via chrome. However, I can traceroute and it looks like my default gateway at home is being used to access the internet: http://pastebin.com/CJHtgLX7 I close the vpn connection and access to the internet via browser resumes like normal. Thanks for your help! This got me most of the way there. Also, I have ip_forward turned on.
Could it be that the hosts in your network do not know the route back to the OpenVPN clients, as described and detailed here? Also make sure the Pi is enabled to route traffic for you and that you are actually pushing the route to the servers behind the Pi to the OpenVPN client. I think one of these might be the missing piece here.. Let me know!
Hi Remi
I’m using 8.8.8.8 and 8.8.4.4 now in server.conf but no luck unfortunately.
What would be the best way to try to connect to a server on the remote network – i.e. if I have a server on the remote network on 192.168.0.3 should I try to ping that once I’ve connected over the VPN? I’ve added push “route 192.168.0.3 255.255.255.0” to server.conf.
When trying to traceroute to news.bbc.co.uk when the VPN is connected this stops and just reports “unknown host news.bbc.co.uk”)
Traceroute without using the VPN (eg over local wifi network) correctly gets to news.bbc.co.uk (212.58.244.132) after about 10 hops.
Thanks
Sam
Hi Sam,
The route you push is a whole /24, so 192.168.0.0 should be ok. 192.168.0.3 and all ip’s starting with 192.168.0. are automatically included (due to the specified netmask). Pinging such a host is a good first test. Connect the VPN, then ping 192.168.0.3. It should reply. Next, try to SSH to it (if it runs it) or connect any other service. If this works, you can successfully access services on the remote network.
Why do you want all internet traffic to go through the VPN as well? This should not be a problem, as long as there is a router on the remote side that does some NATting on the 10.8.x addresses. This router is probably the default gateway of the Pi.
When all traffic goes through the VPN and you do a traceroute to news.bbc.co.uk. What happens?
Hi Remi
OK, I now have push “route 192.168.0.0 255.255.255.0″. To test this I’m using a Macbook Air tethered to an iPhone so its not going over a wireless network. VPN is connected and redirecting all traffic through VPN. iptables are flushed on the Pi (probably irrelevant 🙂
1) I can ping 10.8.0.1 and 10.8.0.6 (client IP indicated in Vivacity)
2) I can SSH to the Raspberry PI no problem but can’t ping it (?). I have SSH on a non standard port for security.
3) I can’t ping 192.168.0.3 or anything else under 192.168.0.* I get messages “Request timeout for icmp_seq 0 (1, 2, up to 13)” , 15 packets transmitted, 0 packets received, 100% packet loss”
4) ping news.bbc.co.uk results in “cannot resolve news.bbc.co.uk: Unknown host”
5) ping 212.58.244.56 results in the same timeout messages as for trying to ping 192.168.0.*.
6) traceroute news.bbc.co.uk results in “traceroute: unknown host news.bbc.co.uk”
What I’m hoping to achieve is ability to connect to the Raspberry Pi on public wifi but be able to browse the web through a secure connection that can’t be sniffed. I’m not fussed about connecting to other servers behind the Pi.
Thanks for sticking with me on this 🙂
Hi Sam,
Well, that’s a nice use case! I did some testing this evening and managed to get this to work. Right now, my MacBook is connected to my iPhone and connects via 3G network to my Pi. It sends all traffic over the vpn link. When I browse right now and visit a site, my home-ip is shown. This is expected behavior of course.
I was typing in this comment how I did it, when I realized I could as well write another blog about it 😉
Have a look here, and let me know if it works for you too!
When it doesn’t work for you, please check if your router (the default gw for the Pi) knows the 10.8.0.0/24 route. Otherwise, the router does not know how to reach the OpenVPN client and nothing works. From your story, I suspect this to be the case. More info also in this post.
Have fun and let me know!
Hi Remi
Glad to see you like the use case, still trying to get things working from this end unfortunately.
Thanks for pointing me to the other article you wrote, very interesting.
Here’s what I’ve done so far ..
1. Double checked that I have net.ipv4.ip_forward=1 in /etc/sysctl.conf. Also made sure this was activated with sudo sysctl -p
2. Confirmed I have push “dhcp option DNS 8.8.8.8” and push “dhcp-option DNS 8.8.4.4” in /etc/openvpn/server.conf
3. My home network with the pi on it is 192.168.0.0. The Pi has a static IP – 192.168.0.111
4. My router is on 192.168.0.1 and is a rather old Sky Netgear DG834GT. I added a static route on the router as follows (and rebooted the router for good measure)
Destination IP address – 10.8.0.0
IP Subnet mask – 255.255.255.0
Gateway IP Address 192.168.0.111
Metric – 3
5. This didn’t work so I then entered this while logged into the Pi as root
route add -net 10.8.0.0/24 gw 192.168.0.111
6. No luck with this either – still get the DNS lookup failure when trying to browse via VPN.
7. Running route -n on the Pi gives me this information :-
Destination Gateway Genmask Flags Metric Ref Use Iface
0.0.0.0 192.168.0.1 0.0.0.0 UG 0 0 0 eth0
10.8.0.0 192.168.0.111 255.255.255.0 UG 0 0 0 eth0
10.8.0.0 10.8.0.2 255.255.255.0 UG 0 0 0 tun0
10.8.0.2 0.0.0.0 255.255.255.255 UH 0 0 0 tun0
192.168.0.0 0.0.0.0 255.255.255.0 U 0 0 0 eth0
Thanks
Sam
Hi Sam,
Step 4: That does not help, as you can see in the routing table there are now two routes for the 10.8.0.0 network. Revert it like this:
Step 3: I’d use metric=1 because it’s a direct connection, but apart from that it looks ok. Can you try a ping test from the Netgear and ping 10.8.0.2 (this is the address of the OpenVPN server?
If this works, and it should, then try the OpenVPN client (probably 10.8.0.6). If it doesn’t work, there’s something wrong in the routing between the Pi and the Netgear. That should be fixed first, because everything else (including Internet access and DNS resolving on the OpenVPN clients) depends on it.
Do you still see the correct route on the Netgear (did it survive a reboot)?
Good luck!
Hi Remi
I can have another go when I’m bac tonight however looking at route -n its interesting that it is referring to 10.8.0.2 rather than 10.8.0.1. I believe my openvpn server should be running on 10.8.0.1 (ifconfig below). Could that be the cause; if so how can I change the routes?
Thanks
Sam
tun0 Link encap:UNSPEC HWaddr 00-00-00-00-00-00-00-00-00-00-00-00-00-00-00-00
inet addr:10.8.0.1 P-t-P:10.8.0.2 Mask:255.255.255.255
UP POINTOPOINT RUNNING NOARP MULTICAST MTU:1500 Metric:1
RX packets:0 errors:0 dropped:0 overruns:0 frame:0
TX packets:40 errors:0 dropped:0 overruns:0 carrier:0
collisions:0 txqueuelen:100
RX bytes:0 (0.0 B) TX bytes:3360 (3.2 KiB
On the Pi pinging 10.8.0.1 is successful. Pinging 10.8.0.2 fails (timeout)
Ok, same here so this is expected behavior.. It’s a point-to-point connection, so you probably can only ping the .1 But, the route seems ok after all. To be sure: can you connect a VPN client, see what ip address it gets and try to ping that one (10.8.0.6?) from the Netgear? Also reversed, so ping 192.168.0.1 (I think) from VPN client -> Netgear. If one of them does not work, try ‘traceroute -I -n’ (I=capital i) so see where it goes.
Are there any restrictions in the Netgear, for example only allowing 192.168.0.x or so?
Anyway, a work-around is to NAT the 10.8.0.0/24 network on the Pi, but that shouldn’t be necessary. I haven’t done that and it works fine here.
It does look promising so far, so we must be getting close 😉
Ok so I’ve done these tests with my Macbook Air tethered to my iPhone through USB.
I’ve modified my Netgear static route to use metric 2 (metric 1 was not allowed).
VPN client connects OK as usual – client IP is 10.8.0.6.
Route Table on Pi
Route table on Netgear
Where x.x.x.x is my ADSL IP address and y.y.y.y is my ADSL gateway IP address
When connected on VPN
1. Router ping fails to 10.8.0.6 (100% packet loss) (this is if macbook connects via local wifi – if on VPN via 3G I can’t browse to 192.168.0.1)
2. Router successfully pings 10.8.0.1 (if macbook connects via local wifi)
3. Router successfully pings 192.168.0.111 (if macbook connects via local wifi)
4. VPN client fails to ping 192.168.0.1 (100% packet loss)
5. VPN client successfully pings 192.168.0.111 (Pi local IP address)
6. VPN client successfully ping 10.8.0.1
7. trace route -I -n from VPN client returns this
I’ve had a look in the router for any restrictions but couldn’t see anything obvious ..
Router is being used as a DHCP server. Starting IP is 192.168.0.2 (default). Ending IP is 192.168.0.254.
Thanks
Sam
Hi Sam,
Does the macbook, while connected to VPN server, has a route to the 192.168.0.x network (check netstat -nr)? If so, I wonder where it goes to. Did you disable the Wifi at the time you were testing with the iPhone connection? I’m wondering whether the macbook is getting confused about this (that is its routes: wifi knows 192.168.0.x and OpenVPN as well).
To rule this one out: Would it be possible to test it at some place with pubic wifi or so? That gives a good real-world test anyway.
Everything seems fine to me so I don’t think there’s something wrong with your configs.
Let me know!
Hi Remi
When I tested I disabled wifi on the Mac and only had a tethered connection with my iPhone. This was connecting over 3G to my router so there was no wifi involved.
Interesting, I ran netstat -nr while connected to VPN and did spot a route to 192.168.0 going to 10.8.0.5 (x.x.x.x is my ADSL ip address)
When disconnecting the VPN the 192.168.0 entry no longer appears (along with the other tun0 entries)
Bloody hell, I’m going nuts over this! 🙂 I’ve been looking at the best way to set up a VPN server for my iOS devices on the go and OpenVPN seemed to be the best choice. I actually used this to set my OpenVPN up: http://www.raspberrypi.org/phpBB3/viewtopic.php?f=36&t=21566 including the config files, before I found this blog. I’m up to the point where I can connect to OpenVPN, both through Viscosity and also through the OpenVPN client on iOS, but after that it’s a no go, probably related to the routing configuration. I just can’t get this figured out, a bit confused here, so if you can lend a hand that would be greatly appreciated!
My modem is at 192.168.100.1 (UBEE EVM2200)
The router at 192.168.1.1 (Airport Extreme)
RPi at 192.168.1.7
So I thought I’d put ‘push “route 192.168.1.0 255.255.255.0″‘ into my server.conf and then execute ‘route add -net 10.8.0.0/24 gw 192.168.1.7’ and I’d be fine (not really knowing what I’m doing here) but so far no luck. I’ve tried all imaginable combinations so I’m slowly starting to pull my hair out. 🙂
You probably have a routing issue: the router/modem should know the route to the OpenVPN network (are you using the default 10.8.0.0/24 by the way?).
Think of it this way: the OpenVPN clients needs to know about the network behind the Pi to be able to contact it (use ‘push route’). Hosts in this network, or at least the default gateway of the Pi (probably the router) need to know the opposite route: the route back to the OpenVPN client (use ‘route add -net …. or some webbased tool to setup the route and point to the Pi’s internal ip). You should not have to add this routes to the Pi itself, but to its default gateway instead. I’d recommend to remove it from the Pi (use ‘route del …’).
Good luck!
Hmm. If I understand this correctly: I can connect to the VPN just fine from outside, it’s just getting connectivity to 192.168.1.7 (RPi int ip) from 10.8.0.0 (OpenVPN netw) then? And that gets routed within the router? Then I’m probably doomed because I can’t seem to find any way to do th is on my Airport Extreme or the modem I have… 😦
Don’t worry. If the router does not support static routes, you can always configure them on the servers you connect to instead. So, say you’d want to connect to a server with ip address 192.168.1.10, you’d add a static route on this server back to the Pi. It depends on the OS how to do it exactly, but it definitely can be done. Just some more work, that’s all.
To add a static route in Linux:
To add a static route in OSX:
Please note that these are not persistent, so you need to add them to a shell script to make them available again after reboot.
Thank you Remi, that very well did the trick! Splendid!
Great, you’re welcome! 🙂
Hi Remi
Ok I tried a slightly different test .. turned off wifi on the macbook air and tethered to my iphone, connecting over VPN (so not possibility off wireless confusing things).
I can ping 192.168.0.1 from the VPN client (Macbook Air).
I can ping 10.8.0.6 (VPN client IP) from the router (using another PC on the network).
So the route looks ok 🙂 However when attempting to browse news.bbc.co.uk I get a timeout and a DNS failure message in the browser window. Trying to ping news.bbc.co.uk (or ping by IP) still fails to connect unfortunately (either host not found or Request timeout error)
Sam
Good news, because then routing is all working properly!
Can you have a look at the /etc/resolv.conf file? Does that file include the right DNS servers? If not, dont’t bother changing that file, as OpenVPN (and Mac OSX) will update it anyway. Check Viscosity, I believe it’s located at: Preferences, then networking and check ‘Enable DNS support’ option. That should allow OpenVPN server to push the DNS servers (which option I suppose you have in your config, server side).
OK, I’ve got “Enable DNS support” option in Viscosity but left the DNS server field blank. Also double checked that I’ve got 8.8.8.8 and 8.8.4.4 as the DNS servers in /etc/open/vpn/server.conf. No luck unfortunately, still get DNS error.
I tried entering 8.8.8.8 into Viscosity in the DNS servers field but didn’t work either. I can ping 8.8.8.8 when not on VPN but cannot ping 8.8.8.8 when VPN is not connected.
That is strange, Sam. The only way to sort this out is to debug everything and try to rule stuff out and then finally pin it down to its root cause. That’s not easy from here 😉
What I’d do is this:
1. Restart OpenVPN on the Pi, so you know for sure the current config is loaded and active
2. When connected, look what it puts in /etc/resolv.conf on the OpenVPN client. No need to supply DNS servers in Viscosity, just check the box and leave it empty
If it has 8.8.8.8 and 8.8.4.4 the that’s correctly. If not, doublecheck both server and client config for this (and restart or reload after changes)
3. If it’s ok, but does not resolve, try pinging the ip address as you did. When it does not work, run a traceroute to see where it gets stuck. You probably would want to run ‘traceroute -n -I 8.8.8.8’ (capital i).
4. Do the same for 212.58.246.129 (BBC’s ip) and 173.194.34.130 (Google)
You need to be able to ping and traceroute these ip’s
5. See what DNS servers are used on other hosts on the network you connect to and try these instead
6. Doublecheck you have no routes etc set for the 8.8.x.x network. Ping and traceroute the ip’s straight from the Pi as well
7. Doublecheck the Pi allows routing. A traceroute should pass the 10.8.0.1 hop
If you cannot contact 8.8.8.8 that is strange because you should. All is left to do now is find a properly working DNS server and have that one pushed to the clients. Then everything will work!
Plan B is to install this DNS server on the Pi, and push that ip. It takes some time to configure but that might be quicker after all 😉
Good luck!
I can certainly sympathise with this being difficult to debug from where you are. Definitely appreciate you helping me out, I am at least learning a good deal about networking 🙂
1. Restarted and iptables flushed. /etc/openvpn/server.conf looks like this
2. When connected /etc/resolv.conf on VPN client looks OK
nameserver 8.8.8.8
nameserver 8.8.4.4
3. Pinging 8.8.8.8 fails from VPN client. trace route gives this output
traceroute to 8.8.8.8 (8.8.8.8), 64 hops max, 72 byte packets
1 10.8.0.1 539.423 ms 569.774 ms 517.730 ms
2 192.168.0.1 522.075 ms 511.242 ms 516.077 ms
3 * * *
4. Same result when trying 212.58.246.129 and 173.194.34.130
5. Other DNS servers used on the router are 90.207.238.97 and 90.207.238.99. However using these rather than 8.8.x.x results in the same behaviour (steps 1-4)
6. Confirmed in routing tables on router, pi and mac osx client that 8.8.x.x is not present
7. trace route from Pi to 8.8.8.8, 212.58.246.129, 173.194.34.130 is successful. However traced route does not include 10.8.0.1 in any of the 3 cases so perhaps routing is not right ?
trace route from pi
traceroute to 8.8.8.8 (8.8.8.8), 30 hops max, 60 byte packets
1 192.168.0.1 (192.168.0.1) 2.006 ms 2.305 ms 2.528 ms
2 027e8f3e.bb.sky.com (my IP) 32.542 ms 34.169 ms 35.545 ms
3 10.245.175.161 (10.245.175.161) 34.810 ms 35.509 ms 36.126 ms
4 te0-6-0-7.er11.thlon.ov.easynet.net (89.200.134.223) 41.775 ms 42.578 ms 42.618 ms
5 72.14.215.13 (72.14.215.13) 39.237 ms 41.213 ms 42.824 ms
6 209.85.240.63 (209.85.240.63) 43.222 ms 209.85.240.61 (209.85.240.61) 35.168 ms 35.380 ms
7 209.85.253.90 (209.85.253.90) 36.184 ms 33.321 ms 34.040 ms
8 209.85.243.33 (209.85.243.33) 40.289 ms 209.85.240.28 (209.85.240.28) 40.538 ms 209.85.243.33 (209.85.243.33) 41.274 ms
9 216.239.49.38 (216.239.49.38) 95.765 ms 216.239.49.28 (216.239.49.28) 47.111 ms 47.289 ms
10 * * *
11 google-public-dns-a.google.com (8.8.8.8) 50.107 ms 50.254 ms 42.784 ms
route table on pi
Destination Gateway Genmask Flags Metric Ref Use Iface
0.0.0.0         192.168.0.1     0.0.0.0         UG    0      0        0 eth0
10.8.0.0        10.8.0.2        255.255.255.0   UG    0      0        0 tun0
10.8.0.2        0.0.0.0         255.255.255.255 UH    0      0        0 tun0
192.168.0.0     0.0.0.0         255.255.255.0   U     0      0        0 eth0
However /etc/sysctl.conf has forwarding enabled. Anything else I need to add ?
Hi Sam,
Thanks for all info! I have the same OpenVPN config and everything just looks right. From what you post it seems the 192.168.0.1 router does not allow the 10.8.0.0/24 network to access the network. Probably it has something to do with a NAT (Network Address Translation) rule there or so. What kind of router is this by the way? Does it say anything on NAT or the 192.168.0.0/24 network?
To prove this is the problem, please run this command on the Pi:
It will hide the 10.8.0.0/24 network behind the Pi’s address, so VPN traffic will now seem to appear from the Pi itself instead of the actual VPN client. May not be what you want, but it at least makes sure the other router does not get confused.
If this works, then you could debug this further. You know then you’ve to look at the router.
Disable the rule again like this, if you want:
Use ‘iptables-save’ to make the rule persistent.
Let me know! 🙂
Hi Remi
My router is a Netgear DG834GT. I couldn’t find anything specific in the settings around 192.168.0.0/24. I have got a static route set up to 192.168.0.111 and firewall ports open for VPN (port1194) and SSH (port 57474).
However your suggestion above worked if I flushed the iptables first – I can now browse websites when connected via VPN 🙂
The last thing I would like to do would be to get this working without flushing IP tables and losing all my existing rules. My /etc/iptables.firewall.rules (prior to dropping the rules and running your masquerade line above) looks like this :-
Please advise what changes I would need to make here to finish things off ?
Hi Sam,
This is because the line is entered after your reject and drop lines.
Try this:
Enable firewall, then run the iptables cmd I sent you but replace -A with -I (capital I).
When this works, add it to the script (using -A) but above the reject and drop settings at the bottom. This should then also work.
Hi Remi
Think I’m nearly there .. I modified my iptables file so that the drop and reject commands were at the bottom. I also added the lines for the nat at the bottom but above the drop and reject lines. Unfortunately this means at reboot the iptables isn’t correctly loaded (i.e. if I uncomment the nat lines at the bottom #*nat to #commit). I’ve tried uncommenting the block and just the -A POSTROUTING line. So I suspect its invalid formatting in the file that is now the problem. I also tried to Google an example file but with no luck.
Thanks
Sam
Hi Sam,
How did you notice it didn’t work? Did you test it, or didn’t the MASQUERADE rule show up when you run ‘iptables -L’?
It seems you generated the output using ‘iptables-save’ so that’s the right way to do it. Your output looks similar to when I try to create it.
Maybe you can add the rule by hand again and see at what positon of the file ‘iptables-save’ writes it. Then edit your own firewall file accordingly.
BTW: MASQUERADE rules are put in the NAT table. You can display its content with:
Hi Remi
I noticed that with my own edits that the iptables wasn’t loading correctly when I rebooted the Pi and looked at iptables -L (probably because the file was no longer valid). What I’ve done now is
1. Have my original firewall rules loaded
2. Run your line above to add the nat rule
3. iptables-save > a new firewall rules file, reboot
4. On boot up verified that filter and nat rules are in place.
5. However I’m still unable to have firewall rules and the NAT in place. Flushing the filter rules with iptables -F allows me to browse web pages (thanks to your masquerade tip), so I guess there’s a restriction in there still that is impacting the routing.
This is what iptables-save generated for my new firewall rules :
Thanks
Sam
Hi Sam, thanks for the explanation. Remember we were talking about DNS before? I don’t see rules allowing DNS so that might be the reason why it isn’t working for you. I’d recommend adding a rule to allow DNS port 53/udp and then try again!
Hi Remi
No luck unfortunately, still getting the same DNS error (unless I flush iptables). Is there another port that I need to open ?
I ran the following commands to open up port 53 (for both tcp and udp). I also tried this with only the udp rules in place but still got the same error.
sudo iptables -A INPUT -p udp -m udp –dport 53 -j ACCEPT
sudo iptables -A INPUT -p tcp -m tcp –dport 53 -j ACCEPT
sudo iptables -A INPUT -p udp -m state –state NEW -m udp –dport 53 -j ACCEPT
sudo iptables -A INPUT -p tcp -m state –state NEW -m tcp –dport 53 -j ACCEPT
and then did iptables-save again. This produced the following file :-
# Generated by iptables-save v1.4.14 on Mon Feb 4 21:13:59 2013
*filter
:INPUT ACCEPT [0:0]
:FORWARD ACCEPT [0:0]
:OUTPUT ACCEPT [0:0]
-A INPUT -i lo -j ACCEPT
-A INPUT -m state –state RELATED,ESTABLISHED -j ACCEPT
-A INPUT -d 127.0.0.0/8 -j REJECT –reject-with icmp-port-unreachable
-A INPUT -p tcp -m tcp –dport 80 -j ACCEPT
-A INPUT -p tcp -m tcp –dport 443 -j ACCEPT
-A INPUT -p udp -m udp –dport 1194 -j ACCEPT
-A INPUT -p tcp -m state –state NEW -m tcp –dport 57474 -j ACCEPT
-A INPUT -p udp -m state –state NEW -m udp –dport 1194 -j ACCEPT
-A INPUT -p icmp -j ACCEPT
-A INPUT -m limit –limit 5/min -j LOG –log-prefix “iptables denied: ” –log-level 7
-A INPUT -j DROP
-A INPUT -p udp -m udp –dport 53 -j ACCEPT
-A INPUT -p tcp -m tcp –dport 53 -j ACCEPT
-A INPUT -p udp -m state –state NEW -m udp –dport 53 -j ACCEPT
-A INPUT -p tcp -m state –state NEW -m tcp –dport 53 -j ACCEPT
-A FORWARD -j DROP
-A OUTPUT -j ACCEPT
COMMIT
# Completed on Mon Feb 4 21:13:59 2013
# Generated by iptables-save v1.4.14 on Mon Feb 4 21:13:59 2013
*nat
:PREROUTING ACCEPT [25:3912]
:INPUT ACCEPT [2:197]
:OUTPUT ACCEPT [14:972]
:POSTROUTING ACCEPT [14:972]
-A POSTROUTING -s 10.8.0.0/24 -o eth0 -j MASQUERADE
COMMIT
# Completed on Mon Feb 4 21:13:59 2013
Thanks again
Sam
Hi Sam,
The DNS iptables rules are below the DROP line and will therefore not work. Please move them up and try again.
In general: use iptables -I when there’s already a DROP statement on place or it will never match.
Also, have a look at the logs since you log what it drops (nice!). That should give some more hints on what’s going on 🙂
Thanks for the tip! I regenerated iptables with -I and now have the file below. The lines have now all been generated above the drop commands. Unfortunately I still get the same error.
I grepped /etc/syslog for “iptables denied” and saw this a few times, implying that iptables is blocking the router from getting to the Pi (?) Do I need a new rule to allow this ?
Feb 4 22:43:43 raspberrypi kernel: [ 26.921008] iptables denied: IN=eth0 OUT= MAC=b8:27:eb:e1:d3:6b:00:1b:2f:7b:e9:0a:08:00:45:00:00:4e:00:14:40:00:40:11:b8:ca SRC=192.168.0.1 DST=192.168.0.111 LEN=78 TOS=0x00 PREC=0x00 TTL=64 ID=20 DF PROTO=UDP SPT=3118 DPT=137 LEN=58
Thanks
Sam
Hi Sam,
UDP port 137 is NETBIOS Name Service; you wouldn’t normally need this. But you can try to allow all traffic between the router and the Pi. You’d probably already trust that network anyway.
Instead of the whole /24 you can also add the router’s ip address with /32.
Alternatively, try changing the ‘-A INPUT -j DROP’ line to ‘-A INPUT -j ACCEPT’ while leaving the rest in place. This disables the firewall, but violations will still be logged. This way you can do everything you want and later inspect the logfiles for violations. Add rules to allow them, do some more test work, and when no more violations are logged, you change it back to DROP. Then it should work. If you want to firewall this, you need to be very sure what traffic needs to pass and allow that. Another way to see what passess by is to use tcpdump and wireshark on the Pi. But that’s too complicated to explain for now 😉
Have fun, debugging always makes you learn new stuff 🙂
No luck unfortunately and I’ve run out of time as I fly abroad tomorrow and need to do some packing 🙂
Nethertheless I feel that I’ve learned a lot (and have a lot still to learn – especially iptables !). I’ll have another go at this when I get back in a couple of weeks.
Thanks a lot for your help over the past few weeks Remi, really appreciate your patience and help!
Thanks
Sam
Hi Sam,
You’re welcome! Have a nice trip and we’ll fix it later 🙂
If you need the VPN abroad, I’d disable the Pi’s firewall for now (if that’s possible) since it isn’t very much exposed to the Internet anyway. It at least works then.
Take care,
Remi
I get this error:
@raspberrypi:/etc/openvpn/easy-rsa/2.0# cp ca.crt ca.key dh1024.pem server.crt server.key /etc/openvpn
cp: cannot stat `ca.crt’: No such file or directory
cp: cannot stat `ca.key’: No such file or directory
cp: cannot stat `dh1024.pem’: No such file or directory
cp: cannot stat `server.crt’: No such file or directory
cp: cannot stat `server.key’: No such file or directory
Any idea?
It seems like the build commands did not finish properly. Did you run all the ‘./build-*’ commands? Any errors?
I experienced the same problem. I ran all the ‘./build-*’ commands without issue. Looking for suggestions. Thanks for sharing your expertise!
Hi Kirk,
Did you run these commands as root or prefixed with sudo? Have a look in the directory where you build the certs. They should be there (if you have write permissions). Please provide some more info otherwise and I’ll have a look!
I think as root, but I’m honestly not sure. I’ll go back and give that a try. Thanks!
take a look at the keys folder.
@Remi thx for the extensive coverage 🙂
You’re welcome and.. I overlooked that indeed.. they are of course in the /etc/openvpn/easy-rsa/2.0/keys folder 🙂 Thx!
PS: Updated the blogpost to make this clear.
Hi Remi,
Great stuff, even for a beginner like myself this is easy to setup. I have one question left though. For security reasons, which of the generated files do I remove from the Raspberry Pi and store somewhere else? I’m guessing the client key and certificate, correct?
Regards,
Marcel
Hi Marcel,
Glad you like it! The OpenVPN server does not need the certificates you generated for clients, so you can indeed safely remove them from the Pi. You need them on the client side only. You can always later revoke the client certificate on the Pi to disallow access if you want to.
Thanks!
Hi Remi
I think I’ve finally sorted this out. There were no further “iptables denied” messages from the iptables INPUT chain but I still had problems – so I added some further logging for FORWARD chain. From this I could see denied messages in /var/log/syslog, which I resolved by allowing forwarding to 10.8.0.0/24 (source and destination)
So my final iptables config (for anyone who reads this far 🙂 looks like this :-
# Generated by iptables-save v1.4.14 on Fri Feb 22 00:14:25 2013*filter
:INPUT ACCEPT [0:0]
:FORWARD ACCEPT [0:0]
:OUTPUT ACCEPT [0:0]
-A INPUT -d 192.168.0.0/24 -j ACCEPT
-A INPUT -p tcp -m state --state NEW -m tcp --dport 53 -j ACCEPT
-A INPUT -p udp -m state --state NEW -m udp --dport 53 -j ACCEPT
-A INPUT -p tcp -m tcp --dport 53 -j ACCEPT
-A INPUT -p udp -m udp --dport 53 -j ACCEPT
-A INPUT -i lo -j ACCEPT
-A INPUT -m state --state RELATED,ESTABLISHED -j ACCEPT
-A INPUT -d 127.0.0.0/8 -j REJECT --reject-with icmp-port-unreachable
-A INPUT -p tcp -m tcp --dport 80 -j ACCEPT
-A INPUT -p tcp -m tcp --dport 443 -j ACCEPT
-A INPUT -p udp -m udp --dport 1194 -j ACCEPT
-A INPUT -p tcp -m state --state NEW -m tcp --dport 57474 -j ACCEPT
-A INPUT -p udp -m state --state NEW -m udp --dport 1194 -j ACCEPT
-A INPUT -p icmp -j ACCEPT
-A INPUT -m limit --limit 5/min -j LOG --log-prefix "iptables denied: " --log-level 7
-A INPUT -j DROP
-A FORWARD -s 10.8.0.0/24 -j ACCEPT
-A FORWARD -d 10.8.0.0/24 -j ACCEPT
-A FORWARD -m limit --limit 5/min -j LOG --log-prefix "iptables forward denied: " --log-level 7
-A FORWARD -j DROP
-A OUTPUT -j ACCEPT
COMMIT
# Completed on Fri Feb 22 00:14:25 2013
# Generated by iptables-save v1.4.14 on Fri Feb 22 00:14:25 2013
*nat
:PREROUTING ACCEPT [313:24501]
:INPUT ACCEPT [10:1245]
:OUTPUT ACCEPT [23:1586]
:POSTROUTING ACCEPT [23:1586]
-A POSTROUTING -s 10.8.0.0/24 -o eth0 -j MASQUERADE
COMMIT
# Completed on Fri Feb 22 00:14:25 2013
So assuming this hasn’t left a gaping hole in my firewall I now have a fully working VPN server I can use when I’m next on public wifi 🙂
Many thanks for your patience and help with all this Remi !
Great to hear! You’re welcome, I’m glad it all works fine now 🙂
Take care!
For a little more explicit guide, go to http://raspberrypi.host56.com/index.php/tutorials/1-openvpn-server-tutorial . That one did the job for me.
Thanks for sharing, that seems like a nice guide. Especially if you need an exact step-by-step tutorial.
Be warned though: setting the keys directory to 777 might not what you want since it allows anyone to write in the directory. 755 should be enough, if you don’t look at ownership. Only the openvpn user and root needs access.
Second note: by specifying the ‘client-to-client’ option in the server config, you allow VPN users to communicate to each other. This is normally not needed and probably not what you want. So, remove it if you don’t need it.
Just my little advice 🙂
I have done
sudo bash
apt-get update
apt-get install openvpn
cp -R /usr/share/doc/openvpn/examples/easy-rsa /etc/openvp
cd /etc/openvpn/easy-rsa/2.0
vi vars –> change the line at the end export KEY_COUNTRY to export KEY_EMAIL
. ./vars
and obtain the following:
================================================================================
/etc/openvpn/easy-rsa/2.0/whichopensslcnf: 6: /etc/openvpn/easy-rsa/2.0/whichopensslcnf: openssl: not found
/etc/openvpn/easy-rsa/2.0/whichopensslcnf: 8: /etc/openvpn/easy-rsa/2.0/whichopensslcnf: openssl: not found
/etc/openvpn/easy-rsa/2.0/whichopensslcnf: 10: /etc/openvpn/easy-rsa/2.0/whichopensslcnf: openssl: not found
NOTE: If you run ./clean-all, I will be doing a rm -rf on /etc/openvpn/easy-rsa/2.0/keys
================================================================================
./clean-all
./build-ca
and obtain the following:
================================================================================
/etc/openvpn/easy-rsa/2.0/pkitool: 325: /etc/openvpn/easy-rsa/2.0/pkitool: openssl: not found
================================================================================
./build-key-server server
and obtain the following:
================================================================================
pkitool: Need a readable ca.crt and ca.key in /etc/openvpn/easy-rsa/2.0/keys
Try pkitool –initca to build a root certificate/key.
================================================================================
./build-key client-name
and obtain the following:
================================================================================
pkitool: Need a readable ca.crt and ca.key in /etc/openvpn/easy-rsa/2.0/keys
Try pkitool –initca to build a root certificate/key.
================================================================================
./build-key bruno
and obtain the following:
================================================================================
pkitool: Need a readable ca.crt and ca.key in /etc/openvpn/easy-rsa/2.0/keys
Try pkitool –initca to build a root certificate/key.
================================================================================
./build-dh
and obtain the following:
================================================================================
./build-dh: 7: ./build-dh: openssl: not found
================================================================================
ls /etc/openvpn/easy-rsa/2.0/keys
================================================================================
index.txt serial
================================================================================
no keys where generated … do I miss something ???
My raspberry running RaspBmc up to date ( version of the 26 of march)
I’d suggest installing OpenSSL:
sudo apt-get install openssl
(if I’m not mistaken)
Then try it again and let me know!
Hi Chris,
Sorry for not getting back to you any sooner. Did you solve your problem already or do you still need help?
If so, I’m wondering from what network are you testing your setup? Are you by any chance on the internal network, or on an external one?
Let me know!
Still having issues. I have a MiFi that I can test with. (192.168.3.0/24) Home network is 192.168.1.0/24… VPN network is 10.8.0/24
Hi Chris,
To be sure: Mifi is a device that turns a mobile (like 3G) internet connection into a Wifi hotspot?
So, your client is connected to Mifi and has access to internet (are you sure it is _only_ connected to this network?). It is probably using NAT to share the mobile public ip I guess. When you check its public ip address it returns something different compared to a pc connected directly to you home network, right? The client then connects to the public ip address of your VPN server and you want to access the network behind it.
If I understand your problem correctly, this actually works except for DNS resolution? If so, your routes etc are all OK and we’ll have to find out why DNS is not working. If not, we will check the routes.
Let me know!
Any chance you can do a follow up showing a client setup for a raspberry pi?
Hi Steve,
So you want the Raspberry Pi to connect to another OpenVPN server?
I’ll think about it and write something down when I find the time. It shouldn’t be too hard.
Thanks for letting me know 🙂
Hi Remi,
Firstly, nice entry! but I´m getting this while starting openvpn: [FAIL] Starting virtual private network daemon: openvpn failed!
I don´t if you could / would help me with this but thank you in advance and keep posting!
Regard
Hi MarcusDo,
Glad you like it! Could you have a look at the log files and post any entries regarding openVPN? That usually brings in some hints.
/var/log/messages
/var/log/daemon.log
I’ll then have a look at what is wrong.
Hi!
Thank you for your prompt response: This is what it’s saying:
May 24 09:31:06 raspberrypi ovpn-server[3580]: Cannot load certificate file server.crt: error:0906D06C:PEM routines:PEM_read_bio:no start line: error:140AD009:SSL routines:SSL_CTX_use_certificate_file:PEM lib
As you could noticed I quite n00b on these matters.
Cheers!
Hi,
OpenVPN doesn’t start because it cannot load the ‘server.crt’ certificate file. Did you copy the certificates to the /etc/openvpn folder?
Please review this part:
We need to copy the keys to the OpenVPN folder:

cd /etc/openvpn/easy-rsa/2.0/keys

cp ca.crt ca.key dh1024.pem server.crt server.key /etc/openvpn
If you make sure the server.crt file is there, OpenVPN will start fine. Let me know if it works 🙂
Hi,
It is there, but it’s goddamn empty.
I’d suggest generating the keys again. Watch for any errors. Then let me know if it works, and, if it does not work, what exact you did including the results you got.
Once you have the right keys generated OpenVPN will start.
Good luck and have fun!
Hey,
Thanks for the nice tutorial. I set up the openvpn on backtrack5 running on virtual machine. I don’t get any errors and i can connect using Viscocity but when i try to load a page on broswer nothing happens. It keeps on loading… Can u help me?
Thanks in advance
Hi Dinos,
This sounds like either a routing or a DNS problem. Did you enable routing and are you able to resolve domain names on the connected clients?
Have a look at this page, as it walks through most of it. Let me know if you need any more help.
Bye,
Remi
Thank you for your reply.
I did what you send me in the link but still nothing. I have some questions. How can i find out which DNS is open? You say “Just enter some DNS servers that work on the network of your OpenVPN server and that you are allowed to use”.
I want also to tell you that i am trying it on a virtual machine with bridged network. When i disconnect from home wifi on pc the virtual machine loses internet connection so i cannot connect to another network to test it.
Hi Remi,
Like this blog. But still not able to start openvpn on raspberry pi.
Jun 24 21:37:09 juno ovpn-server[3202]: Options error: –server directive network/netmask combination is invalid
Jun 24 21:37:09 juno ovpn-server[3202]: Use –help for more information.
Any clue what can be wrong?
openvpn.conf files contains:
dev tun
proto udp
port 1194
ca /etc/openvpn/easy-rsa/keys/ca.crt
cert /etc/openvpn/easy-rsa/keys/server.crt
key /etc/openvpn/easy-rsa/keys/server.key
dh /etc/openvpn/easy-rsa/keys/dh1024.pem
user nobody
group nogroup
server 192.168.2.82 255.255.255.0
persist-key
persist-tun
status /var/log/openvpn-status.log
verb 3
push “redirect-gateway def1”
#set the dns servers
push “dhcp-option DNS 8.8.8.8”
push “dhcp-option DNS 8.8.4.4”
log-append /var/log/openvpn
comp-lzo
thx in advance.
Erik
Hi Erik,
This line in your config:
server 192.168.2.82 255.255.255.0
Should be:
server 192.168.2.0 255.255.255.0
Or the default:
server 10.8.0.0 255.255.255.0
It’s the network used to assign ip addresses to clients, not the
server ip address.
You need a separate, unused range so if 192.168.2.x is already in use
on your network you cannot use it here. Start with the default unless
you already use that range.
Let me know if this works!
Thx this solved the issue.
Hello Remi,
Thanks for this great write-up….which as others have correctly pointed out, is one of the best on the web.
That being said, I’m a noob to Linux and VPNs (in general) and OpenVPN (in particular), and I find the conclusion of your post to be rather abrupt/incomplete (for lack of a better word). What I mean by that is that I have no clue what to do next, i.e.once I have both the server (on a Raspberry Pi), and a client (on a Win XP machine) setup, and even connected (which is where I’ve reached, and have no idea what to do next).
What I’m trying to achieve is this:
1. I’d like to have the R-Pi be an “always-on” VPN server, which will allow me to (from anywhere outside the home) tunnel-in to my home network and access files from any machine.
2. If possible, I’d also like to be able to access my home internet, while in a coffee shop, library etc. .
The questions/doubts I have are:
1. Once connected, what do I need to do, or what else is required in order for me to be able to view files from my other machines (be it Windoze or Linux machines)?
2. Do I have to be outside the house (or using a friendly neighbours’ free-for-all WiFi connection) in order to have this work, or can I be inside the house using my own network?
Thanks,
Gerard
I’ll answer for you Gerard,
I believe from your above post that you have created an openVPN server and are able to connect without problems, from a remote internet location such as a 3G mobile phone or public wifi spots. if not you will need to create a dyndns name at with a service like No-IP and forward traffic from you internet modem on port 1194 udp to the servers internal IP address. Also the client config will now have to be directed at the No-IP dns name.
Once you are able to access the vpn from outside your network, you will be able to create a samba share on the raspberry pi, which will be accessible both on the local network or over the VPN link using the Pi’s IP address. Google has heaps of guides for setting up a samba shares and accessing them.
To force all internet traffic over the vpn you can either follow the guide on this blog:
If you follow that guide all traffic of all the connected cleints to the vpn server will have their traffic redirected over your home network , which is less than ideal when working on files over the VPN or using internal resources whilst still happy to use the local location for web browsing.I which case you can do the method listed below, however it is slightly more complex
add this lines to server.conf (sudo nano /etc/openvpn/server.conf) the DNS sever has to be pushed to the clients because the local DNS server that they are using though DHCP will no longer be assessable, the push “dhcp-option DNS 8.8.8.8” can be added here or in the ccd files later on, I recommend here unless you will be connecting from a point that uses in house dns servers such as a corporate network. In that case only push to specific clients that are for secure browsing using the CCD files.
client-config-dir ccd
push “dhcp-option DNS 8.8.8.8”
next set of commands
sudo su (Change to Root)
cd /etc/openvpn
mkdir ccd (make client config dir)
cd ccd
Add the individual client config file the file name is exactly what the certficate common name is based upon this tutorial it would be client-name, add the line push “redirect-gateway def1” to the client config file. This command forces all traffic over the gateway.
nano client-name
push “redirect-gateway def1”
restart the VPN process and you are complete provide the vpn server has be previously configured to allow vpn access to the entire home network.
I generally have two certificates per machine like my laptop has one certificate for general usage and remote access to the network and one for secure browsing. This allows my VPN server to be used by my laptop 24/7 without the internet speeds being affected by my slow upload speeds at home and access the intranet at work, whilst still being able to securely browse the net at public WiFi spots at a click of a button.
Regards,
Cole
Hey, you need to change the DH parameters to 2048 bits in the ./vars file. 1024 bits is widely regarded as insecure and crackable. Its use was recommended to cease after 2010.
Thanks, updated it!
HOW??????????????????
Remi,
Thank you for making this how to series. Everything works great! I would like to ask you when we can expect the next how to in which you will explain how to connect two LAN segments – seperated through a WAN – by using OpenVPN and 2 RPI’s.
Best regards,
B
Hi,
Thanks for your feedback. I’m quite busy at the moment so it will probably take some time. But it is interesting so I might dive into it again 🙂
Hi, I’m trying to setup a vpn to connect from home to the office network. I’ve used an open vpn access server which is hosted on aws amazon cloud. So in theory, right now I should be able to connect from home to the vpn server on the cloud, but I’m not sure how the vpn server will then make the rest of the connection to the office lan. I should add a route on the office lan router that point to the vpn server on the cloud? Can you help me figuring this up? I’m new working on vpn.. Thanks