


The Raspberry Pi does not have a hardware clock on board. Instead, to keep track of time during reboots and downtime the ‘fake-hwclock’ package is used. It contains scripts to save the kernel’s current clock periodically (including at shutdown) and restore it at boot so that the system clock keeps at least close to realtime. Combined with NTP this is a simple, cheap and fairly accurate setup for most use-cases.
For a project at work I wanted to test a Raspberry Pi with a Real Time Clock (RTC) connected through the GPIO pins. This hardware clock needs to be very precise. I found the RasClock, by Afterthought Software, to be precise enough (about 3ppm or ~95 seconds deviation per year) while still affordable (about 15 euro).
Hardware installation
The hardware installation is simple. Just insert the battery and place the RasClock on the last 6 GPIO ports, at the end of the board. That’s it.
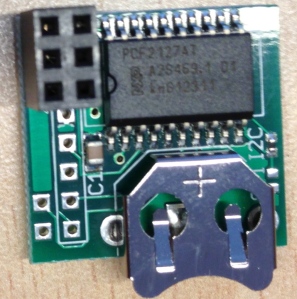
This is how the RasClock GPIO module looks like
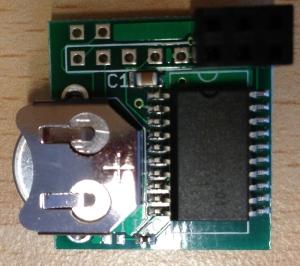
This is the RasClock with a battery backup installed
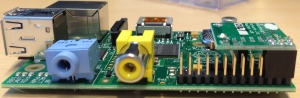
This is the RasClock installed on the Raspberry Pi, side view
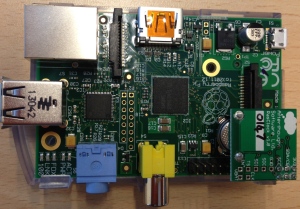
This is the RasClock installed on the Raspberry Pi, top view
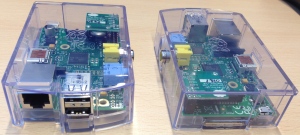
This is the RasClock installed on two boxed Raspberry Pi’s
Looks pretty good!
Software installation
I recommend upgrading to the latest Raspbian version. At the time of writing Raspbian runs on kernel 3.6.11. By far the easiest way to upgrade firmware, is to use rpi-update.
Unfortunately the ‘rtc-pcf2127a’ module needed to operate the RasClock, is not in the default Linux kernel provided by Raspbian. Afterthought Software provides both a binary packages and source code for their forked raspberrypi/linux repository. They added an I2C driver for NXP/Philips PCF2127A device from Eckelmann AG.
To install the binary package:
wget http://afterthoughtsoftware.com/files/linux-image-3.6.11-atsw-rtc_1.0_armhf.deb
dpkg -i linux-image-3.6.11-atsw-rtc_1.0_armhf.deb
cp /boot/vmlinuz-3.6.11-atsw-rtc+ /boot/kernel.img
The binary package is nice and quick for testing. Installing from source allows you to only build the needed kernel module, instead of a complete kernel replacement.
In the comments of the Afterthought Software site, someone posted these steps. Thanks for sharing your work!
sudo apt-get -y install build-essential gcc make cmake i2c-tools
mkdir devel
cd devel
wget https://github.com/raspberrypi/linux/archive/rpi-3.6.y.tar.gz
wget https://github.com/afterthoughtsoftware/linux/commit/fd5ff2d88f470ed70ff58393eee61110b181816a.patch
tar vxzf rpi-3.6.y.tar.gz
cd linux-rpi-3.6.y/
SUW=`pwd`
patch -p1 < ../fd5ff2d88f470ed70ff58393eee61110b181816a.patch
zcat /proc/config.gz > .config
sed -i 's/# CONFIG_RTC_DRV_PCF2127A is not set/CONFIG_RTC_DRV_PCF2127A=m/g' .config
echo m | make oldconfig
wget https://github.com/raspberrypi/firmware/raw/master/extra/Module.symvers
make modules_prepare
cd drivers/rtc
make -C $SUW M=`pwd`
sudo cp rtc-pcf2127a.ko /lib/modules/3.6.11+/kernel/drivers/rtc/
sudo depmod
It doesn’t matter if you install the binary package or compile the kernel module on your own. The steps below are the same either way.
Make sure to load the needed modules:
cat >> /etc/modules <<EOL
i2c-bcm2708
rtc-pcf2127a
EOL
Make sure the i2c-tools package is installed:
apt-get install i2c-tools
I talked about the ‘fake-hwclock’ package. Now that we have a hardware clock, we should remove this package and it’s crons.
apt-get remove fake-hwclock
rm /etc/cron.hourly/fake-hwclock
update-rc.d -f fake-hwclock remove
rm /etc/init.d/fake-hwclock
Enable the ‘hwclock.sh’ script (part of util-linux), instead:
update-rc.d hwclock.sh enable
It’s now time to boot the new kernel. When you reboot, the RasClock will be available as /dev/rtc0.
dmesg
The kernel ring buffer should list something like this:
[ 32.737903] rtc-pcf2127a 1-0051: chip found
[ 32.739712] rtc-pcf2127a 1-0051: rtc core: registered rtc-pcf2127a as rtc0
[ 32.739775] i2c i2c-1: new_device: Instantiated device pcf2127a at 0x51
Because this is a new device, we need to set the time in the hardware clock. Do this by copying the system time to the RasClock.
hwclock --systohc --utc
Using the ‘hwclock’ command, you can read the RasClock:
hwclock --show --utc
Output:
Wed 08 May 2013 21:59:49 CEST -0.862324 seconds
Adding the ‘–debug’ flag adds some more interesting output, especially if you want to know exactly what goes on. Example output:
hwclock from util-linux 2.20.1
Using /dev interface to clock.
Assuming hardware clock is kept in UTC time.
Waiting for clock tick...
/dev/rtc0 does not have interrupt functions. Waiting in loop for time from /dev/rtc0 to change
...got clock tick
Time read from Hardware Clock: 2013/05/08 19:56:20
Hw clock time : 2013/05/08 19:56:20 = 1368042980 seconds since 1969
Wed 08 May 2013 21:56:20 CEST -0.752934 seconds
You can also access the hardware clock through the /sys pseudo filesystem like this:
cat /sys/class/rtc/rtc0/date
cat /sys/class/rtc/rtc0/name
The first command returns the date, the second command the name of the chip which is ‘rtc-pcf2127a’.
Using the clock
In my current setup, the RasClock keeps time during reboot and when the Raspberry Pi is turned off. My goal is to build a NTP server that is capable of keeping time also when no NTP peers are available to prevent time drifts. I assume the hardware clock that I have now available is more accurate than the clocksource that drives the system time. I need to experiment to see how the two clocks compare. I’ll come back on the subject in a follow-up post.


