Archives For 29 February 2016

customuiversionI was the Release Manager for Apache CloudStack versions 4.6, 4.7 and 4.8 and during this time many people told me they thought it’s hard to build and package Apache CloudStack. The truth is, it’s not that hard once you know the steps to take. 😉

Next to that there’s the release pace. You may want to move in a different pace than the project is. There’ve been lots of discussions for example on a fast release cycle, and also on LTS-releases on the other hand. In this blog post I’ll show you how easy it is to create your own CloudStack release to satisfy the demands of your organisation.

Maven
Compiling Apache CloudStack is done using Maven. You need to install this tool in order to work with releases so let’s do it. Let’s assume a CentOS 7 box you want to compile this on. It should pretty much work on any OS.

yum install maven java-1.8.0-openjdk mkisofs ws-commons-util genisoimage gcc

We also install Java and some tools needed to compile Apache CloudStack.

Versioning
When you’re building your own release of Apache CloudStack, you have two options:

  1. Rebuild an existing version
  2. Create a new version

You’ve to keep in mind that when you create a new version, you need also to create so-called upgrade-paths: how the database can be upgraded to your version. When you choose option 1, and rebuild an existing version, this is not necessary. This sounds easy, but on the other hand, it’s confusing as there’s no way to tell the difference later on.

Apache CloudStack works with versions like 4.8.0 and 4.7.1, etc. The upgrade mechanism will only consider the first 3 parts. This means, we are free to create 4.8.0.16 (our 16th custom version of 4.8.0) as long as we do not touch the database. That sounds like a nice way to make custom daily releases, and at the same time can be used for those wanting to build LTS (Long Term Support) versions.

Setting the version
The question then is, how can we modify the version of Apache CloudStack? Well, there’s actually a tool supplied in the source that does this for you. It’s called setnextversion.sh. Here’s how it works:

usage: ./tools/build/setnextversion.sh -v version [-b branch] [-s source dir] [-h]
  -v sets the version
  -b sets the branch (defaults to 'master')
  -s sets the source directory
  -h

To build our custom 4.8.0.16 version off the 4.8 branch we run:

./tools/build/setnextversion.sh -v 4.8.0.16 -b 4.8 -s /data/git/cs1/cloudstack/

Output shows a lot of things, most interesting:

found 4.8.0 setting version numbers 
[master 27fa04a] Updating pom.xml version numbers for release 4.8.0.16
126 files changed, 130 insertions(+), 130 deletions(-)
committed as 858805957e2c7e0a0fbeb170a7f1681a73b4fb7a

The result is a new commit that changed the versions in the POMs. You an see it here:

git log

setnextversion

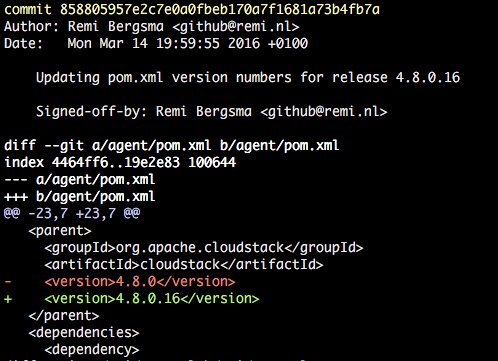
You’ve successfully set the version!

Compiling the custom version
Let’s compile it. This works like with any release build:

mvn clean install -P systemvm

This will take a few minutes. You should see your new version flying by lots of times.

customversion

After a few minutes the build completes.

By the way, if you want to skip the unit tests to speed up the process, add -DskipTests to the mvn command.

custombuilddone

RPM packages
The source also contains scripts to build packages. To build packages for CentOS 7 for example, do this:

cd ./packaging
./package.sh -d centos7

You should see this:

Preparing to package Apache CloudStack 4.8.0.16

When the script finishes, you can find the RPM packages here:

ls -la ../dist/rpmbuild/RPMS/x86_64/

customrpmpackages

Installing the new version
You can either use the war that is the result of the compile, or install the generated RPM packages. Installing and upgrading is out-of-scope in this blog, so I assume you know how to install a stock version of CloudStack. I first installed a stock 4.8.0 version, then (as shown above) built 4.8.0.16 and will show the upgrade.

As soon as you start the management server with the new version you will see this:

2016-03-14 12:34:09,986 DEBUG [c.c.u.d.VersionDaoImpl] (main:null) (logid:) Checking to see if the database is at a version before it was the version table is created
2016-03-14 12:34:09,995 INFO  [c.c.u.DatabaseUpgradeChecker] (main:null) (logid:) DB version = 4.8.0 Code Version = 4.8.0.16
2016-03-14 12:34:09,995 INFO  [c.c.u.DatabaseUpgradeChecker] (main:null) (logid:) DB version and code version matches so no upgrade needed.

This is actually very nice. We made a custom version and CloudStack still assumes it’s 4.8.0 and so no upgrade of the data base is needed. This obviously means that you cannot do this when your patch requires a data base change.

When we look at the database, we can confirm we still run a 4.8.0-compatible release:

databasecustomrelease

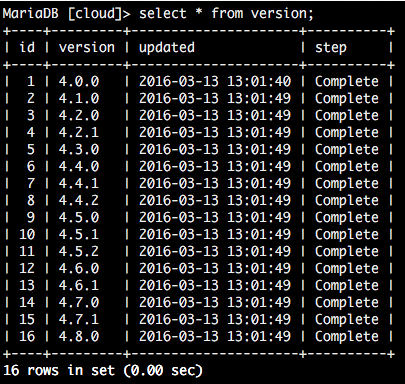
From this table, one cannot tell we upgraded to our custom version. But when you look closer, the new version is active.

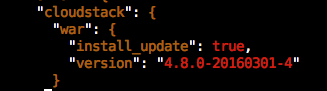
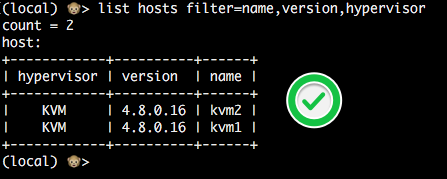
This is the version an agent reports:

customapiversion

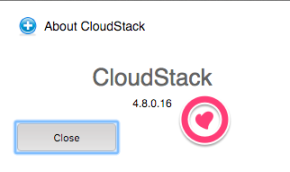
Also, the UI will show the custom version in the About box. This way users can easily tell what version they are running.

Conclusion
Creating your own custom version of Apache CloudStack may sound complicated but we’ve seen it’s pretty easy to do so. Creating a custom release will provide you with a lot of flexibility, especially if you combine it with war dropping. By numbering your version like 4.8.0.x you don’t have to worry about upgrade paths.

Happy releasing!

300px-Tomcat-logo.svgUpgrading CloudStack can be tough at times. Some say therefore you should do as little upgrades as possible. My approach is to make it easy and make the number of changes as small as possible. The more upgrades, the better. The smallest unit is a single Pull Request with a single commit. That we should be able to deploy to production in an automated way with almost no effort. At Schuberg Philis, our current deploy record to our Mission Critical Clouds is five times a day. Here’s how we do it.

CloudStack is a Java application

CloudStack is a java application and when you compile it, it creates jars and also a war. A war-file (short for Web application ARchive) according to Wikipedia, is used “to distribute a collection of JavaServer Pages, Java Servlets, Java classes, XML files, tag libraries, static web pages (HTML and related files) and other resources that together constitute a web application.” All-in-one, that’s handy! Now, Tomcat is used to serve Java applications and one can add an application to it by what we call “dropping a war“. This means that Tomcat will unpack and start the application inside the war-file.

Our goal: we compile a war from the CloudStack source and then tell Tomcat to run it. Let’s me show you how we do this.

Installing Tomcat

In this blog I’ll show you how to do it on CentOS 7, as this is currently my favourite distribution. Tomcat runs on any OS, so with slight adjustments you can use another distribution as well.

yum install tomcat mkisofs

The package mkisofs is used by the Management Server. We’ll configure Tomcat later on.


The MySQL connector story

If you try dropping a CloudStack war in Tomcat, you will find that it doesn’t work because the MySQL driver cannot be found. My colleague Miguel Ferreira sent a Pull Request to add it but as it seems that wasn’t allowed due to licensing issues.

There’s a reason why the MySQL connector is not a dependency – it is Cat-X licensed, which means we may not depend on it in the default build.

Miguel then investigated alternatives and finally found that when you install the mysql-connector-java RPM package, and then put it at the front of the ClassPath, Tomcat will pick it up automatically. Details are in the Pull Request. Awesome work dude!

In short, this makes it work:

yum install -y -q tomcat mysql-connector-java
echo "CLASSPATH=\"/usr/share/java/mysql-connector-java.jar:${CLASSPATH}\"" >> /etc/sysconfig/tomcat

Building a CloudStack war-file

Time to build a CloudStack war-file. In order to do that, you need the CloudStack source and Maven + Java.

Clone the source:

git clone https://github.com/apache/cloudstack.git

Install these packages:

yum install maven tomcat mkisofs python-paramiko jakarta-commons-daemon-jsvc jsvc ws-commons-util genisoimage gcc python MySQL-python openssh-clients wget git python-ecdsa bzip2 python-setuptools mariadb-server mariadb python-devel nfs-utils setroubleshoot openssh-askpass java-1.8.0-openjdk-devel.x86_64 rpm-build

Set the Maven options like this:

export MAVEN_OPTS="-Xmx1024m -XX:MaxPermSize=512m -Xdebug -Xrunjdwp:transport=dt_socket,address=8787,server=y,suspend=n -Djava.net.preferIPv4Stack=true"

Set Tomcat options:

echo "JAVA_OPTS=\"-Djava.awt.headless=true -Dfile.encoding=UTF-8 -server -Xms1536m -Xmx3584m -XX:MaxPermSize=256M\"" >> ~tomcat/conf/tomcat.conf

Then go into the root of the source folder and run:

mvn clean install -P systemvm

If you have a fast computer, you may add -T 4 to compile with 4 treads. It’s faster, that’s all.

After a while you see:

[INFO] --------------------------------------------
[INFO] BUILD SUCCESS
[INFO] --------------------------------------------
[INFO] Total time: 06:09 min (Wall Clock)
[INFO] Finished at: 2016-02-29T11:21:50+01:00
[INFO] Final Memory: 109M/1571M
[INFO] --------------------------------------------

Notice this line:

[INFO] Building war: /data/git/cs1/cloudstack/dist/rpmbuild/BUILD/cloudstack-4.8.0/client/target/cloud-client-ui-4.8.0.war

So, the war is in client/target/ folder.

Copy the war-file to the Management server that will run Tomcat.

You can build the war-file on the management server itself, on another server, even on your laptop if you like. Just make sure you copy it to the management server (mine is named cs1).

scp client/target/cloud-client-ui-4.8.0.war [email protected]:/tmp

Dropping a war-file into Tomcat

The war-file needs to be added to Tomcat. You can use the UI manager for this and do it while Tomcat keeps running. To keep this demo easy, let’s stop Tomcat and assume it’s the only application it runs:

systemctl stop tomcat

Be sure to go to the Tomcat home folder:

cd ~tomcat/webapps/

Then copy the war-file you built, but rename it to ‘client.war‘. This is because the application is supposed to be called ‘client‘. This is why the url also has ‘/client‘.

cp /tmp/cloud-client-ui-4.8.0.war ~tomcat/webapps/client.war

Folder now looks like:

[root@cs1 webapps]# ls -al
total 247836
drwxrwxr-x. 3 root tomcat 4096 Feb 29 10:42 .
drwxr-xr-x. 3 root tomcat 4096 Oct 28 12:49 ..
-rw-r--r--. 1 root root 253766159 Feb 29 10:41 client.war

Starting Tomcat will automatically unpack the war and start it:

systemctl start tomcat

That’s it! Now, have a look at the folder:

[root@cs1 webapps]# ls -al
total 247836
drwxrwxr-x. 3 root tomcat 4096 Feb 29 10:42 .
drwxr-xr-x. 3 root tomcat 4096 Oct 28 12:49 ..
drwxr-xr-x. 11 tomcat tomcat 4096 Feb 29 10:42 client
-rw-r--r--. 1 root root 253766159 Feb 29 10:41 client.war

Management server log is here:

less ~tomcat/vmops.log

As you’ll see, CloudStack is started and the UI is available after a few minutes.

Missing files in war-file

If you want to deploy a new cloud, you’ll find that some stuff goes wrong. First of all, the database scripts are not in the war. You can place them in the Tomcat home dir.

To generate an archive of the files from the CloudStack source:

cd setup/db; tar -c -f ~/Downloads/db-scripts-${CLOUD_VERSION}.tar.gz -pPz db/; cd -

Copy this to the Tomcat homedir, and extract.

cd ~tomcat
tar zvxf db-scripts-${CLOUD_VERSION}.tar.gz
chown tomcat.tomcat ./db -R

The same counts for any additional scripts, like ‘cloudstack-setup-management‘ etc. They are not part of the war so you need to copy them should you want to use them.

Legacy /etc/cloudstack folder

If you’re looking for config files, they’re all inside the webapps folder. This means both a new location and that you need to backup/restore when dropping a new war-file.

You could make a symlink to the new location like this:

mkdir -p /etc/cloudstack
cd /etc/cloudstack
ln -s /var/lib/tomcat/webapps/client/WEB-INF/classes management 

Another option is to copy the files and add ‘/etc/cloudstack/management‘ to the CLASSPATH. The benefit is that you keep your config files out of the client folder so persistence is easier.

The user tomcat runs as

CloudStack wants it to run as user ‘cloud‘, don’t ask me why. For development it works fine as user tomcat, but for some stuff to work (like encryption) you better change it to user ‘cloud‘.

vim /etc/sysconfig/tomcat 
TOMCAT_USER="cloud"


Automation!

We obviously want automation in place for this to work without even thinking about it. You can use your favourite configuration management tool.

Screen Shot 2016-03-02 at 11.09.39

Flipping an attribute does the trick.

The work-flow we use looks like this:

– Build new war, then upload to some central place
– Flip a Chef attribute to indicate the new version should be installed
– Chef then takes over and:

– downloads the war-file
– downloads the db-scripts.tar.gz
– stops Tomcat
– backups settings, like db.properties and such
– removes old files
– puts new client.war in ~tomcat/webapps folder
– extracts db-scripts.tar.gz in Tomcat home folder
– starts Tomcat

Loadbalanced Management Servers

As you can see, there is some downtime involved when upgrading to a newer version. When you setup two or more CloudStack application servers with a loadbalancer in front of them, you can upgrade the management servers one-by-one without service interruption.

Conclusion

CloudStack clearly wasn’t designed for easy war-dropping into Tomcat, but as we’ve seen it can be done. Once you overcome a few hurdles, you’ll find it is actually much easier compared to upgrading RPMs all the time. Especially when you want to deploy the same version, with an extra bugfix this comes in handy.

It’d be nice to enhance CloudStack to fully support war drops. Even though users may want to use RPM packages we could simplify them by getting a war artifact (signed) from Maven Central or such, and then have the RPM package setup the things around it. We then would get the best of both worlds: Use RPMs if you want, be able to simply drop a war-file if you want to go faster.

For Schuberg Philis, this allows us to do continuous deployments to our production clouds. By making the numer of changes as smal as possible, we have many small deployments that are easy to test and easy to revert, should we have to.

Welcome to the new ‘continuous everything‘ world!