


When it not possible to reach a server you want to SSH to directly, you can make use of SSH’s built in capability to chain multiple commands. Suppose you have a network setup like in the image below.
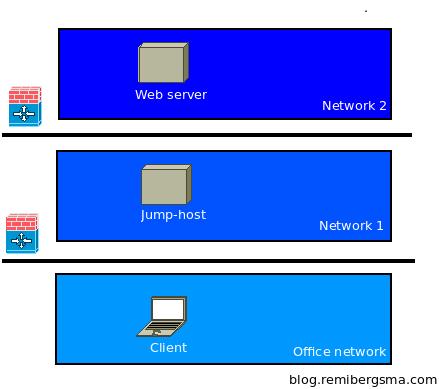
Network overview
Firewalls or ACL’s prevent direct access to the ‘web server’ in network #2. In between is a ‘jump host’ in network #1. A ‘jump host’ is a host you can SSH to, and from there reach the next hop. How to SSH to the web server?
You could do this manually:
ssh -l user jump-host
and then from that server:
ssh -l user webserver.dmz
But using the -t switch, you can chain them together like this:
ssh -A -t -l user jump-host \
ssh -A -t -l user webserver.dmz
The -A switch enables forwarding of the ssh-agent. When using key based authentication, you’ll be able to login with typing the certificate’s password only once.
Using this technique, you can also build a SSH tunnel through the jump host:
ssh -A -t -l user jump-host \
-L 8080:localhost:8080 \
ssh -A -t -l user webserver.dmz \
-L 8080:localhost:8080
When you type: http://localhost:8080 in a browser, you are connected over a secure tunnel to the web server in Network #2. Thanks to the chaining of commands, this is now possible.
You can use many chained commands, so this is very flexible.


Nice write-up!
Since you are (ab)using the -t switch for these purposes, I’d like to add that this switch enables pseudo-tty allocation. In simple terms, you get a fully functioning terminal at the other end, which is what makes the subsequent ssh command useful.
I use an alias when connecting through ssh, which makes sure -t is always used. The main reason for me:
Wasim:~ samy[10:12:47][9986]$ ssh -2 -l root example.com vim
Vim: Warning: Output is not to a terminal
Vim: Warning: Input is not from a terminal
Without the -t switch the result is a pretty much useless vim-session 🙂 Of course, there are many interactive terminal-based commands for which this is also important, e.g. your new ssh session.
On a side note, -A rocks too, but make sure you take note of this fragment from the ssh manual:
Agent forwarding should be enabled with caution. Users with the
ability to bypass file permissions on the remote host (for the
agent’s UNIX-domain socket) can access the local agent through
the forwarded connection. An attacker cannot obtain key material
from the agent, however they can perform operations on the keys
that enable them to authenticate using the identities loaded into
the agent.
Hi Samy,
Thanks for your feedback! Will play a bit with -t, sounds nice.
I agree -A should be used with caution. I usually use it on systems only where I know admins are the only ones to login. I wouldn’t use it on a public shell server or so 😉
Take care,
Remi
Have you ever tried tunnel chaining without “-t”? It shouldn’t differ, I presume.
Thanks Remi for explaining multi-hop SSH tunneling.
I have peculiar requirement where I do not know the IP address/host name of the endpoint. Client_Host needs to have SSH session with Server_Host where I don’t have the IP address of the later. Hence I introduce a Gateway_Host in between them which has static IP. In this scenario Client_Host and Server_Host establishes separate SSH tunnels with Gateway_Host (Client_Host -> Gateway_Host <- Server_Host) where they should get knitted. Multiple clients will have SSH sessions with their corresponding Servers. Let me know how this could be established. Thanks.
Perfect! Worked like a charm for me. I had to make a couple minor changes but it pointed me in the right direction. For me, I needed to go thru host1, hit an internal server (host2) and bring up locally, an internally hosted website (this.url.com) hosted on host2. This is how I did that:
Local machine teminal:
ssh -A -t -l user host1 -L 8081:localhost:8081 ssh -A -t -l user host2 -L 8081:this.url.com:80
Local Browser:
http://localhost.com:8081
clearly showed which host is which
Hello.
Is possible use ssh-key? But, I need the keys stay in ‘Client machine’.
I try use:
ssh -A -t -i key_jump.pem -l user jump-host \ ssh -A -t -i key_web.pem -l user webserver.dmz
This case, it try to use key_web.pem in ‘Jump Host’, but, I need the key_web.pem stay in ‘Client machine’.
Tks.
I would recommend creating multihop tunnels using ProxyCommand and ssh -W, as in:
ssh user2@host2 -o ‘ProxyCommand = ssh user1@host1 -W host2:22’. All authentication and encryption is local so there is no need to trust the middle host not to tamper with/log the connection, or abuse the ssh agent. You can also put the jump hosts in the config and you won’t need to specify any extra parameters.
hello. Is it possible use same tecnique for call snmpget command on a lan printer accessible by web server and without have root priviledges on jump-host ?
in some situations you would can get following error
“channel 2: open failed: administratively prohibited: open failed”
in this case you have to configure on the JUMPHOST (see picture)
/etc/ssh/sshd_config
AllowTCPForwarding yes
PermitOpen yes